
1.3. Engine — Assembly (page 3 of 3)
- Make
- Peugeot
- Model
- J5 Pocket Mechanic, 1.8 and 2.0 petrol
- Year
- 1987–1994
- Section
- Engine assembly
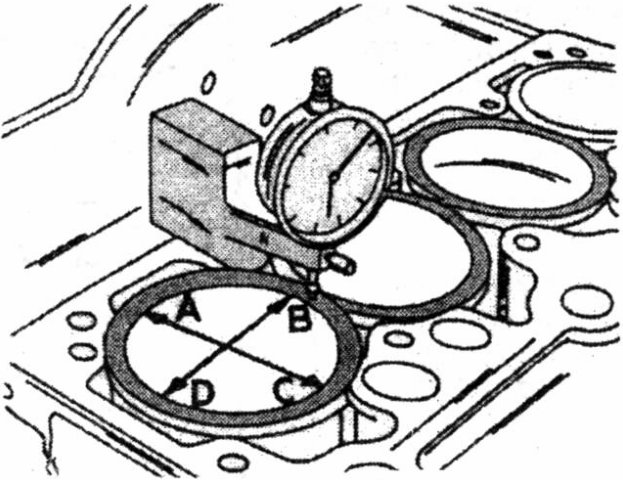
Fig. 1.26. — Second stage to check the cylinder liner protrusion. The dial gauge stylus is now placed over the shoulder of each liner, at points A to D.
All seals/shims have tags on the outside, which are, however, also different on the old and the new version. The table below lists the allocation of the liner seals for the engines in question:
| Paper Gaskets to July 1985 | No. of tags | Thickness | |
|---|---|---|---|
| highest point of liner without seal | +0.039 to 0.045 mm | 1 | 0.07 mm |
| +0.019 to 0.038 mm | 2 | 0.085 mm | |
| —0.006 to + 0.018 mm | 3 | 0.105 mm | |
| —0.095 to 0.007 mm | 4 | 0.130 mm | |
| Steel Shims from July 1985 | No. of tags | Thickness | |
|---|---|---|---|
| highest point of liner without seal | +0.039 to 0.045 mm | 1 | 0.10 mm |
| +0.019 to — 0.006 mm | 2 | 0.12 mm | |
| —0.095 to 0.007 mm | 3 | 0.15 mm | |
Note: Only one seal is placed underneath each cylinder liner. Measure each liner on both sides of the cylinder block.
If the correct protrusion cannot be obtained, remove the liner and check the joining surface of the liner/seal for foreign matter.
- Remove the cylinder liner and fit the liner seals in accordance with Fig. 1.27, but note the following points: The seal has a tag (1), which is inserted into a locating groove in the liner. A second tag (tab) is used to identify the thickness of the liner seal and must be arranged so that it is in line with the flat (3) at the upper end of the liner. If all cylinder liners are removed at once, make sure they are identified where they come from.
The engine can now be assembled in the following manner. It is assumed that all parts have been checked and/or replaced as necessary:
- Screw the plugs into the crankshaft. As the original plugs were peened in position, it is possible that the threads are no longer in perfect condition. Damaged threads can be re-cut with a M25 x 1.5 thread cutter, but not deeper than 10 mm (0.4 in.). Use new plugs and tighten them to 5.5 kgm (40 ft.lb.).
Parts & tools for this job For 1987 Peugeot J5
- PARTEngine gasket setSearch: Peugeot J5 1987 engine gasket set
- TOOLTorque wrenchSearch: 3/8 inch torque wrench
- TOOLFeeler gauge setSearch: feeler gauge set
Links open Amazon search results in a new tab. As an Amazon Associate I earn from qualifying purchases.