
Test 2 – Check the SRS unit
- Make
- Rover
- Model
- 600 Rover 600 Repair Manual - Volumes 1 and 2 - 2nd Edition
- Section
- Fault finding › Test 2 – Check the SRS unit
‹ Prev Test 4 – Check for short to earth in the SRS main harnessNext › Test 3 – Check for open circuit in SRS main harness
Supplementary restraint system (SRS)Test 2 – Check the SRS unit
CAUTION: Do not disconnect the passenger’s airbag connector.
- Connect the SCS short connector to the service check connector.
- Reconnect battery positive and negative terminals.
- Turn ignition ON (II).
- Record the most recent DTC, is DTC 2 – 1 or DTC 2 – 2 indicated?
If DTC 2 – 1 is indicated, go to Test 2.
If DTC 2 – 2 is indicated, open circuit in passenger’s airbag inflator. Replace passenger’s airbag assembly.
Test 2 – Check the SRS unit
Connect Test Harness B:
- Turn ignition OFF and disconnect SCS short connector.
- Disconnect battery negative and then the positive terminal and wait 3 minutes.
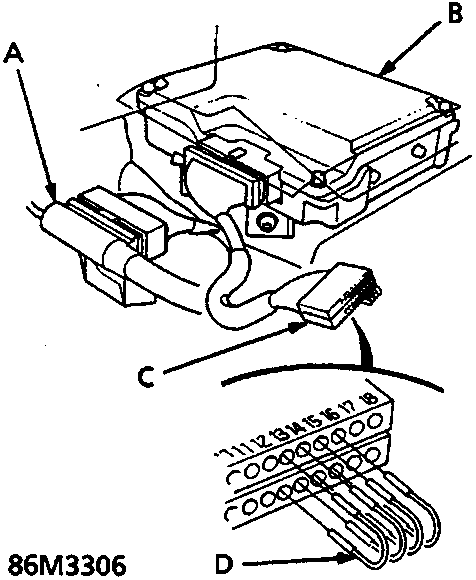
- A SRS main harness 18 – P connector
- B SRS unit
- C Test Harness B – SMD 4088
- D Jumper wires – SMD 4087
- Connect the short connector (RED) to the driver’s airbag 3 – P connector.
- Disconnect SRS main harness 18 – P connector from SRS unit and connect Test Harness B between SRS unit and the 18 – P connector.
- Connect jumper wires, as shown, to No. 13, 14, 15, and 16 terminals on rows A (SRS unit) and B (main harness) of Test Harness B. Ensure jumper wires are connected to the correct terminals.
- Reconnect battery positive and negative terminals.
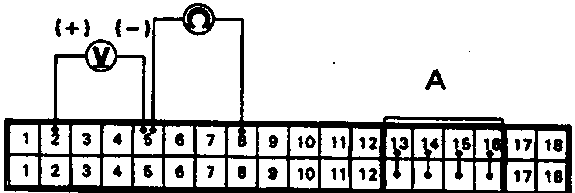
A Test Harness B – SMD 4088
- Connect voltmeter between terminals No. A2 and No. A5 (–) of Test Harness B.
- Turn ignition ON (II) and measure voltage, which should be 9.4 – 14 V.
- Turn ignition OFF and measure resistance between terminals No. A8 and No. A5 of test harness B. There should be 0.75 – 1.0 ohm.
Note: The resistance will be unstable if measured immediately after the ignition is switched OFF. Allow time for the reading to stabilise.
If voltage and resistance are as specified, go to Test 3.
If voltage and resistance are not as specified, SRS unit is faulty. Replace the unit.
‹ Prev Test 4 – Check for short to earth in the SRS main harnessNext › Test 3 – Check for open circuit in SRS main harness
Parts & tools for this job For Rover 600
- TOOLOBD2 scanner with SRSSearch: OBD2 scanner ABS SRS
- TOOLTrim removal tool kitSearch: trim removal tool kit
Links open Amazon search results in a new tab. As an Amazon Associate I earn from qualifying purchases.