
Test 8 – Check the main harness
- Make
- Rover
- Model
- 600 Rover 600 Repair Manual - Volumes 1 and 2 - 2nd Edition
- Section
- Fault finding › Test 8 – Check the main harness
‹ Prev Test 6 – Check for continuity between terminals No. B11 and No. B5 of Test Harness BNext › Test 10 – Check the dashboard harness
Supplementary restraint system (SRS)Test 8 – Check the main harness
Test 8 – Check the main harness
- Turn ignition OFF
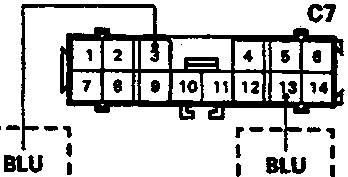
A Main harness 14 – P connector
View from wire side
- Check for continuity between the terminal No. 13 (LHD) or No. 3 (RHD) of the main harness 8 – P connector and earth.
If there is continuity, failure in the SRS unit due to short to earth in the BLUE wire of the main harness. Replace main harness and the SRS unit.
If there is no continuity, failure in the BLUE wire of the main harness. Replace main harness.
Test 9 – Check the SRS indicator light circuit
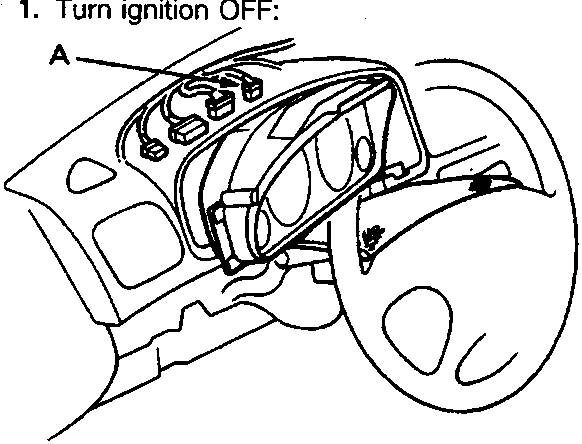
- Turn ignition OFF:
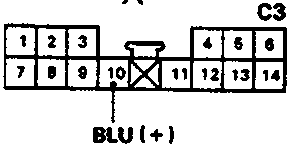
A Dashboard harness 14 – P connector
View from wire side
- Connect the dashboard harness 14 – P connector from main harness.
- Remove the gauge assembly.
- Disconnect the dashboard harness 14 – P connector from the gauge assembly.
- Connect voltmeter between terminal No. 10 (+) of the dashboard harness 14 – P connector and earth.
- Turn ignition ON (II).
- Measure voltage for 6 seconds after the ignition is switched ON (II):
If there is 8.5V or more, faulty SRS indicator light circuit in the gauge assembly. Replace gauge assembly.
If there is less than 8.5V, go to Test 10.
Original page
‹ Prev Test 6 – Check for continuity between terminals No. B11 and No. B5 of Test Harness BNext › Test 10 – Check the dashboard harness
Parts & tools for this job For Rover 600
- TOOLDigital multimeterSearch: automotive digital multimeter
- PARTAssorted fuse kitSearch: car fuse assortment kit
- TOOLWire crimper and connector kitSearch: wire crimper connector kit
Links open Amazon search results in a new tab. As an Amazon Associate I earn from qualifying purchases.