Power transmissionGearbox casing and clutch casing: repair
| Gearbox casing and clutch casing: repair |

|
q
| In the event of replacement, see adjustment chart → Chapter |
| 2 - | Secondary shaft needle bearing |
|
q
| Assemble and fix into place → Fig. |
| 3 - | Lid for control of oil level.25 Nm |
| 4 - | Adjustment washer for main shaft |
|
q
| In the event of replacement, see adjustment chart → Anchor |
| 5 - | Outer track, tapered roller bearing for main shaft |
|
q
| In the event of replacement, see adjustment chart → Chapter |
| 6 - | Outer track, tapered roller bearing for secondary shaft |
|
q
| In the event of replacement, see adjustment chart → Chapter |
| 7 - | Adjustment washer for secondary shaft |
|
q
| In the event of replacement, see adjustment chart → Anchor |
| 8 - | Outer track, tapered roller bearing for main shaft |
|
q
| In the event of replacement, see adjustment chart → Chapter |
| 9 - | Axial/radial needle bearing for reverse gear axle |
| 11 - | Bush-bearing for the start motor |
|
q
| It may be replaced with the gearbox mounted |
| In the event of replacement, see adjustment chart → Chapter |
|
q
| With retainer for main shaft and vulcanised O-ring seal |
|
q
| In order to replace the retainer for the main shaft it is necessary that the guide sleeve be dismounted. |
|
q
| Replace the guide sleeve if the O-ring seal is damaged. |
| 14 - | Bolt for attaching the guide sleeve .20 Nm |
|
q
| Tightening torque: 20 Nm |
| 15 - | Retainer for right coupling flange |
|
q
| Replacement with the gearbox mounted in the vehicle → Chapter |
|
q
| For coupling flange retainer → Item |
| 17 - | Shaft for operating speedometer 30 Nm |
| 18 - | Top for emptying oil. 25 Nm |
| 19 - | Outer track for the tapered roller bearing in the differential |
|
q
| It is held between the casings for the gearbox and the clutch |
| 21 - | Outer track for the tapered roller bearing in the differential |
|
q
| In the event of replacement, adjust the differential → Chapter |
| 22 - | Adjustment washer for differential |
|
q
| Finding the thickness → |
| 23 - | Retainer for left flange |
|
q
| Replacement with the gearbox mounted in the vehicle → Chapter |
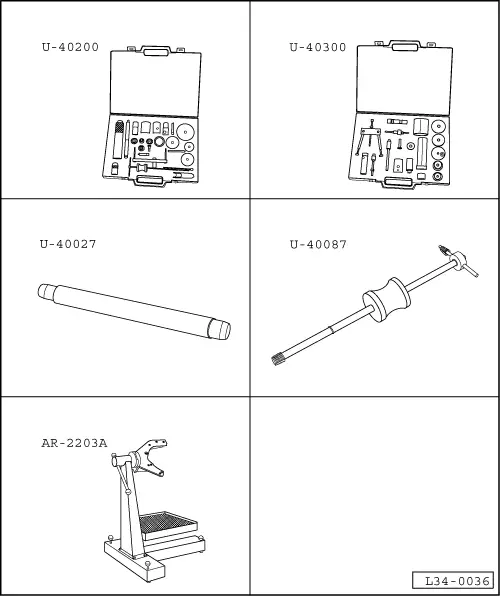
| Special tools and workshop equipment required |
| t
| Gearbox repairs case -U-40200- |
| t
| Gearbox repairs case -U-40300- |
| t
| Taps for Ø 11 and Ø 14 with plunger -U-40087- |
| t
| Tool for assembling starter sleeve -U-40027- |
| t
| Support column for gearbox-differential -Ar-2203A- |
| Dismounting the needle bearing for the secondary shaft |
| –
| Dismount the needle bearing from the gearbox casing using tool -U-40200/10- and tool -U-40300/1-. |
|
|

|
| Assembling and fitting the needle bearing for the secondary shaft |
| –
| Assemble the needle bearing in the gearbox casing using tool -U-40200/10- and the tool -U-40300/12-. |
| –
| Fit the bearing by making three marks with a marking hammer set out with 120º between each other. |
|
|

|
| Dismount the retainer for the main shaft in the guide sleeve |
| –
| Dismount the retainer for the main shaft in the guide sleeve by carrying out the following steps: |
| –
| Place the guide sleeve over tool -U-40300/9-. |
| –
| Dismount the retainer for the main shaft in the guide sleeve using tool -U-40300/2- with side A facing towards the sleeve and tool -U-40200/10-. |
|
|

|
| Assemble the retainer for the main shaft in the guide sleeve |
| –
| Assemble the retainer for the main shaft in the guide sleeve, carrying out the following steps: |
| –
| Place the guide sleeve over the tool -U-40300/9-. |
| –
| Assemble the retainer for the main shaft in the guide sleeve using tool -U-40300/2- with side B facing towards the sleeve and tool -U-40200/10-. |
|
|

|
| Dismounting the sleeve-bearing for the start-up motor |
| –
| Place the top of tool -U-40087- on the sleeve and tighten it right to the end. |
| –
| Work the initiator until extracting the sleeve. |
|
|

|
| Assembling the sleeve-bearing for the start-up motor |
| –
| Lubricate the sleeve-bearing with oil. |
| –
| Fit it into the clutch casing, with tool -U-40027- side B, right up to the top. |
|
|

|
| Dismounting the plate sleeve for the coupling flange retainer |
| –
| Remove the sleeve by levering out carefully with a screwdriver. |
| t
| If the sleeve is damaged or has defects, it must be replaced. |
|
|

|
| Assembling the plate sleeve for the coupling flange retainer |
| –
| Impregnate the contact surface of the sleeve with sealing paste. |
| –
| Fit in the sleeve using tool -U-40200/13- with the trimming of the tool facing towards the sleeve and tool -U-40200/10-. |
|
|

|
01 Transmission
The same page in:
Leon Mk2.