
Heater plugs - r+r
- Make
- Fiat
- Model
- Bravo Factory Service Manual
- Year
- 2007–2014
- Section
- Engine starting › Heater plugs - r+r
HEATER PLUGS - R+R
Removing
Op. 1016A10 SOUND-PROOFING COVER - R.R
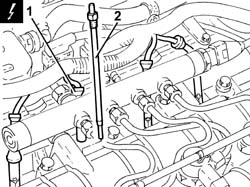
1. Detach the electrical connections for the glow plugs.
| Description | Connector | |
|---|---|---|
| 1 | Glow heater plug | See A040 HEATER PLUGS |
2. Undo the glow plugs and remove them.
| Tool | Description | Function | Validity |
|---|---|---|---|
| 2000003200 | 9 mm heater plug spanner | Removing/refitting glow heater plugs | 1.9 JTD 16v |
Refitting
- Place the glow plugs in their housings and tighten them to the recommended torque, using the tool.
| Tool | Description | Function | Validity |
|---|---|---|---|
| 2000003200 | 9 mm heater plug spanner | Removing/refitting glow heater plugs | 1.9 JTD 16v |
| Component | Fastening | dia | Value (daNm) | Validity |
|---|---|---|---|---|
| Glow heater plug | M9 | 0.7 ÷ 0.9 | 1.9 JTD 16v |
- Connect the electrical connections to the engine glow heater plugs.
Op. 1016A10 SOUND-PROOFING COVER - R.R
Removing
Op. 1016A10 SOUND-PROOFING COVER - R.R
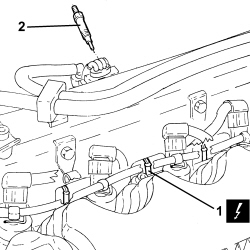
1. Disconnect the electrical connections for the glow plugs.
| Description | Connector | |
|---|---|---|
| 1 | Glowheater plugs | See A040 HEATER PLUGS |
2. Unscrew and remove the glow plugs using a suitable tool.
Refitting
- Place the glow plugs in their housings and tighten them to the recommended torque, using a suitable tool.
| Component | Fastening | dia | Value (daNm) | Validity |
|---|---|---|---|---|
| Glow heater plug | M12 | 1.3 ÷ 1.7 | 1.9 JTD 8v |
- Connect the electrical connections for the glow plugs.
Parts & tools for this job For 2007 Fiat Bravo
- TOOLA/C manifold gauge setSearch: AC manifold gauge set
- TOOLUV leak detection kitSearch: AC UV leak detection kit
- PARTCabin filterSearch: Fiat Bravo 2007 cabin filter
Links open Amazon search results in a new tab. As an Amazon Associate I earn from qualifying purchases.