
Fuel tank - r + r for replacement
- Make
- Fiat
- Model
- Croma Factory Service Manual
- Year
- 2005–2010
- Section
- Fuel tank and pipes › Fuel tank - r + r for replacement
FUEL TANK - R + R FOR REPLACEMENT
Removing
- Position the vehicle on a lift.
- Make sure that the ignition key is in the OFF position, then disconnect the battery terminal (-).
| Description | Connector | |
|---|---|---|
| Battery | See A001 BATTERY |
Op. 4450B08 RIGHT REAR WHEEL - R.R
Op. 7055B45 RIGHT REAR WHEEL ARCH LINER - R.R
Op. 1040A30 FUEL FILLER PIPE ASSEMBLY- R + R
Op. 1076B20 REAR EXHAUST SILENCER - R + R
Op. 1076B30 FRONT EXHAUST SILENCER - R + R
Op. 1040A10 FUEL TANK - R + R AND DECANT FUEL
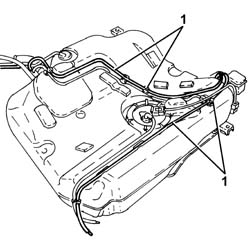
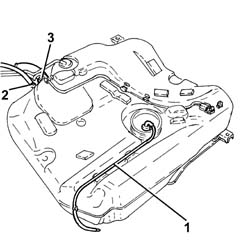
1. Release the fuel vapour inlet and outlet pipes to the activated charcoal filter from the fastenings on the tank.
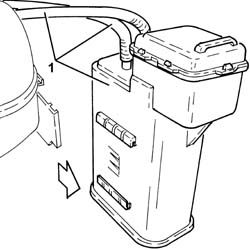
1. Release the activated charcoal filter for fuel vapours from the mount on the tank and remove with the pipes.
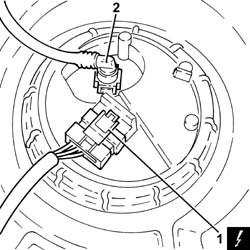
1. Disconnect the electrical connection from the submerged pump assembly complete with level gauge.
| Description | Connector | |
|---|---|---|
| 1 | Fuel pump and level gauge | See N040 FUEL PUMP AND LEVEL GAUGE |
2. Disconnect the rapid connector for the rear fuel supply pipe, submerged pump assembly side complete with level gauge.
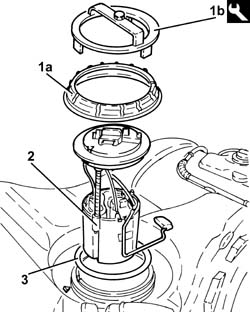
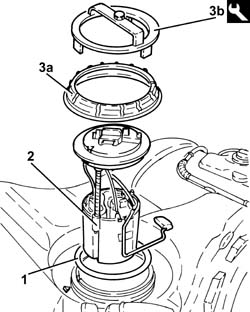
1. Remove the ring nut (1a) using the tool (1b).
| Tool | Description | Function | Validity |
|---|---|---|---|
| 1870736000 | Spanner | Loosen/tighten ring nut securing submerged pump assembly complete with level gauge |
2. Remove the submerged fuel assembly complete with level gauge control.
3. Remove the O-ring.
1. Release the rear fuel supply pipe from the fastenings on the fuel tank and remove it.
2. Loosen the collar and remove the antiregurgitation pipe from the fuel tank.
3. Loosen the collar and remove the fuel filler pipe from the fuel tank.
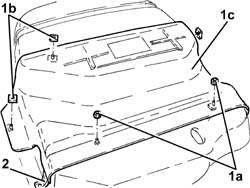
1. Undo nuts (1a), remove clips (1b) and remove the lower fuel tank protection (1c).
2. Remove the fuel tank support belt.
Refitting
- Place the fuel tank support belt back in its housing.
- Replace the lower fuel tank protection and secure it using the bands and the nuts.
- Connect the fuel filler pipe to the fuel tank and secure with the collar.
- Connect the antiregurgitation pipe to the fuel tank and secure with the collar.
- Refit the rear fuel delivery pipe to its seat on the tank.
1. Place a new O-Ring seal in the housing on the fuel tank collar and make sure that it is correctly positioned.
2. Position the submerged pump assembly complete with level gauge control in its housing.
Fit the submerged fuel pump assembly complete with level gauge control to ensure:
- the arrow stamped on the pump is aligned with the arrow on the tank;
- the protrusion on the submerged fuel pump fits into the corresponding seat on the fuel tank collar.
3. Tighten the ring nut (3a) securing the submerged pump assembly complete with level gauge using the tool (3b).
| Tool | Description | Function | Validity |
|---|---|---|---|
| 1870736000 | Spanner | Loosen/tighten ring nut securing submerged pump assembly complete with level gauge |
- Connect the rapid connector for the rear fuel supply pipe, submerged pump assembly side complete with level gauge.
- Connect the electrical connection to the submerged pump assembly complete with level gauge.
- Refit the activated carbon filter for fuel vapours complete with pipes and secure to the bracket on the tank.
- Fasten the fuel vapour inlet and outlet pipes to the activated charcoal filter to the fastenings on the tank.
Op. 1040A10 FUEL TANK - R + R AND DECANT FUEL
Op. 1076B30 FRONT EXHAUST SILENCER - R + R
Op. 1076B20 REAR EXHAUST SILENCER - R + R
Op. 1040A30 FUEL FILLER PIPE ASSEMBLY- R + R
Op. 7055B45 RIGHT REAR WHEEL ARCH LINER - R.R
Op. 4450B08 RIGHT REAR WHEEL - R.R
- Connect the negative battery terminal.
- Remove the vehicle from the lift.
Removing
- Position the vehicle on a lift.
- Make sure that the ignition key is in the OFF position, then disconnect the battery terminal (-).
| Description | Connector | |
|---|---|---|
| Battery | See A001 BATTERY |
Op. 7050A20 ONE-PIECE REAR SEAT CUSHION - R.R.
Op. 1040A10 FUEL TANK - R + R AND DECANT FUEL
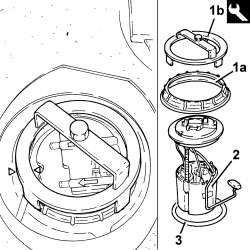
1. Undo the ring nut (1a) using the tool (1b).
| Tool | Description | Function | Validity |
|---|---|---|---|
| 1870736000 | Spanner | Loosen/tighten ring nut securing submerged pump assembly complete with level gauge |
2. Remove the submerged fuel assembly complete with level gauge control.
3. Remove the O-ring.
Refitting
- Place a new O-Ring seal in the housing on the fuel tank collar and make sure that it is correctly positioned.
- Position the submerged pump assembly complete with level gauge control in its housing.
Fit the submerged pump assembly complete with level gauge ensuring that the reference is in line with the arrow on the tank.
- Tighten the ring nut securing the submerged pump assembly complete with level gauge using the tool.
| Tool | Description | Function | Validity |
|---|---|---|---|
| 1870736000 | Spanner | Loosen/tighten ring nut securing submerged pump assembly complete with level gauge |
Op. 1040A10 FUEL TANK - R + R AND DECANT FUEL
Op. 7050A20 ONE-PIECE REAR SEAT CUSHION - R.R.
- Connect the negative battery terminal.
- Remove the vehicle from the lift.
Parts & tools for this job For 2005 Fiat Croma
- PARTEngine gasket setSearch: Fiat Croma 2005 engine gasket set
- TOOLTorque wrenchSearch: 3/8 inch torque wrench
- TOOLFeeler gauge setSearch: feeler gauge set
Links open Amazon search results in a new tab. As an Amazon Associate I earn from qualifying purchases.