
Fluid pan gasket and screen
- Make
- Land Rover
- Model
- Defender 90 Workshop Manual (NAS)
- Section
- Repair › Fluid pan gasket and screen
Automatic gearboxFluid pan gasket and screen
FLUID PAN GASKET AND SCREEN
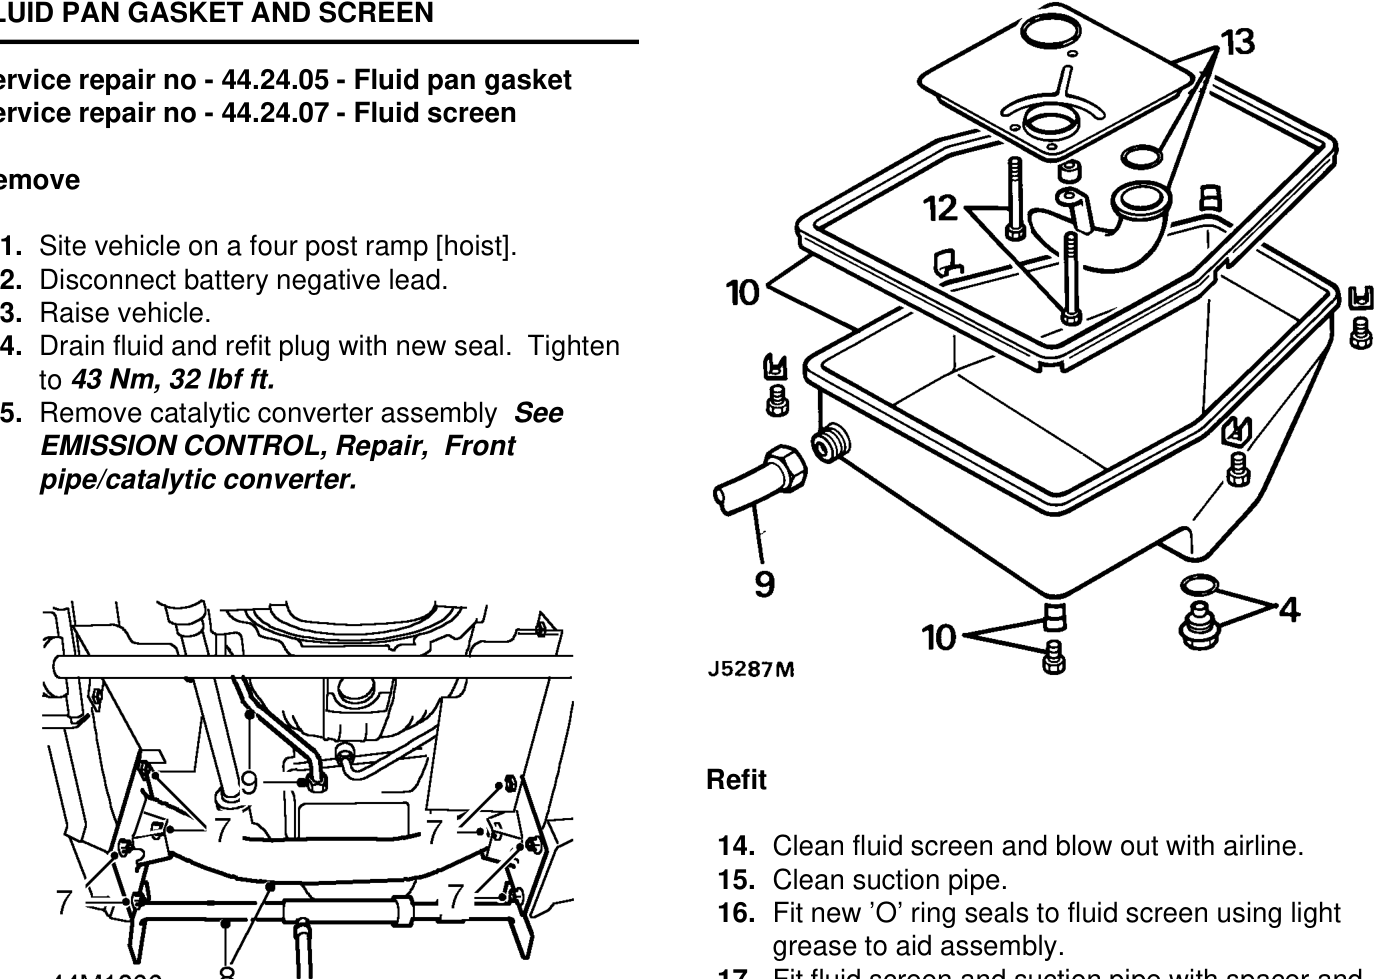
Service repair no - 44.24.05 - Fluid pan gasket Service repair no - 44.24.07 - Fluid screen
Remove
- Site vehicle on a four post ramp [hoist].
- Disconnect battery negative lead.
- Raise vehicle.
- Drain fluid and refit plug with new seal. Tighten to 43 Nm, 32 lbf ft.
- Remove catalytic converter assembly See EMISSION CONTROL, Repair, Front pipe/catalytic converter.
Refit
- Clean fluid screen and blow out with airline.
- Clean suction pipe.
- Fit new ’O’ ring seals to fluid screen using light grease to aid assembly.
- Fit fluid screen and suction pipe with spacer and
- Refit fluid pan using a NEW gasket.
- Connect dipstick tube to fluid pan, tighten bolt at
- Release fuel pipes from retaining clip secured by top RH chassis crossmember bolt.
- Remove 8 bolts securing chassis crossmember.
- Position both exhaust heat shields and refit
- With assistance and using a body jack between chassis longitudinals, jack chassis sufficiently to enable removal of crossmember.
- Refit catalytic converter assembly
- Disconnect dipstick tube from fluid pan. Loosen securing bolt at bell housing and move tube aside.
- Connect battery.
- Remove clamps securing fluid pan. Note their
- Refill transmission using correct grade of fluid
locations for refit and withdraw pan.
- Remove gasket and clean gasket mating faces.
- Remove securing screws and detach oil screen and suction pipe, taking care to retain suction
- Apply parking brake and with selector at ’P’, run
pipe spacer, discard ’O’ ring seal.
- Detach suction pipe from fluid screen, discard
- Apply footbrake, from ’P’, move selector to
’O’ ring seal.
secure with bolts. Tighten to 8 Nm, 6 lbf ft. Tighten to 8 Nm, 6 lbf ft.
bell housing. Filler tube union nut Tighten to 70 Nm, 52 lbf ft.
chassis cross-member. Secure fuel pipes to retaining clip. See EMISSION CONTROL, Repair, Front pipe/catalytic converter.
- See LUBRICANTS, FLUIDS AND
- CAPACITIES, Information, Recommended
- Lubricants and Fluids.
engine at idle.
position ’1’ and back to ’N’. Check fluid level, this must be between the level marks. Top-up as necessary.
Parts & tools for this job For Land Rover Defender
- PARTTransmission filter kitSearch: Land Rover Defender transmission filter kit
- FLUIDAutomatic transmission fluidSearch: Land Rover automatic transmission fluid
- TOOLFluid transfer pumpSearch: fluid transfer pump
Links open Amazon search results in a new tab. As an Amazon Associate I earn from qualifying purchases.