
Lock - steering column (page 3 of 3)
- Make
- Land Rover
- Model
- Freelander Workshop Manual
- Year
- 1998–2000
- Section
- Repairs
SteeringLock - steering column · page 3 of 3
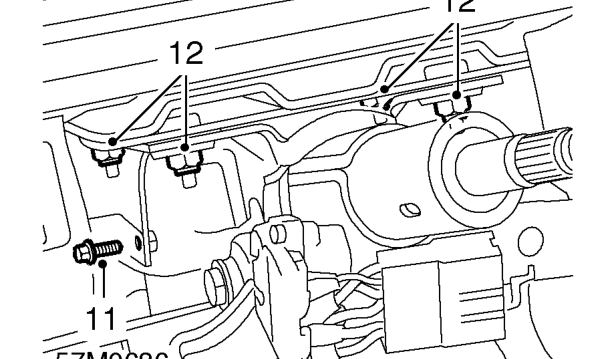
- Remove bolt securing side of steering column to fuse box support bracket.
- Remove 4 nuts securing column to fascia.
- Remove column from vehicle.
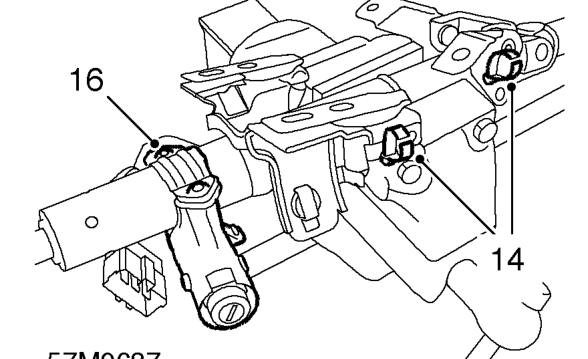
- Remove 2 cable ties from column.
- Position steering column in vice.
CAUTION: If steering column is to be re-used, take care not to deform or damage column in vice.
- Centre punch shear bolts securing lock to column.
- Using a 5mm drill, drill out 2 shear bolts securing column to lock.
CAUTION: Take care not to damage steering lock body if the lock is to be refitted.
- Remove steering column lock.
Refit
- Locate steering column lock in position on steering column, fit but do not tighten shear bolts at this stage.
- Insert key, confirm correct operation of steering lock and that key turns freely.
- Tighten shear bolts until heads shear off.
- Remove steering column assembly from vice.
- Fit NEW cable ties to harness.
- Position column to vehicle, locate column on steering rack aligning column coupling with rack input shaft flag.
- Fit nuts and and tighten to 14 Nm.
- Fit side support bolt and tighten to 10 Nm.
- Fit clamp bolt and tighten to 32 Nm.
- Position harness and secure with clips to column.
- Fit fuse box cover and close glove box lid.
- Position rubber column cover over steering column.
- Fit aperture trim and secure with screws.
- Position indicator/wiper switch assembly, tighten screw and connect multiplugs.
- Fit rotary coupler. See BODY, Repairs.
Parts & tools for this job For 1998 Land Rover Freelander
- TOOLTie rod end toolSearch: tie rod end puller
- TOOLBall joint separatorSearch: ball joint separator
- FLUIDPower steering fluidSearch: Land Rover power steering fluid
Links open Amazon search results in a new tab. As an Amazon Associate I earn from qualifying purchases.