
MASTER CYLINDER
- Make
- Land Rover
- Model
- Range Rover Classic
- Section
- OVERHAUL › MASTER CYLINDER
CLUTCH
1
OVERHAUL
MASTER CYLINDER
Service repair no - 30.20.07
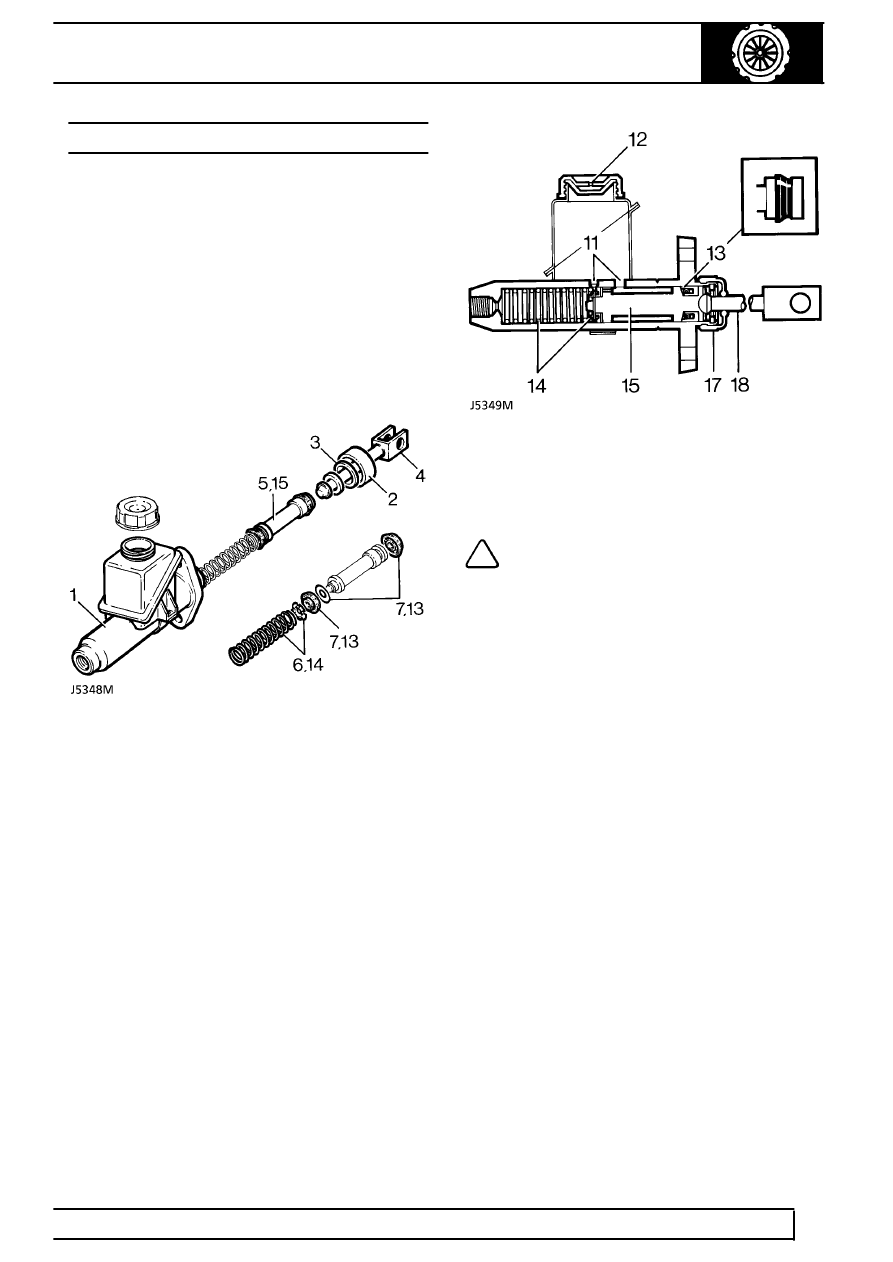
1. Remove master cylinder.
See Repair, Master
Cylinder
Disassemble
2. Pull back and remove rubber sealing boot from
pushrod.
3. Depress push-rod and extract circlip.
4. Withdraw push-rod assembly.
5. Withdraw piston assembly.
6. Withdraw retainer and spring.
7. Remove two piston seals and piston washer.
Inspecting
8. Clean all components thoroughly using new
hydraulic fluid. Dry, using a lint-free cloth.
9. Examine cylinder bore and piston, ensure they
are smooth to touch with no corrosion, score
marks or ridges. If in doubt, fit new components.
10. Fit new seals and rubber boot. These items are
all included in master cylinder overhaul kit.
11. Ensure that feed and by-pass ports are not
obstructed.
12. Ensure reservoir cap vent is clear.
Assemble
NOTE: Cleanliness is essential, ensure
hands are free of grease or dirt. Lubricate
cylinder bore and rubber seals with new
hydraulic fluid before assembly.
13. Fit a new piston washer and thinner of two piston
seals, lip last, over piston nose, up against
drilled piston head. Fit thicker seal into piston
groove with lip facing towards seal at opposite
end.
14. Insert spring and retainer into master cylinder
bore.
15. Insert piston and seal assembly, ensuring that
seal lips do not bend back.
16. Reverse 3 and 4, correctly locating circlip.
17. Stretch new rubber boot over push-rod, pack
with rubber grease. Fit securely into locating
groove.
18. Operate push-rod several times to ensure free
movement of internal components.
19. Fit master cylinder.
Parts & tools for this job For Land Rover Range Rover
- TOOLBrake bleeder kitSearch: one man brake bleeder kit
- FLUIDBrake fluidSearch: brake fluid
- TOOLBrake line flaring toolSearch: brake line flaring tool
Links open Amazon search results in a new tab. As an Amazon Associate I earn from qualifying purchases.