
Evaporative emission 2-way valve - ’l’ series
- Make
- Rover
- Model
- 400 Workshop Manual
- Year
- 1995–2000
- Section
- Repairs › Evaporative emission 2-way valve - ’l’ series
Fuel delivery systemEvaporative emission 2-way valve - ’l’ series
Refit
- Position cable to vehicle, align cable to footwell and control lever.
- Connect inner and outer cable to control lever.
- Align control and tighten bolts.
- Align cable to sill and secure to clips
- Route cable across to passenger’s side. and secure cable to heel board clips.
- Pass cable through seat squab pan and secure cable to clips.
- Secure cable to clips in luggage compartment and connect to filler flap.
- Position carpet to sills, fit door sill finishers and tighten screws.
- Position carpet under ’D’ post finisher, on drivers side and fit studs securing carpet.
- Fit seat belt to lower anchorage point and tighten bolt to 32 Nm.
- Fit control lever cover and tighten screw. Fit cover stud.
- Fit control knobs to levers.
- Position luggage compartment side trim and fit retaining studs.
- Fit finisher ’D’ post lower. See BODY, Interior trim components.
- Fit rear seat cushion.
EVAPORATIVE EMISSION 2-WAY VALVE - ’L’ SERIES
Service repair no - 19.55.25
Remove
- Remove fuel tank assembly. See this section.
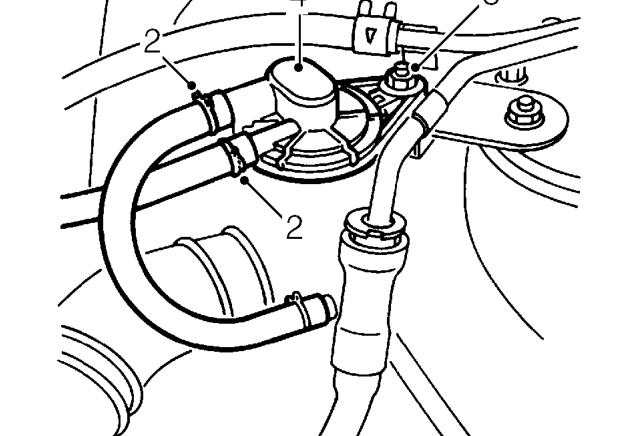
- Release 2 clips and disconnect 2 breather hoses from breather valve.
- Remove nut securing breather valve to mounting bracket.
- Remove breather 2-way valve.
Refit
- Remove plugs from new breather 2-way valve and fit to old.
- Position breather 2-way valve to mounting bracket, fit nut and tighten to 9 Nm.
- Connect hoses to breather valve and secure with clips.
- Refit fuel tank assembly. See this section.
Parts & tools for this job For 1995 Rover 400
- PARTEngine gasket setSearch: Rover 400 1995 engine gasket set
- TOOLTorque wrenchSearch: 3/8 inch torque wrench
- TOOLFeeler gauge setSearch: feeler gauge set
Links open Amazon search results in a new tab. As an Amazon Associate I earn from qualifying purchases.