
Single cylinder head extension - change gasket
- Make
- Alfa Romeo
- Model
- 147 Factory Service Manual
- Year
- 2000–2004
- Section
- Cylinder head/s › Single cylinder head extension - change gasket
Single cylinder head extension - change gasket
Removing
Position the vehicle on the ramp
Proceed with removal - 1016A10 sound-proofing cover - r + r.
Ensure that the ignition key is in the OFF position, then disconnect the negative battery terminal (-).
| Name | Connector | |
|---|---|---|
| Battery | A1B |
Proceed with removal - 1008C10 power unit upper reaction link r r.
Proceed with removal - 1060G80 ds electric injection control unit - r r.
Proceed with removal - 4450B04 right front wheel r r.
Proceed with removal - 7055B54 under-engine guard - r r.
Proceed with removal - 7055B91 Right front WHEEL ARCH LINER - R.R..
Proceed with removal - 1092G10 single engine belt r r.
Proceed with removal - 1092A10 Crankshaft services PULLEY - R.R..
Proceed with removal - 1092G20 engine component single belt fixed tensioner - one - r + r.
Proceed with removal - 1032D12 timing system protective cover(s) - r + r.
Proceed with removal - 1032B10 toothed timing belt - r + r for timing adjustment or replacement.
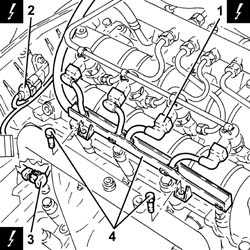
1. Disconnect the electrical connections from the injectors.
| Name | Connector | |
|---|---|---|
| 1 | Injector | N70 |
2. Disconnect the electrical connection from the cam angle sensor.
| Name | Connector | |
|---|---|---|
| 2 | Timing sensor. | K47 |
3. Disconnect the electrical connection for the air conditioning compressor.
| Name | Connector | |
|---|---|---|
| 3 | Air conditioning compressor engagement electro-magnet | L20 |
Release the electrical wiring from the band on the timing cover.
4. Undo the bolts fastening the cable duct and move the electrical wiring aside.
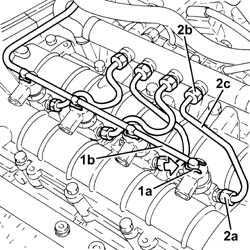
1. Push clips (1a) by hand and disconnect the pipe from the injectors to the fuel recovery manifold (1b), injectors side and move it aside.
2. Undo the connectors (2a), (2b) and remove the pipe from the fuel manifold to the injectors (2c).
Use new pipes from from fuel manifold to injectors upon reassembly.
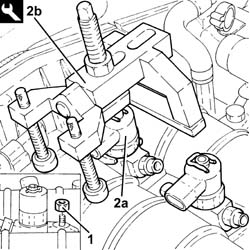
1. Undo the nuts fixing the injector brackets.
2. Remove the injectors (2a) complete with brackets using the tool (2b).
If the same injectors are being reused, mark the cylinder to which they belong so that they can be correctly refitted.
If new fuel injectors are fitted:
- determine the identification code stamped on the top;
- check that the new injectors(s) is (are) recognized by the engine management control unit using the Examiner.
Start removal beginning with the fuel injector of cylinder no. 1 and continuing with the injectors for cylinders 2, 3 and 4.
| Name | Country | |
|---|---|---|
| 2b | Extractor | 1.870.897.300 |
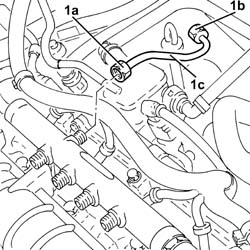
1. Undo the connectors (1a), (1b) and remove the pipe from the pressure pump to the fuel manifold (1c).
When refitting, fit a new pipe from the pressure pump to the fuel manifold.
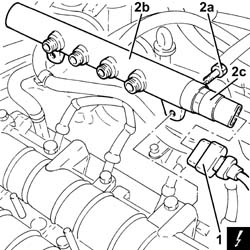
1. Disconnect the electrical connection from the fuel pressure sensor.
| Name | Connector | |
|---|---|---|
| 1 | Fuel pressure sensor | K83 |
2. Undo the bolts (2a) and remove the single fuel manifold pipe (2b) complete with fuel pressure sensor (2c).
Proceed with removal - 5530B10 battery - r+r.
1. Loosen the band and disconnect the vacuum pipe from the brake servo.
2. Loosen the band and disconnect the engine oil vapour recovery pipe from the engine oil filler.
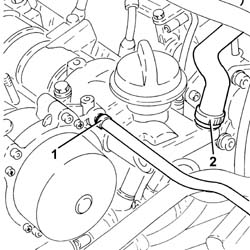
1. Disconnect the electrical connection from the engine coolant temperature sensor.
| Name | Connector | |
|---|---|---|
| 1 | Engine temperature sender unit | K36 |
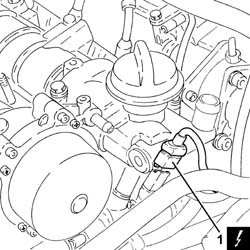
1. Undo the bolts (1a) and remove the engine oil filler (1b).
2. Remove the gasket.
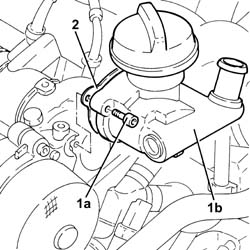
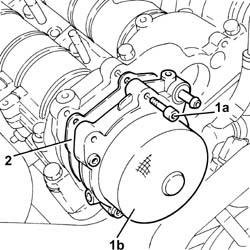
1. Undo bolts (1a) and remove vacuum unit (1b).
2. Remove the gasket.
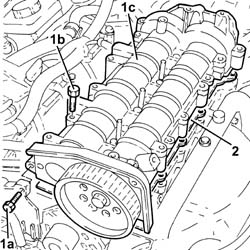
1. Undo the bolts (1a), (1b), and remove the camshaft housing assembly (1c).
2. Remove the gasket.
Refitting
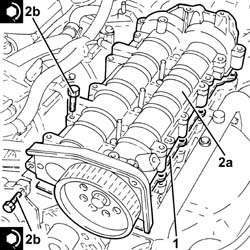
1. Place the upper cylinder head gasket back in its housing.
2. Place the camshaft housing assembly (2a) back in its housing and secure it tightening the bolts (2b) to the recommended torque.
| Fastening | Component | Ø | Value (daNm) | |
|---|---|---|---|---|
| 2b | Bolt | CYLINDER HEAD EXTENSION | M8 | (Cylinder head side 23 28 |
| Fastening | Component | Ø | Value (daNm) | |
|---|---|---|---|---|
| 2b | Bolt | INJECTION PRESSURE PUMP MOUNT | M8 | (Cylinder head side) 2.3 ÷ 2.8 |
Proceed with refitting - 1032B10 toothed timing belt - r + r for timing adjustment or replacement.
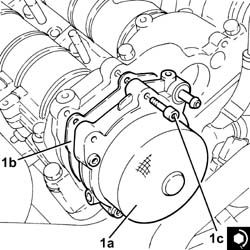
1. Place the vacuum unit (1a), complete with gasket (1b), back in its housing and secure it tightening the bolts (1c) to the recommended torque.
| Fastening | Component | Ø | Value (daNm) | |
|---|---|---|---|---|
| 1c | Bolt | BRAKE SERVO VACUUM PUMP | M6 | (Cylinder head side 05 06 50 |
1. Place the engine oil filler (1a), complete with gasket (1b), back in its housing and secure it tightening the bolts (1c) to the recommended torque.
| Fastening | Component | Ø | Value (daNm) | |
|---|---|---|---|---|
| 1c | Bolt | OIL FILTER FITTING | M6 | (Cylinder head side 08 10 |
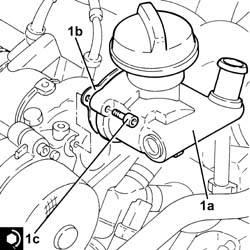
Connect the electrical connection to the engine coolant temperature sensor.
Connect the oil vapour recovery pipe to the engine oil filler and tighten the band.
Connect the vacuum pipe to the brake servo and tighten the band.
Proceed with refitting - 5530B10 battery - r+r.
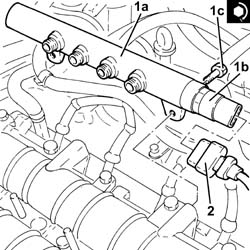
1. Place the single fuel manifold pipe (1a), complete with fuel pressure sensor (1b), back in its housing and secure it tightening the bolts (1c) to the recommended torque.
| Fastening | Component | Ø | Value (daNm) | |
|---|---|---|---|---|
| 1c | Bolt | INJECTOR FUEL MANIFOLD (DIESEL) | M8 | (Camshaft housing side 23 28 |
2. Connect the electrical connection to the fuel pressure sensor.
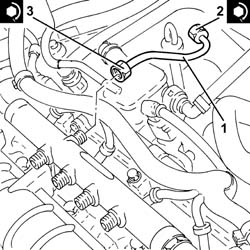
1. Place the pipe from the pressure pump to the single fuel manifold back in its housing and fix it using the connectors without tightening them.
2. Tighten the connector for the pipe from the pressure pump to the single fuel manifold, pump side, to the recommended torque using a suitable spanner.
| Fastening | Component | Ø | Value (daNm) | |
|---|---|---|---|---|
| 2 | Connector | PRESSURE PUMP LINE TO FUEL MANIFOLD | M14 | (Pressure pump side 22 24 |
3. Tighten the connector for the pipe from the pressure pump to the single fuel manifold, fuel manifold side, to the recommended torque using a suitable spanner.
| Fastening | Component | Ø | Value (daNm) | |
|---|---|---|---|---|
| 3 | Connector | PRESSURE PUMP LINE TO FUEL MANIFOLD | M14 | (Fuel manifold side 22 24 |
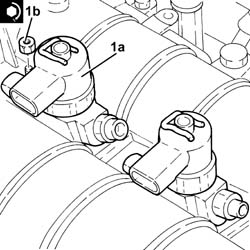
1. Refit the injectors (1a) complete with brackets and secure by tightening the nuts (1b) to the specified torque.
Start the refitting beginning with the injector for cylinder no. 4 and continuing with the injectors for cylinders 3, 2 and 1.
| Fastening | Component | Ø | Value (daNm) | |
|---|---|---|---|---|
| 1b | Nut | INJECTORS(DIESEL) | M8 | (Camshaft housing side) 2.3 ÷ 2.8 |
1. Fit the new pipes from the fuel manifold to the injectors and secure them using the connectors without tightening them.
2. Tighten the connectors for the pipes from the fuel manifold to the injectors, injector side, to the recommended torque using a suitable spanner.
| Fastening | Component | Ø | Value (daNm) | |
|---|---|---|---|---|
| 2 | Connector | FUEL MANIFOLD LINE TO INJECTORS | M12 | (Injector side) 2.2 ÷ 2.4 |
3. Tighten the connectors for the pipes between the fuel manifold and the injectors, fuel manifold side, to the recommended torque using a suitable spanner.
| Fastening | Component | Ø | Value (daNm) | |
|---|---|---|---|---|
| 3 | Connector | FUEL MANIFOLD LINE TO INJECTORS | M12 | Fuel manifold side 22 24 |
Clean the threaded seats for the above-mentioned pipe on the manifold and the injectors using heptane.
4. Connect the pipe from the injectors to the fuel recovery manifold (4a) to the injectors pushing it until the clips (4b) can be heard clicking into place.
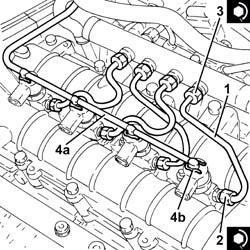
Place the electrical wiring back in its housing and tighten the cable duct fixing bolts.
Fasten the electrical wiring using the band on the timing cover.
Connect the electrical connection to the air conditioner compressor.
Connect the electrical connection to the cam angle sensor
Connect the electrical connections to the injectors.
Proceed with refitting - 1032D12 timing system protective cover(s) - r + r.
Proceed with refitting - 1092G20 engine component single belt fixed tensioner - one - r + r.
Proceed with refitting - 1092A10 Crankshaft services PULLEY - R.R..
Proceed with refitting - 1092G10 single engine belt r r.
Proceed with refitting - 7055B91 Right front WHEEL ARCH LINER - R.R..
Proceed with refitting - 7055B54 under-engine guard - r r.
Proceed with refitting - 4450B04 right front wheel r r.
Proceed with refitting - 1060G80 ds electric injection control unit - r r.
Proceed with refitting - 1008C10 power unit upper reaction link r r.
Connect the negative (-) battery terminal
Proceed with refitting - 1016A10 sound-proofing cover - r + r.
Remove the car from the ramps.
Parts & tools for this job For 2000 Alfa Romeo 147
- PARTEngine gasket setSearch: Alfa Romeo 147 2000 engine gasket set
- TOOLTorque wrenchSearch: 3/8 inch torque wrench
- TOOLFeeler gauge setSearch: feeler gauge set
Links open Amazon search results in a new tab. As an Amazon Associate I earn from qualifying purchases.