
Installation
- Make
- Aston Martin
- Model
- DB9 Factory Workshop Manual
- Year
- Issue 2, 2005
- Section
- Air Conditioning (A/C) System › Installation
12 Climate controlInstallation
Installation
- Install the power transistor and connect the wiring harness plug.
- Install the glove box.
- Connect the vehicle battery.
Evaporator Temperature Sensor
Inspection
Inspect the Evaporator Temperature Sensor when it is installed in the A/C unit.
- Set the fan speed Max. Hi.
- Set the temperature control to Max. Cold.
- Set the air intake mode to Recirculate.
- Turn the A/C switch off.
- Close all the doors and windows. Wait for 5 minutes.
- Disconnect the Evaporator Temperature Sensor connector.
- Measure the temperature at the air intake.
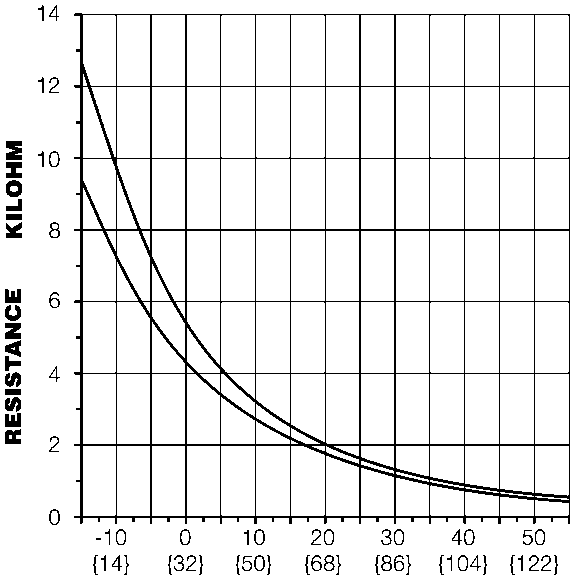
- Measure the resistance between the Evaporator Temperature Sensor terminals.
If the characteristics of the Evaporator Temperature Sensor are not as shown in the graph, replace the Evaporator Temperature Sensor.
Removal
- Disconnect the vehicle battery.
- Remove the A/C unit (Refer to ‘A/C Unit’, page 12-3-11).
- Remove the evaporator (Refer to ‘Evaporator’, page 12-3-14).
- Remove the wiring harness plug from the A/C unit.
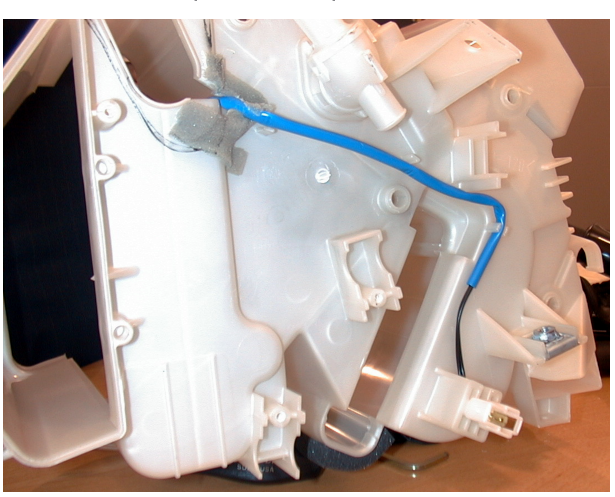
- Remove the evaporator temperature sensor.
Installation
- Install the evaporator temperature sensor.
- Insert the evaporator (inlet / outlet first) into the half of the A/C unit which houses the expansion valve.
- Complete with new ‘O’ rings, install the expansion valve and the A/C pipes clamp (screws x2).
- Install the clips (x2) that secure the evaporator temperature sensor element to the evaporator.
- Secure the two halves of the A/C unit together.
- Take care to correctly locate the two vent flaps.
- Connect (glue) the filter gauze and foam where the two halves of the A/C unit meet.
- Install the in-vehicle temperature pipe to the A/C unit clips.
- Install the A/C unit to the IP (Refer to ‘A/C Unit’, page 12-3-11).
- Install the IP (Refer to ‘Instrument Panel (IP) (01.12)’, page 1-9-1).
- Carry out A/C system actuator check and functional check to ensure correct operation (Refer to ‘A/C System Testing’, page 12-3-9).
Parts & tools for this job For 2005 Aston Martin DB9
- TOOLA/C manifold gauge setSearch: AC manifold gauge set
- TOOLUV leak detection kitSearch: AC UV leak detection kit
- PARTCabin filterSearch: Aston Martin DB9 2005 cabin filter
Links open Amazon search results in a new tab. As an Amazon Associate I earn from qualifying purchases.