
Front end assembly - r.r.
- Make
- Fiat
- Model
- Bravo Factory Service Manual
- Year
- 2007–2014
- Section
- Removing-refitting › Front end assembly - r.r.
FRONT END ASSEMBLY - R.R.
Removing
- Position the vehicle on a lift.
- Drain the coolant.
Op. 0010T84 COOLANT FOR AIR CONDITIONING SYSTEM - DEHYDRATE AND REPRESSURIZE
- Drain the engine coolant.
Op. 0010T20 ENGINE COOLANT - CHANGE
Op. 5540B07 LEFT FRONT HEADLAMP - R.R
Op. 5540B08 RIGHT FRONT HEADLAMP - R.R
Op. 7025A34 BONNET LID LOCK (ONE) - R+R OR REPAIR
Op. 7210A15 R.R. FRONT WING/HEADLAMP HOUSING CROSSMEMBER
Op. 5050A12 WINDSCREEN WASHER FLUID RESERVOIR FILLER PIPE (IN ENGINE COMPARTMENT) - R.R.
Op. 7055B54 UNDER ENGINE PROTECTION/GUARD - R.R.
Op. 7055B65 ENGINE COMPARTMENT DUST COVER IN LEFT FRONT WHEEL ARCH - R.R.
Op. 7055B66 ENGINE COMPARTMENT DUST COVER IN RIGHT FRONT WHEEL ARCH - R.R.
1. Undo the bolt (1a) and disconnect pipe connectors (1b) and (1c) from the condenser.
Seal the connectors that have been disconnected using suitable plugs to prevent dampness and impurities from entering the system.
2. Disconnect the vacuum pipe (2a) from the actuator (2b).
3. Loosen the retaining bands (3a) and disconnect the pipes (3b) from the front end assembly.
4. Undo the bolt (4a) for the screen washer fluid reservoir (4b).
5. Undo the bolts (5a) fixing the air filter mounting (5b).
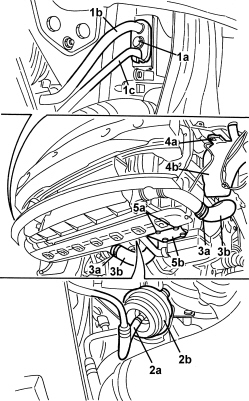
- Lower the vehicle.
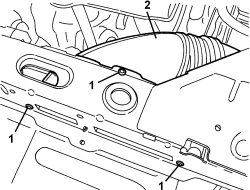
1. Undo the bolts.
2. Remove the cold air intake.
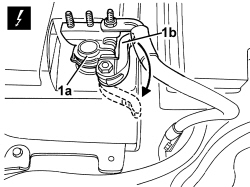
1. Working on the battery, disconnect the negative battery terminal (1a) after having loosened it by rotating the cam lever (1b).
| Description | Connector | |
|---|---|---|
| 1a | BATTERY | See A001 BATTERY |
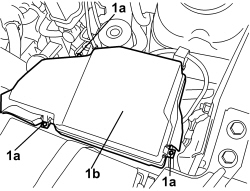
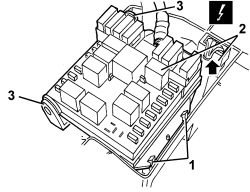
1. Release the retainers (1a) and remove the junction unit cover (1b).
1. Undo the control unit side retainers.
2. Raise the control unit.
3. Release the control unit rotating pins from the retainers.
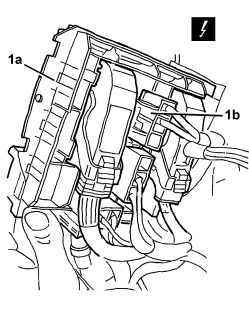
1. Lift up the control unit (1a) and disconnect the lower electrical connection (1b).
| Description | Connector | |
|---|---|---|
| 1b | JUNCTION UNIT | See B001 JUNCTION UNIT |
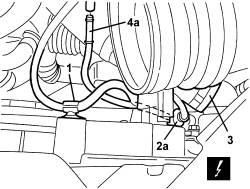
1. Disconnect the wiring retainer.
2. Disconnect the electrical connection (2a) for the variable geometry valve turbo adjustment valve (Pierbourg).
| Description | Connector | |
|---|---|---|
| 2 | VARIABLE GEOMETRY TURBINE CONTROL SOLENOID VALVE | See L036 TURBINE VARIABLE GEOMETRY CONTROL SOLENOID VALVE |
3. Disconnect the engine coolant pipe.
4. Disconnect the variable geometry valve turbo adjustment valve (Pierbourg) pipe (4a).
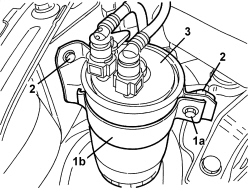
1. Undo the bolt (1a) and remove the half collar (1b).
2. Undo the bolts.
3. Move the diesel filter.
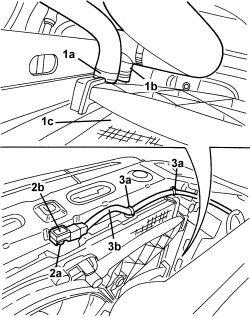
1. Working behind the right side of the radiator, disconnect the pipes (1a) and (1b) from the radiator (1c).
2. Undo the bolt (2a) and move the Air Bag sensor (2b).
3. Disconnect the retaining bands (3a) and move the wiring (3b) and Air Bag sensor (2b).
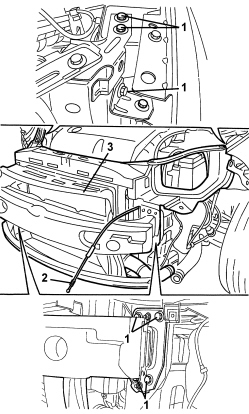
1. Working on both sides of the vehicle, undo the front end fixing bolts.
2. Release the bonnet lid lock control rod.
3. Remove the front end assembly with the help of a second mechanic.
Refitting
- Check that the front end is not damaged.
- Position the front end assembly with the help of a second mechanic.
- Attach the bonnet lid lock control rod to the front end.
- Working on both sides of the vehicle, tighten the front end fixing bolts.
| Component | Fastening | dia | Value (daNm) | Validity |
|---|---|---|---|---|
| Front-end upper fastening | Bolt | M10 | 2.4 ÷ 3.6 |
| Component | Fastening | dia | Value (daNm) | Validity |
|---|---|---|---|---|
| Front-end to bodyshell fastening | Bolt | M8 | 2.0 ÷ 2.4 |
- Position the wiring and Air Bag sensor, then connect the retaining bands and tighten the bolt.
- Working behind the right side of the radiator, connect the pipes to the radiator.
- Position the diesel filter and tighten the bolts.
- Fit the diesel filter half collar and tighten the bolt.
- Connect the variable geometry valve turbo adjustment valve (Pierbourg) pipe.
- Connect the engine coolant pipe.
- Connect the variable geometry valve turbo adjustment valve (Pierbourg) electrical connection.
- Connect the wiring retainer.
- Secure the lower electrical connection for the junction unit.
- Position the junction unit and attach the swivel pins to the retainers.
- Attach the control unit side retainers.
- Position the control unit cover and do up the retainers.
- Working on the battery, connect the electrical connection.
- Position the cold air intake and tighten the bolts.
- Raise the vehicle.
- Fit the air filter mounting and tighten the fixing bolts.
- Position the screen washer fluid reservoir and tighten the bolt.
- Connect the pipes to the front end assembly and secure them using the retaining bands.
- Connect the vacuum pipe to the actuator.
Replace the O rings for the connectors. Only use green coloured seals that are resistant to R134a coolant.
Lubricate the connector threads using anti-freeze.
- Connect the pipe connectors to the condenser and tighten the bolt to the recommended torque.
| Component | Fastening | dia | Value (daNm) | Validity |
|---|---|---|---|---|
| Pipe connector on condenser | Bolt | M8 | 1.8 ÷ 2.2 |
Op. 7055B66 ENGINE COMPARTMENT DUST COVER IN RIGHT FRONT WHEEL ARCH - R.R.
Op. 7055B65 ENGINE COMPARTMENT DUST COVER IN LEFT FRONT WHEEL ARCH - R.R.
Op. 7055B54 UNDER ENGINE PROTECTION/GUARD - R.R.
Op. 5050A12 WINDSCREEN WASHER FLUID RESERVOIR FILLER PIPE (IN ENGINE COMPARTMENT) - R.R.
Op. 7210A15 R.R. FRONT WING/HEADLAMP HOUSING CROSSMEMBER
Op. 7025A34 BONNET LID LOCK (ONE) - R+R OR REPAIR
Op. 5540B08 RIGHT FRONT HEADLAMP - R.R
Op. 5540B07 LEFT FRONT HEADLAMP - R.R
- Pressurize the engine coolant.
Op. 0010T20 ENGINE COOLANT - CHANGE
- Repressurize the coolant.
Op. 0010T84 COOLANT FOR AIR CONDITIONING SYSTEM - DEHYDRATE AND REPRESSURIZE
- Remove the vehicle from the lift.
Removing
- Position the vehicle on a lift.
- Drain the coolant.
Op. 0010T84 COOLANT FOR AIR CONDITIONING SYSTEM - DEHYDRATE AND REPRESSURIZE
- Drain the engine coolant.
Op. 0010T20 ENGINE COOLANT - CHANGE
Op. 5540B07 LEFT FRONT HEADLAMP - R.R
Op. 5540B08 RIGHT FRONT HEADLAMP - R.R
Op. 7025A34 BONNET LID LOCK (ONE) - R+R OR REPAIR
Op. 7210A15 R.R. FRONT WING/HEADLAMP HOUSING CROSSMEMBER
Op. 5050A12 WINDSCREEN WASHER FLUID RESERVOIR FILLER PIPE (IN ENGINE COMPARTMENT) - R.R.
Op. 7055B54 UNDER ENGINE PROTECTION/GUARD - R.R.
Op. 7055B65 ENGINE COMPARTMENT DUST COVER IN LEFT FRONT WHEEL ARCH - R.R.
Op. 7055B66 ENGINE COMPARTMENT DUST COVER IN RIGHT FRONT WHEEL ARCH - R.R.
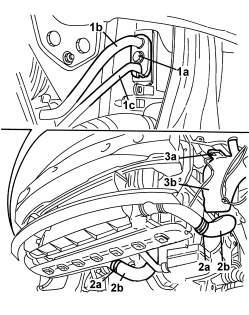
1. Undo the bolt (1a) and disconnect pipe connectors (1b) and (1c) from the condenser.
Seal the connectors that have been disconnected using suitable plugs to prevent dampness and impurities from entering the system.
2. Loosen the retaining bands (2a) and disconnect the pipes (2b) from the front end assembly.
3. Undo the bolt (3a) for the screen washer fluid reservoir (3b).
- Lower the vehicle.
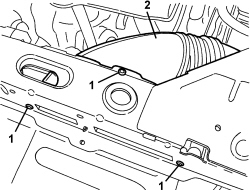
1. Undo the bolts.
2. Remove the cold air intake.
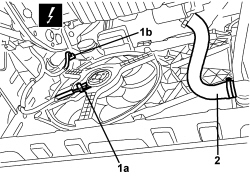
1. Disconnect the electrical connections (1a) and (1b) for the engine cooling fan.
| Description | Connector | |
|---|---|---|
| 1a | FAN MOTOR | See N011 FAN MOTOR |
| 1b | ENGINE FAN ADJUSTMENT RESISTANCE - 1 | See O010 ENGINE FAN ADJUSTMENT RESISTANCE - 1 |
2. Disconnect the engine coolant pipe.
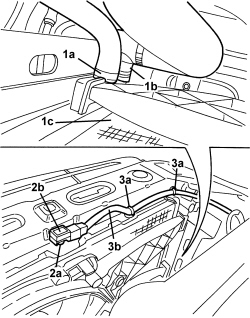
1. Working behind the right side of the radiator, disconnect the pipes (1a) and (1b) from the radiator (1c).
2. Undo the bolt (2a) and move the Air Bag sensor (2b).
3. Disconnect the retaining bands (3a) and move the wiring (3b) and Air Bag sensor (2b).
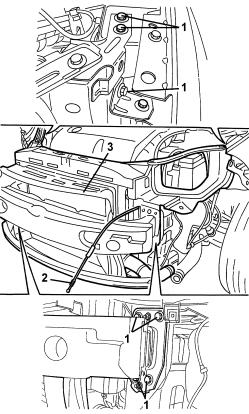
1. Working on both sides of the vehicle, undo the front end fixing bolts.
2. Release the bonnet lid lock control rod.
3. Remove the front end assembly with the help of a second mechanic.
Refitting
- Check that the front end is not damaged.
- Position the front end assembly with the help of a second mechanic.
- Attach the bonnet lid lock control rod to the front end.
- Working on both sides of the vehicle, tighten the front end fixing bolts.
| Component | Fastening | dia | Value (daNm) | Validity |
|---|---|---|---|---|
| Front-end upper fastening | Bolt | M10 | 2.4 ÷ 3.6 |
| Component | Fastening | dia | Value (daNm) | Validity |
|---|---|---|---|---|
| Front-end to bodyshell fastening | Bolt | M8 | 2.0 ÷ 2.4 |
- Position the wiring and Air Bag sensor, then connect the retaining bands and tighten the bolt.
- Working behind the right side of the radiator, connect the pipes to the radiator.
- Connect the engine coolant pipe.
- Connect the electrical connections for the engine cooling fan.
- Position the cold air intake and tighten the bolts.
- Position the screen washer fluid reservoir and tighten the bolt.
- Connect the pipes to the front end assembly and secure them using the retaining bands.
Replace the O rings for the connectors. Only use green coloured seals that are resistant to R134a coolant.
Lubricate the connector threads using anti-freeze.
- Connect the pipe connectors to the condenser and tighten the bolt to the recommended torque.
| Component | Fastening | dia | Value (daNm) | Validity |
|---|---|---|---|---|
| Pipe connector on condenser | Bolt | M8 | 1.8 ÷ 2.2 |
Op. 7055B66 ENGINE COMPARTMENT DUST COVER IN RIGHT FRONT WHEEL ARCH - R.R.
Op. 7055B65 ENGINE COMPARTMENT DUST COVER IN LEFT FRONT WHEEL ARCH - R.R.
Op. 7055B54 UNDER ENGINE PROTECTION/GUARD - R.R.
Op. 5050A12 WINDSCREEN WASHER FLUID RESERVOIR FILLER PIPE (IN ENGINE COMPARTMENT) - R.R.
Op. 7210A15 R.R. FRONT WING/HEADLAMP HOUSING CROSSMEMBER
Op. 7025A34 BONNET LID LOCK (ONE) - R+R OR REPAIR
Op. 5540B08 RIGHT FRONT HEADLAMP - R.R
Op. 5540B07 LEFT FRONT HEADLAMP - R.R
- Pressurize the engine coolant.
Op. 0010T20 ENGINE COOLANT - CHANGE
- Repressurize the coolant.
Op. 0010T84 COOLANT FOR AIR CONDITIONING SYSTEM - DEHYDRATE AND REPRESSURIZE
- Remove the vehicle from the lift.
Parts & tools for this job For 2007 Fiat Bravo
- TOOLTrim removal tool kitSearch: trim removal tool kit
- PARTTouch-up paintSearch: Fiat touch up paint
- PARTPanel clip assortmentSearch: Fiat panel clips assortment
Links open Amazon search results in a new tab. As an Amazon Associate I earn from qualifying purchases.