
R.r. rear bumper
- Make
- Fiat
- Model
- Croma Factory Service Manual
- Year
- 2005–2010
- Section
- Removing-refitting › R.r. rear bumper
R.R. REAR BUMPER
Removing
- Turn the ignition key to the OFF position.
- Open the bonnet.
- Disconnect the negative battery terminal.
| Description | Connector | |
|---|---|---|
| BATTERY | See A001 BATTERY |
FOLLOW ALL THE RECOMMENDED SAFETY INSTRUCTIONS
Follow the instructions for handling speakers.
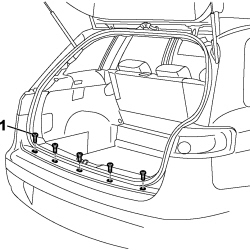
1. Open the passenger compartment tailgate and unscrew the five upper bolts.
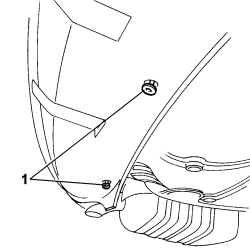
1. Unscrew the two bolts under the beam.
- Working on both sides:
Op. 4450B13 REAR WHEELS (TWO) - R.R
1. Unscrew the bolts (1a) securing the wheel arch to the inner edge of the wing on the bumper.
2. Using the special tool, release the three retaining buttons (2a) and the wheel arch retainer (2b).
| Tool | Description | Function | Validity |
|---|---|---|---|
| 1878077000 | Knife | Retainer removal |
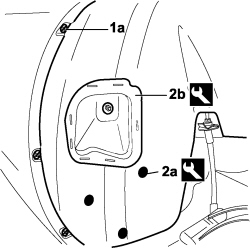
- Partly move aside the wheel arch to gain access to the bolt.
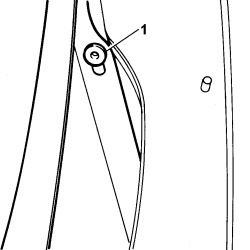
1. Undo the retaining bolt.
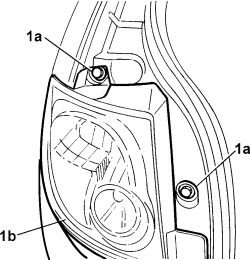
1. Unscrew both bolts (1a) securing the outer tail-light (1b) and prise out of its seat without disconnecting the connectors.
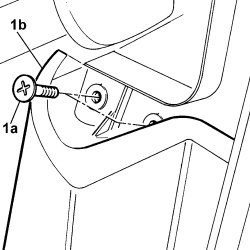
1. Undo the two bolts (1a) fixing the bumpers (1b) to the vehicle.
Op. 7040B22 LUGGAGE COMPARTMENT/LOAD PLATFORM MOULDING - R+R
Op. 7040B26 LOAD PLATFORM COVER BLIND - R+R
Op. 7040B42 PROTECTION GRILLE FOR ANIMAL TRANSPORT - R and R
Op. 7040G46 LOAD COMPARTMENT COURTESY LIGHT - R and R
Op. 7050A47 SIDE PANEL ONE OF REAR SEAT SQUAB LH OR RH R R
Op. 7040B24 LOAD COMPARTMENT TOP TRIM (ONE) - R+R
Op. 7040B10 LOAD PLATFORM (LUGGAGE PLATFORM) TRIM - R+R
Op. 7040B18 LOAD COMPARTMENT LOAD PLATFORM SIDE TRIM ONE LH OR RH - R.R
Op. 5570T95 SUBWOOFER WITH AMPLIFIER BUILT INTO SOUND SYSTEM - R.R.
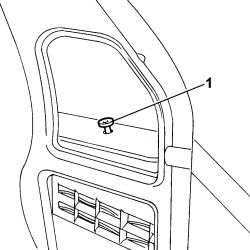
1. Undo the bolt fixing the bumper at the side.
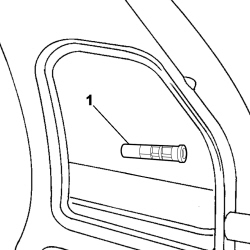
1. Unscrew the bolt with the extension in the box section.
1. Move aside the bumper to gain access to the number plate light and parking sensor connector.
2. Disconnect the parking sensor connector (2a) and withdraw the bulb holder from the number plate lights (2b).
| Description | Connector | |
|---|---|---|
| 2a | PARKING SENSOR COUPLING | See D089 PARKING SENSOR COUPLING |
| Description | Connector | |
|---|---|---|
| 2b | LEFT NO. PLATE LIGHT | See F050 LEFT NUMBER PLATE LIGHT |
| Description | Connector | |
|---|---|---|
| 2b | RIGHT NO. PLATE LIGHT | See F051 RIGHT NUMBER PLATE LIGHT |
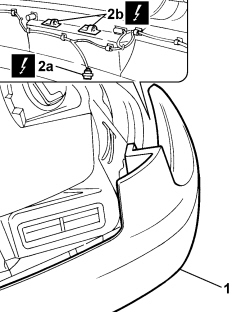
1. Disconnect the bumper from the vehicle.
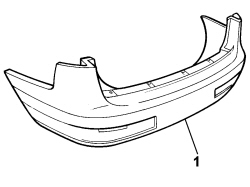
Refitting
- Check that the bumper is not damaged.
- Position the bumper in the housing.
- Insert the bulb holder in the number plate lights.
| Description | Connector | |
|---|---|---|
| LEFT NO. PLATE LIGHT | See F050 LEFT NUMBER PLATE LIGHT |
| Description | Connector | |
|---|---|---|
| RIGHT NO. PLATE LIGHT | See F051 RIGHT NUMBER PLATE LIGHT |
- Connect the electrical connection for the parking sensors.
| Description | Connector | |
|---|---|---|
| PARKING SENSOR COUPLING | See D089 PARKING SENSOR COUPLING |
Working on both sides:
- Tignten the bolt with extension in the box section.
- Tignten the side bumper bolt in the box section.
Op. 5570T95 SUBWOOFER WITH AMPLIFIER BUILT INTO SOUND SYSTEM - R.R.
Op. 7040B18 LOAD COMPARTMENT LOAD PLATFORM SIDE TRIM ONE LH OR RH - R.R
Op. 7040B10 LOAD PLATFORM (LUGGAGE PLATFORM) TRIM - R+R
Op. 7040B24 LOAD COMPARTMENT TOP TRIM (ONE) - R+R
Op. 7050A47 SIDE PANEL ONE OF REAR SEAT SQUAB LH OR RH R R
Op. 7040G46 LOAD COMPARTMENT COURTESY LIGHT - R and R
Op. 7040B42 PROTECTION GRILLE FOR ANIMAL TRANSPORT - R and R
Op. 7040B26 LOAD PLATFORM COVER BLIND - R+R
Op. 7040B22 LUGGAGE COMPARTMENT/LOAD PLATFORM MOULDING - R+R
- Tighten both bolts in the outer tail-light seat.
- Position the outer tail-light in its seat and tighten the bolts.
- Tighten the bumper side bolt under the wheel arch.
- Use an appropriate tool to fit the wheel arch in the retaining bell housing.
| Tool | Description | Function | Validity |
|---|---|---|---|
| 1878077000 | Knife | Retainer removal |
- Attach the wheel arch retaining studs.
Op. 4450B13 REAR WHEELS (TWO) - R.R
- Tighten the two bolts under the beam.
- Tighten the five upper retaining bolts.
- Connect the negative battery terminal once again.
| Description | Connector | |
|---|---|---|
| BATTERY | See A001 BATTERY |
Parts & tools for this job For 2005 Fiat Croma
- TOOLTrim removal tool kitSearch: trim removal tool kit
- PARTTouch-up paintSearch: Fiat touch up paint
- PARTPanel clip assortmentSearch: Fiat panel clips assortment
Links open Amazon search results in a new tab. As an Amazon Associate I earn from qualifying purchases.