
R.r. tailgate
- Make
- Fiat
- Model
- Croma Factory Service Manual
- Year
- 2005–2010
- Section
- Removing-refitting › R.r. tailgate
R.R. TAILGATE
Removing
- Open the tailgate.
- Turn the ignition key to the OFF position.
- Disconnect the negative battery terminal.
| Description | Connector | |
|---|---|---|
| BATTERY | See A001 BATTERY |
Op. 7015A04 TAILGATE INTERIOR PANEL - R+R
Op. 7015A58 INTERNAL TAILGATE MOULDING (ONE) - R+R
(BOTH)
Op. 7015A07 TAILGATE SIDE TRIM - R&R
Op. 7015B10 SINGLE TAILGATE LOCK - R+R OR REPAIR WITH PANEL/PROTECTION REMOVED
Op. 7015B60 EXTERIOR HANDLE FOR OPENING TAILGATE WITH TAILGATE UNLOCKING SWITCH - R.R.
Working from inside the tailgate:
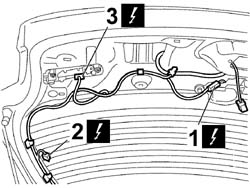
1. Disconnect the electrical connection from the rear wiper motor.
| Description | Connector | |
|---|---|---|
| REAR WIPER MOTOR | See N016 REARSCREEN WIPER MOTOR |
2. Disconnect the electrical connections on both sides of the tailgate, from the heated rear window.
| Description | Connector | |
|---|---|---|
| HEATED REAR WINDSCREEN | See P055 HEATED REAR WINDSCREEN |
3. Disconnec the electrical connections from the mobile tail-lights.
| Description | Connector | |
|---|---|---|
| LEFT REAR LIGHT CLUSTER (MOVING SECTION ON BOOT LID) | See F035 LEFT REAR LIGHT CLUSTER (MOVING SECTION ON BOOT LID) |
| Description | Connector | |
|---|---|---|
| RIGHT REAR LIGHT CLUSTER (MOVING SECTION ON BOOT LID) | See F036 RIGHT REAR LIGHT CLUSTER (MOVING SECTION ON BOOT LID) |
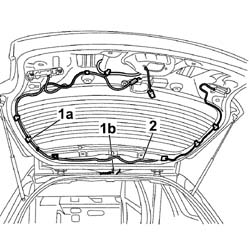
1. Release the wiring from the retaining clips (1a), prise the bulkhead coupling (1b) from the tailgate hole.
- Disconnect the pipe carrying fluid to the screen washer fluid jet.
2. Carefully withdraw the wiring harness.
To facilitate subsequent refitting, it is advisable to apply a probe cable.
- Support the tailgate
(BOTH)
Op. 7015A28 L/H OR R/H TAILGATE TELESCOPIC STRUT (ONE) - R+R
1. Undo the bolts fixing the tailgate to the hinges on both sides.
2. Remove the tailgate.
Refitting
- Position the tailgate and screw in the hinge fixing bolts without tightening them.
(BOTH)
Op. 7015A28 L/H OR R/H TAILGATE TELESCOPIC STRUT (ONE) - R+R
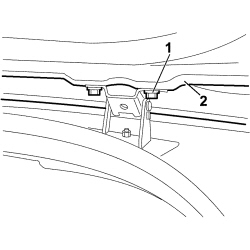
- Fit the bulkhead coupling through the hole in the tailgate.
- Carefully fit the wiring harness through the slots.
- Connect the pipe carrying fluid to the screen washer fluid jet.
- Secure the wiring to the retaining springs.
- Connect the electrical connections to the mobile tail-lights.
| Description | Connector | |
|---|---|---|
| LEFT REAR LIGHT CLUSTER (MOVING SECTION ON BOOT LID) | See F035 LEFT REAR LIGHT CLUSTER (MOVING SECTION ON BOOT LID) |
| Description | Connector | |
|---|---|---|
| RIGHT REAR LIGHT CLUSTER (MOVING SECTION ON BOOT LID) | See F036 RIGHT REAR LIGHT CLUSTER (MOVING SECTION ON BOOT LID) |
Connect the electrical connections on both sides of the tailgate to the heated rear window.
| Description | Connector | |
|---|---|---|
| HEATED REAR WINDSCREEN | See P055 HEATED REAR WINDSCREEN |
Connect the electrical connection to the rear wiper motor.
| Description | Connector | |
|---|---|---|
| REAR WIPER MOTOR | See N016 REARSCREEN WIPER MOTOR |
Op. 7015B60 EXTERIOR HANDLE FOR OPENING TAILGATE WITH TAILGATE UNLOCKING SWITCH - R.R.
Op. 7015B10 SINGLE TAILGATE LOCK - R+R OR REPAIR WITH PANEL/PROTECTION REMOVED
(BOTH)
Op. 7015A07 TAILGATE SIDE TRIM - R&R
Op. 7015A58 INTERNAL TAILGATE MOULDING (ONE) - R+R
Op. 7015A04 TAILGATE INTERIOR PANEL - R+R
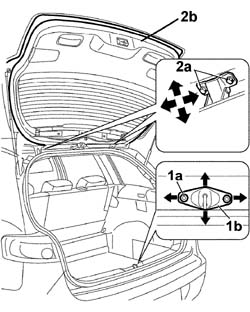
1. Loosen the bolts (1a) fixing the tailgate lock striker (1b).
The arrows indicate the possible movements for the adjustment.
- Adjust the position of the tailgate, checking the alignment with the outer profile.
- Check that the striker is perfectly matched with the tailgate lock.
2. After adjustment, tighten the bolts (2a) securing tailgate (2b) to the hinges.
- Tighten the bolts fixing the lock striker.
- Connect the negative battery terminal.
| Description | Connector | |
|---|---|---|
| BATTERY | See A001 BATTERY |
Parts & tools for this job For 2005 Fiat Croma
- TOOLTrim removal tool kitSearch: trim removal tool kit
- PARTTouch-up paintSearch: Fiat touch up paint
- PARTPanel clip assortmentSearch: Fiat panel clips assortment
Links open Amazon search results in a new tab. As an Amazon Associate I earn from qualifying purchases.