
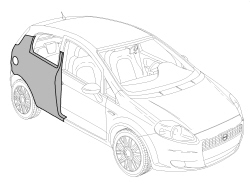
R.r. rear wing
- Make
- Fiat
- Model
- Grande Punto Factory Service Manual
- Year
- 2005–2012
- Section
- Removing-refitting › R.r. rear wing
R.R. REAR WING
Removing
- Check that the components connected are not distorted by checking the bodyshell alignment measurements using suitable equipment (gauges, templates or jigs).
- Straighten the body as necessary.
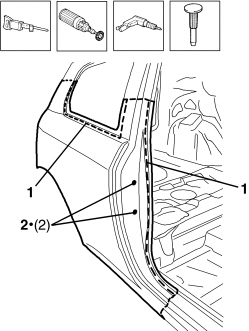
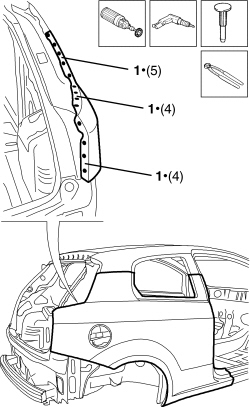
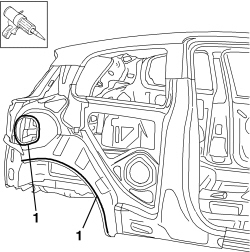
1. Use a hack sawing machine following the cutting lines shown in the diagram.
- Use a rotary brush to remove the paint to gain access to the spot welds.
2. Use the drill to remove the spot welds shown in the diagram.
- Use the hammer and chisel and remove the spot welds chamfered previously.
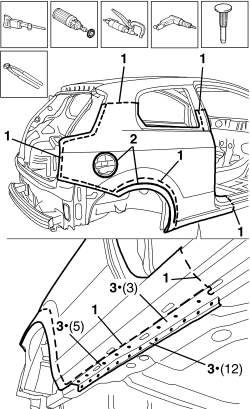
1. Use a hack sawing machine following the cutting lines shown in the diagram.
2. Remove the part from the vehicle, separating the edges joined with heat expandable sealant.
- Use a rotary brush to remove the paint to gain access to the spot welds.
3. Use the chamfering machine to remove the spot welds shown in the diagram.
- Use the drill and chamfer the spot welds not accessible with the chamfering machine.
- Use the hammer and chisel and remove the spot welds chamfered previously.
- Remove the offcuts from the vehicle.
- Use a rotary brush to remove the paint to gain access to the spot welds.
1. Use the chamfering machine to remove the spot welds shown in the diagram.
- Use the drill and chamfer the spot welds not accessible with the chamfering machine.
- Use the hammer and chisel and remove the spot welds chamfered previously.
- Remove the offcuts from the vehicle.
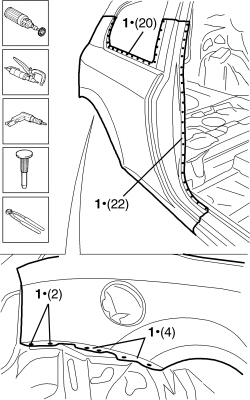
- Use a rotary brush to remove the paint to gain access to the spot welds.
1. Use the drill to remove the spot welds shown in the diagram.
- Use the hammer and chisel and remove the spot welds chamfered previously.
- Remove the offcuts from the vehicle.
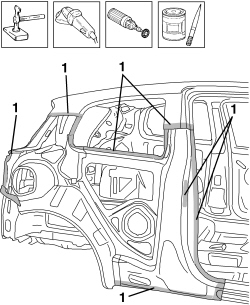
- Straighten the edges of the vehicle using a mallet and profiled block.
- Remove the spot weld residues using a disc grinder.
- Use the rotary brush to remove heat expandable sealant residues from the vehicle.
- Use a rotary brush to clean the areas treated previously.
1. Apply electro-galvanizing paint.
Refitting
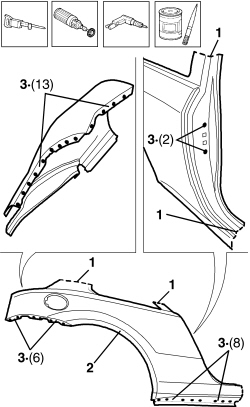
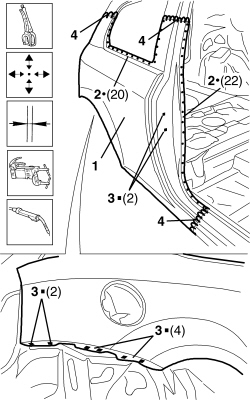
1. Work at the bench and cut the replacement wing, at the points shown in the diagram, making sure that a section of the panel remains for overlapping.
2. Remove the anti-corrosion treatment from the entire perimeter of the inside and outside of the replacement part using a rotary brush.
3. Drill out part at the points indicated.
- Apply electro-weldable paint to the edges involved.
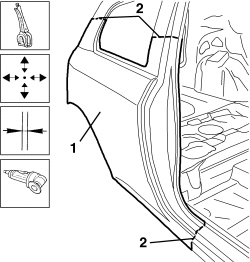
1. Position the replacement part correctly on the vehicle and secure it using self-locking clamps.
- Fit the door housing seal, striker and close the door temporarily.
- Close the boot lid temporarily.
- Check the alignment and the surrounding gaps.
2. Use the circular saw to cut the edges of the panel so that the join line is perfect.
- Remove the replacement part, the excess panels and the components used for the adjustment.
1. Apply sealant to the areas illustrated in the diagram.
1. Position the replacement part correctly on the vehicle and secure it using self-locking clamps.
- Check the alignment and the surrounding gaps.
2. Use a spot welder in the areas shown in the diagram.
3. Use a MIG welder and fill weld the openings made previously.
4. Use a MIG welder to seam weld in the join areas.
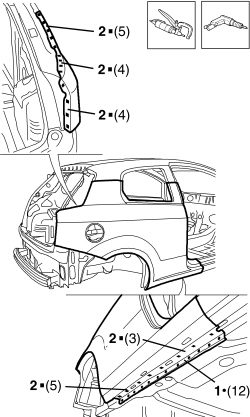
1. Use a spot welder in the areas shown in the diagram.
2. Use a MIG welder and fill weld the openings made previously.
- Correct any distortions to the panel using a mallet and dolly block.
1. Use a disc grinder to level the welds.
- Use a rotary brush to clean the areas welded previously.
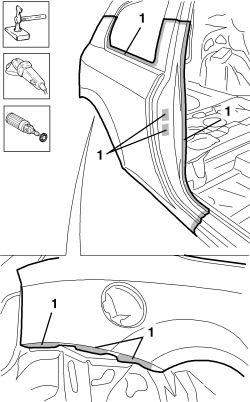
- Correct any distortions to the panel using a mallet and dolly block.
1. Use a disc grinder to level the welds.
- Use a rotary brush to clean the areas welded previously.
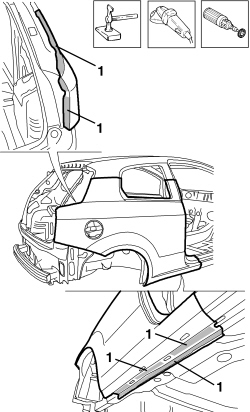
1. Apply anti-oxidant protection to the areas involved in the welding.
- Seal the join lines between the replacement part and the vehicle.
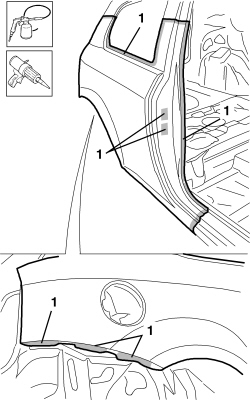
1. Apply anti-oxidant protection to the areas involved in the welding.
- Seal the join lines between the replacement part and the vehicle.
- Proceed with the painting stage.
- Apply the wax based oil protection to the inside of the rear wing.
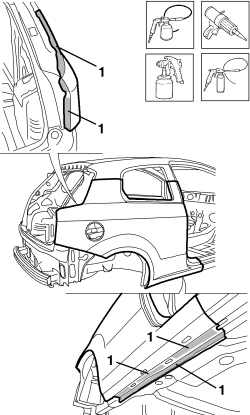
Removing
- Check that the components connected are not distorted by checking the bodyshell alignment measurements using suitable equipment (gauges, templates or jigs).
- Straighten the body as necessary.
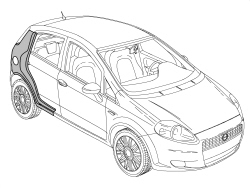
1. Use a hack sawing machine following the cutting lines shown in the diagram.
- Use a rotary brush to remove the paint to gain access to the spot welds.
2. Use the drill to remove the spot welds shown in the diagram.
- Use the hammer and chisel and remove the spot welds chamfered previously.
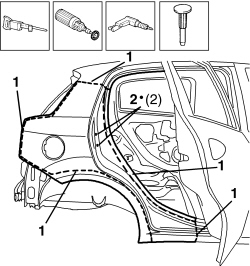
1. Use a hack sawing machine following the cutting lines shown in the diagram.
2. Remove the part from the vehicle, separating the edges joined with heat expandable sealant.
- Use a rotary brush to remove the paint to gain access to the spot welds.
3. Use the chamfering machine to remove the spot welds shown in the diagram.
- Use the drill and chamfer the spot welds not accessible with the chamfering machine.
- Use the hammer and chisel and remove the spot welds chamfered previously.
- Remove the offcuts from the vehicle.
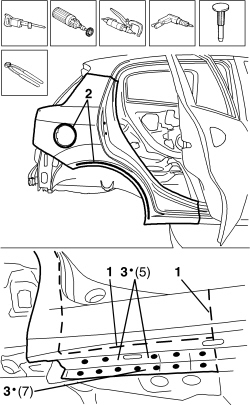
- Use a rotary brush to remove the paint to gain access to the spot welds.
1. Use the chamfering machine to remove the spot welds shown in the diagram.
- Use the drill and chamfer the spot welds not accessible with the chamfering machine.
- Use the hammer and chisel and remove the spot welds chamfered previously.
- Remove the offcuts from the vehicle.
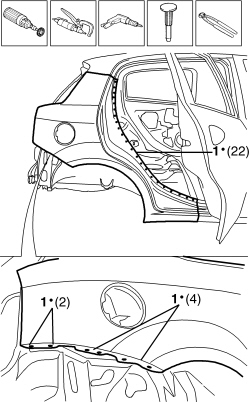
- Use a rotary brush to remove the paint to gain access to the spot welds.
1. Use the drill to remove the spot welds shown in the diagram.
- Use the hammer and chisel and remove the spot welds chamfered previously.
- Remove the offcuts from the vehicle.
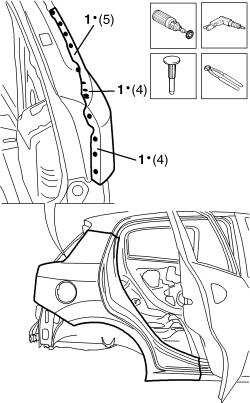
- Straighten the edges of the vehicle using a mallet and profiled block.
- Remove the spot weld residues using a disc grinder.
- Use the rotary brush to remove heat expandable sealant residues from the vehicle.
- Use a rotary brush to clean the areas treated previously.
1. Apply electro-galvanizing paint.
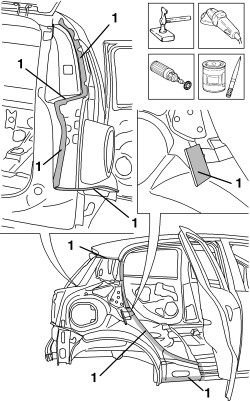
Refitting
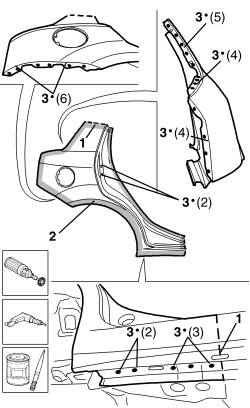
1. Work at the bench and cut the replacement wing, at the points shown in the diagram, making sure that a section of the panel remains for overlapping.
2. Remove the anti-corrosion treatment from the entire perimeter of the inside and outside of the replacement part using a rotary brush.
3. Drill out part at the points indicated.
- Apply electro-weldable paint to the edges involved.
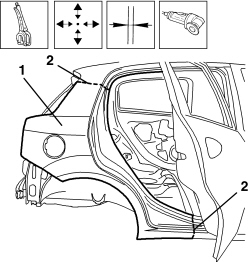
1. Position the replacement part correctly on the vehicle and secure it using self-locking clamps.
- Fit the door housing seal, striker and close the door temporarily.
- Close the boot lid temporarily.
- Check the alignment and the surrounding gaps.
2. Use the circular saw to cut the edges of the panel so that the join line is perfect.
- Remove the replacement part, the excess panels and the components used for the adjustment.
1. Apply sealant to the areas illustrated in the diagram.
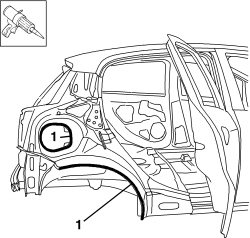
1. Position the replacement part correctly on the vehicle and secure it using self-locking clamps.
- Check the alignment and the surrounding gaps.
2. Use a spot welder in the areas shown in the diagram.
3. Use a MIG welder and fill weld the openings made previously.
4. Use a MIG welder to seam weld in the join areas.
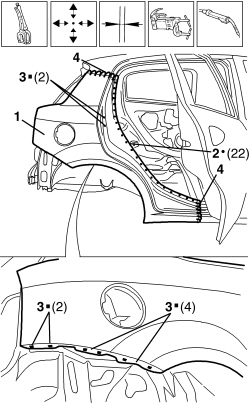
1. Use a spot welder in the areas shown in the diagram.
2. Use a MIG welder and fill weld the openings made previously.
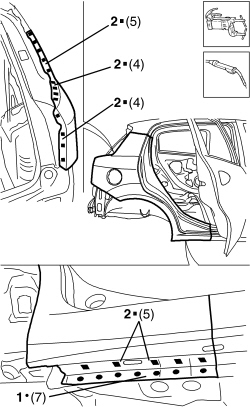
- Correct any distortions to the panel using a mallet and dolly block.
1. Use a disc grinder to level the welds.
- Use a rotary brush to clean the areas welded previously.
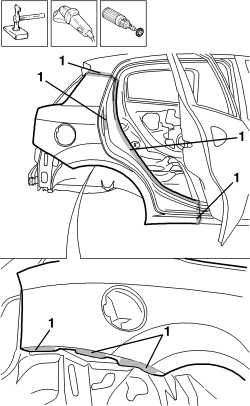
- Correct any distortions to the panel using a mallet and dolly block.
1. Use a disc grinder to level the welds.
- Use a rotary brush to clean the areas welded previously.
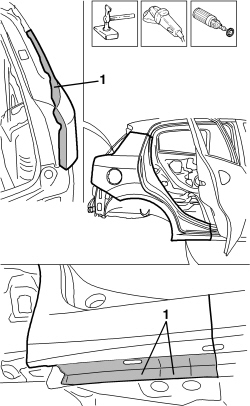
1. Apply anti-oxidant protection to the areas involved in the welding.
- Seal the join lines between the replacement part and the vehicle.
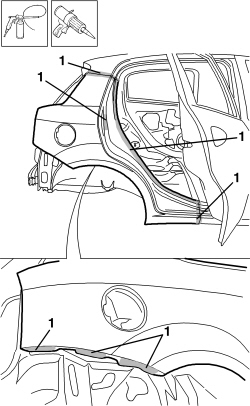
1. Apply anti-oxidant protection to the areas involved in the welding.
- Seal the join lines between the replacement part and the vehicle.
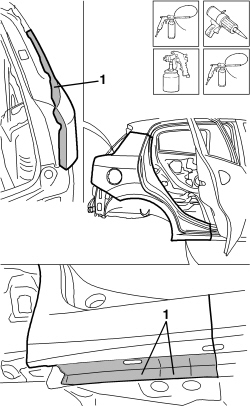
- Proceed with the painting stage.
- Apply the wax based oil protection to the inside of the rear wing.
Parts & tools for this job For 2005 Fiat Grande Punto
- TOOLTrim removal tool kitSearch: trim removal tool kit
- PARTTouch-up paintSearch: Fiat touch up paint
- PARTPanel clip assortmentSearch: Fiat panel clips assortment
Links open Amazon search results in a new tab. As an Amazon Associate I earn from qualifying purchases.