
Headlamp mounting panel
- Make
- Land Rover
- Model
- Freelander Body Repair Manual
- Year
- 1998 on
- Section
- Repairs › Headlamp mounting panel
Panel repairsHeadlamp mounting panel
HEADLAMP MOUNTING PANEL
Remove
- Disconnect battery earth lead.
- Disconnect alternator. See ELECTRICAL, Repairs.
- Disconnect all ECUs.
- Remove front bumper valance. See BODY, Exterior fittings.
- Remove front bumper armature.
- Remove radiator. See COOLING SYSTEM, Repairs.
- Remove headlamp assembly. See ELECTRICAL, Repairs.
- Release wiring to headlamp and position aside.
For LH side
- Remove front bumper LH support bracket.
- Remove battery. See ELECTRICAL, Repairs.
- Remove horn. See ELECTRICAL, Repairs.
- Remove air intake hose.
For RH side
- Remove front bumper RH support bracket.
- Remove windscreen washer reservoir. See WIPERS & WASHERS, Repairs.
- Remove PAS fluid cooler. See STEERING, Repairs.
Repair
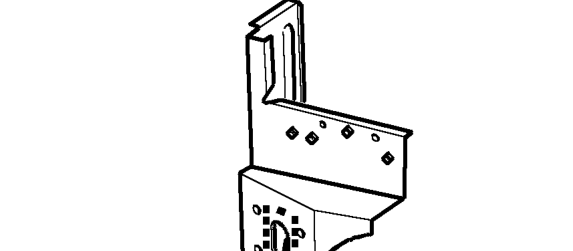
- Remove existing panel(s), prepare panel joint faces and install new panel(s) in accordance with Panel Replacement Procedure. Punch or drill holes in new panel for plug welding as shown.
Refit
For LH side
- Fit air intake hose.
- Fit horn. See ELECTRICAL, Repairs.
- Fit battery. Do not connect earth lead. See ELECTRICAL, Repairs.
- Fit front bumper LH support bracket.
For RH side
- Fit PAS fluid cooler. See STEERING, Repairs.
- Fit windscreen washer reservoir. See WIPERS & WASHERS, Repairs.
- Fit front bumper LH support bracket.
For both sides
- Fit headlamp assembly. See ELECTRICAL, Secure headlamp wiring.
Repairs.
- Fit radiator. See COOLING SYSTEM, Repairs.
- Fit front bumper armature.
- Fit front bumper valance. See BODY, Exterior fittings.
- Connect all ECUs.
- Connect alternator. See ELECTRICAL, Repairs.
- Connect battery earth lead.
Parts & tools for this job For 1998 Land Rover Freelander
- PARTReplacement bulbsSearch: Land Rover Freelander 1998 bulbs
- TOOLDigital multimeterSearch: automotive digital multimeter
Links open Amazon search results in a new tab. As an Amazon Associate I earn from qualifying purchases.