
Data
- Make
- Aston Martin
- Model
- DB7 Factory Workshop Manual Volume 2: Electrics, Body and Air Conditioning
- Year
- 1994–1998
- Section
- Repair procedures › Data
ElectricsData
Data
Torque Figures
Nut TCM to mounting bracket 2-3 Nm
Procedure
- Disconnect the battery.
- Remove the rear seat squab. Remove the rear quarter trim and the rear quarter lower trim pad.
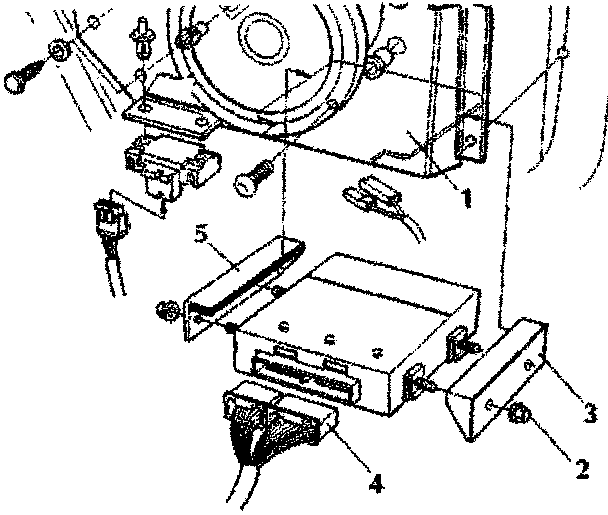
- Remove the TCM to mounting bracket securing nuts (Fig. 1-2) and remove one bracket.
- Remove the TCM and mounting bracket assembly from the body mounting bracket (Fig. 1-1).
- Disconnect the TCM multi plug (Fig. 1-4) and remove the TCM.
- Fit and align the left mounting bracket (Fig. 1-5) to the new TCM, and secure with two nuts. Connect the harness multi plug (Fig. 1-4) to the TCM. Fit the TCM and left mounting bracket assembly to the body mounting bracket (Fig. 1-1), ensure the left bracket slot is fully seated.
- Fit the right mounting bracket (Fig. 1-3) to the TCM and to the body mounting bracket. Secure with two nuts.
- Refit the rear quarter lower trim pad.
- Refit the rear quarter trim panel.
- Refit the rear seat squab.
- Reconnect the battery.
Parts & tools for this job For 1994 Aston Martin DB7
- TOOLTorque wrenchSearch: 3/8 inch torque wrench
- TOOLSocket setSearch: socket set metric
- BOOKHaynes manualSearch: Haynes manual Aston Martin DB7
Links open Amazon search results in a new tab. As an Amazon Associate I earn from qualifying purchases.