
Refit
- Make
- Rover
- Model
- Coupé, Cabriolet & Tourer 200/400 Coupé, Cabriolet & Tourer Workshop Manual
- Section
- Sun roof › Refit
BodyRefit · page 1 of 3
BODY
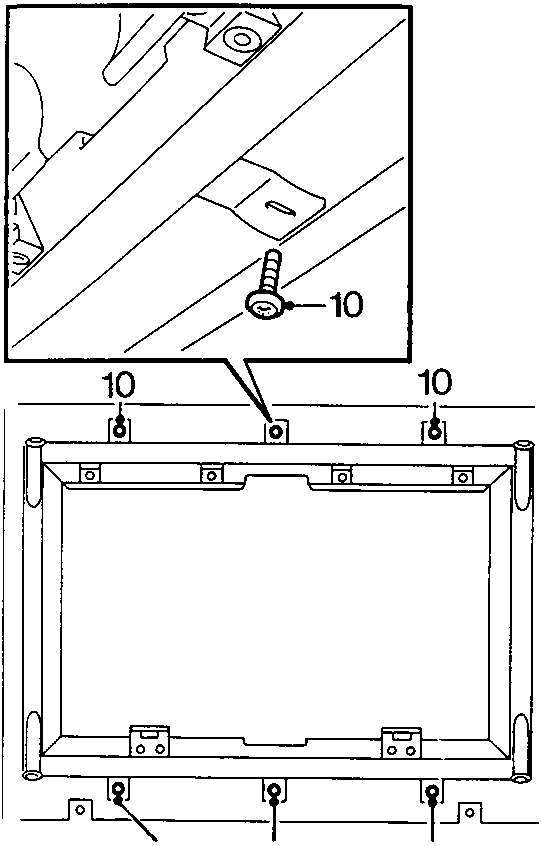
- Remove 6 screws and brackets retaining sun roof frame.
- Apply masking tape as necessary to prevent damage to paintwork as sun roof frame is removed.
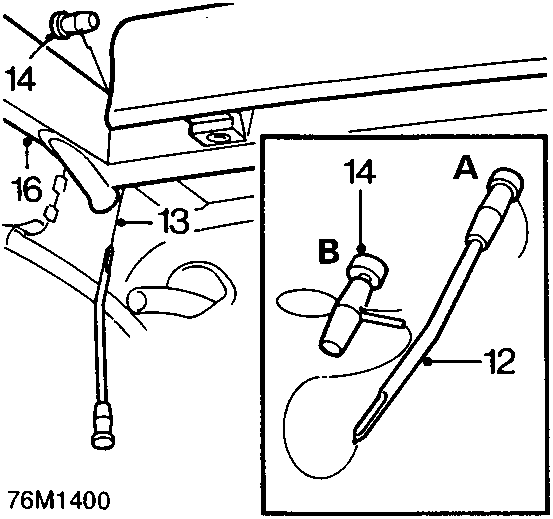
- Prepare cutting wire in handle A. Bend end of wire to handle and tape over end.
- Force cutting wire through sun roof frame seal at one corner.
- Attach handle B. Allow 200 mm of wire between handles, bend end of wire to handle and tape over end.
- Using assistance, carefully cut the sun roof frame seal.
- Using assistance, remove sun roof frame; recover cutting wire.
- Transfer components to new sun roof assembly as necessary.
- Check primary, secondary and 'T' bar seals for damage; replace as necessary.
Refit
- Carefully cut old seal on body aperture to obtain a 2 mm thick smooth surface.
- If original sun roof frame is to be refitted, repeat above procedure on frame seal.
- Apply soft soap to primary and secondary seals and fit to sun roof frame.
- Assemble 'T' bar and sun roof lids to sun roof frame, adjust position of lids as necessary to obtain equal spacing.
- Apply cleaning solvent to body aperture and outer flange of sun roof frame.
CAUTION: Do not touch cleaned or primed surfaces with fingers.
- Shake primer tin for 30 seconds. Apply a 20 mm wide coat of primer to body aperture and outer flange of sun roof frame.
- Fit pre – cut nozzle to sealer cartridge, remove lid and shake out crystals and install in applicator gun.
- Apply a continuous bead of sealer 10 mm wide x 14 mm thick around outer flange of sun roof frame.
- Attach suction cups to sun roof glass and using assistance, position sun roof frame on body aperture.
- Adjust position of sun roof frame on body aperture as necessary, remove suction cups.
- Remove protective masking tape.
- Position brackets, fit and tighten screws.
CAUTION: Hold brackets to sun roof frame whilst tightening screws.
- Remove excess sealer.
- Connect drain tubes to sun roof frame.
- Fit 'A' post trim panel.
- Fit seal to upper 'A' post and cantrail.
- Fit front headlining.
- Fit rear headlining.
CAUTION: A sealant curing time of 6 hours is desirable, during this time, leave windows open and do not slam the doors. If the car must be used, keep sun roof closed, drive slowly.
Parts & tools for this job For Rover Coupé, Cabriolet & Tourer
- TOOLTrim removal tool kitSearch: trim removal tool kit
- PARTTouch-up paintSearch: Rover touch up paint
- PARTPanel clip assortmentSearch: Rover panel clips assortment
Links open Amazon search results in a new tab. As an Amazon Associate I earn from qualifying purchases.