
Fuel delivery manifold - r r
- Make
- Alfa Romeo
- Model
- 147 Factory Service Manual
- Year
- 2000–2004
- Section
- Diesel fuel injection › Fuel delivery manifold - r r
Fuel delivery manifold - r r
Removing
- 1016A10 sound-proofing cover - r + r
- 1060F20 pressure pump/manifold pipe - r r
- 1060F36 lines to injectors - r r
Release the wiring from the clips that secure it to the fuel manifold pipe.
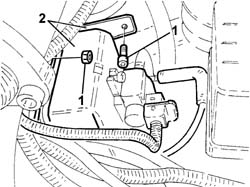
1. Unscrew the nuts and bolts retaining the vacuum tank mount to the pressure pump mount and the single fuel manifold.
2. Remove the vacuum tank with mounting bracket from the seat.
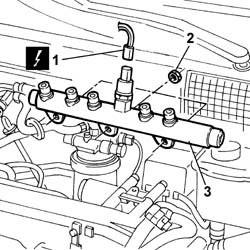
1. Disconnect the electrical connection from the fuel pressure sensor.
| Name | Connector | |
|---|---|---|
| 1 | Fuel pressure sensor | K83 |
2. Undo the bolts securing the fuel manifold to the intake manifold.
3. Remove the single fuel manifold.
Fit a new high pressure pipe from the pressure pump to the fuel manifold.
Refitting
Fit the single fuel manifold in its seat on the intake manifold.
Tighten the nuts securing the fuel manifold to torque.
| Fastening | Component | Ø | Value (daNm) | |
|---|---|---|---|---|
| Nut | INJECTOR FUEL MANIFOLD (DIESEL) | M8 | 2.5 |
Connect the electrical connection to the fuel pressure senor.
| Name | Connector | |
|---|---|---|
| Fuel pressure sensor | K83 |
Secure the vacuum tank mount to the pressure pump mount and crankcase.
Secure the injection wiring to the manifold pipe using new collars.
- 1060F36 lines to injectors - r r
- 1060F20 pressure pump/manifold pipe - r r
- 1016A10 sound-proofing cover - r + r
Removing
Proceed with removal - 1016A10 sound-proofing cover - r + r.
Ensure that the ignition key is in the OFF position, then disconnect the negative battery terminal (-).
| Name | Connector | |
|---|---|---|
| Battery | A1B |
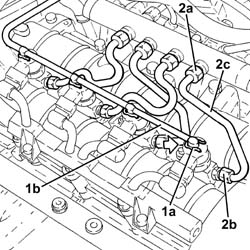
1. Push clips (1a) by hand and disconnect the pipe from the injectors to the fuel recovery manifold (1b), injectors side and move it aside.
2. Undo the connectors (2a), (2b) and remove the pipe from the fuel manifold to the injectors (2c).
Use new pipes from from fuel manifold to injectors upon reassembly.
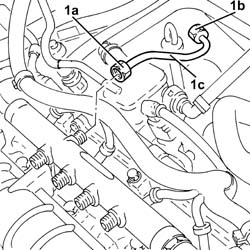
1. Undo the connectors (1a), (1b) and remove the pipe from the pressure pump to the fuel manifold (1c).
When refitting, fit a new pipe from the pressure pump to the fuel manifold.
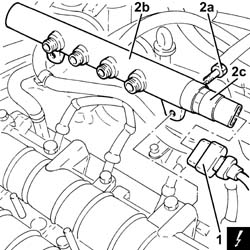
1. Disconnect the electrical connection from the fuel pressure sensor.
| Name | Connector | |
|---|---|---|
| 1 | Fuel pressure sensor | K83 |
2. Undo the bolts (2a) and remove the single fuel manifold pipe (2b) complete with fuel pressure sensor (2c).
Refitting
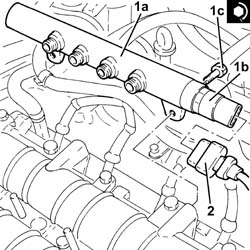
1. Place the single fuel manifold pipe (1a), complete with fuel pressure sensor (1b), back in its housing and secure it tightening the bolts (1c) to the recommended torque.
| Fastening | Component | Ø | Value (daNm) | |
|---|---|---|---|---|
| 1c | Bolt | INJECTOR FUEL MANIFOLD (DIESEL) | M8 | (Camshaft housing side 23 28 |
2. Connect the electrical connection to the fuel pressure sensor.
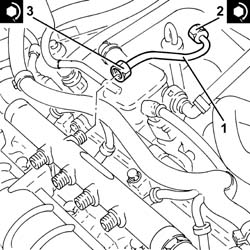
1. Place the pipe from the pressure pump to the single fuel manifold back in its housing and fix it using the connectors without tightening them.
2. Tighten the connector for the pipe from the pressure pump to the single fuel manifold, pump side, to the recommended torque using a suitable spanner.
| Fastening | Component | Ø | Value (daNm) | |
|---|---|---|---|---|
| 2 | Connector | PRESSURE PUMP LINE TO FUEL MANIFOLD | M14 | (Pressure pump side 22 24 |
3. Tighten the connector for the pipe from the pressure pump to the single fuel manifold, fuel manifold side, to the recommended torque using a suitable spanner.
| Fastening | Component | Ø | Value (daNm) | |
|---|---|---|---|---|
| 3 | Connector | PRESSURE PUMP LINE TO FUEL MANIFOLD | M14 | (Fuel manifold side 22 24 |
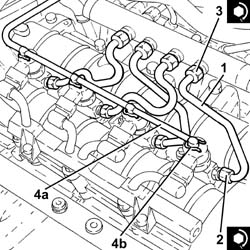
1. Fit the new pipes from the fuel manifold to the injectors and secure them using the connectors without tightening them.
2. Tighten the connectors for the pipes from the fuel manifold to the injectors, injector side, to the recommended torque using a suitable spanner.
| Fastening | Component | Ø | Value (daNm) | |
|---|---|---|---|---|
| 2 | Connector | FUEL MANIFOLD LINE TO INJECTORS | M12 | (Injector side) 2.2 ÷ 2.4 |
3. Tighten the connectors for the pipes between the fuel manifold and the injectors, fuel manifold side, to the recommended torque using a suitable spanner.
| Fastening | Component | Ø | Value (daNm) | |
|---|---|---|---|---|
| 3 | Connector | FUEL MANIFOLD LINE TO INJECTORS | M12 | Fuel manifold side 22 24 |
Clean the threaded seats for the above-mentioned pipe on the manifold and the injectors using heptane.
4. Connect the pipe from the injectors to the fuel recovery manifold (4a) to the injectors pushing it until the clips (4b) can be heard clicking into place.
Connect the negative (-) battery terminal
Proceed with refitting - 1016A10 sound-proofing cover - r + r.
Parts & tools for this job For 2000 Alfa Romeo 147
- PARTFuel filterSearch: Alfa Romeo 147 2000 fuel filter
- TOOLFuel pressure test kitSearch: fuel pressure test kit
- TOOLFuel line disconnect toolSearch: fuel line disconnect tool
Links open Amazon search results in a new tab. As an Amazon Associate I earn from qualifying purchases.