
Electro-pneumatically controlled THROTTLE CASING - R.R.
- Make
- Alfa Romeo
- Model
- 147 Factory Service Manual
- Year
- 2000–2004
- Section
- Diesel fuel injection › Electro-pneumatically controlled THROTTLE CASING - R.R.
Electro-pneumatically controlled THROTTLE CASING - R.R.
Removing
- 1016A10 sound-proofing cover - r + r
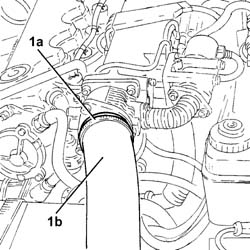
1. Loosen band (1a) and disconnect the air delivery sleeve from heat exchanger to intake manifold.
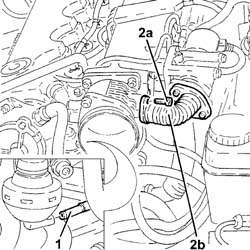
1. Disconnect the vacuum pipe from the pneumatic valve on the throttle body.
2. Undo bolts (2a) and disconnect the expansion coupling on EGR valve (2b) from the throttle body.
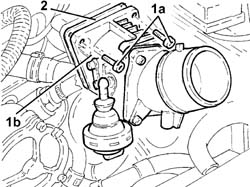
Release the vacuum pipe leading from the throttle body from the bracket.
1. Undo the retaining bolts (1a) and remove the throttle casing (1b).
2. Remove the gasket.
Refitting
Fit the throttle body to the intake manifold and gasket.
Tighten the bolts retaining the throttle casing to the intake manifold.
Connect the vacuum pipe to the mount bracket.
Connect the expansion joint to the throttle body and tighten the retaining bolts.
Connect the vacuum pipe to the pneumatic valve on the throttle body.
Conect the air supply hose from the heat exchanger to the inlet manifold.
- 1016A10 sound-proofing cover - r + r
Removing
Proceed with removal - 7025A12 Engine front sound insulation COVER - R.R..
Proceed with removal - 7025A14 Bonnet LID - R.R..
Proceed with removal - 1016A10 sound-proofing cover - r + r.
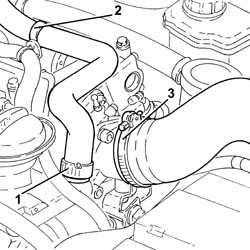
1. Loosen the band and disconnect the engine oil vapour recovery pipe from the engine oil filler.
2. Release the engine oil vapour recovery pipe from the fastening band and move it sideways.
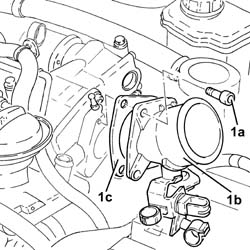
3. Loosen the band and disconnect the air intake hose from the connector on the throttle casing.
1. Undo the bolts (1a) and remove the connector on the throttle casing (1b) complete with gasket.
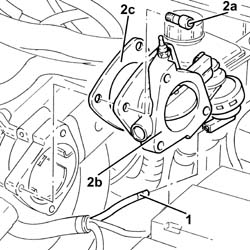
1. Disconnect the vacuum pipe from the pneumatic valve on the throttle body.
2. Undo the bolts (2a) and remove the electro-pneumatically controlled throttle casing (2b) complete with gasket (2c).
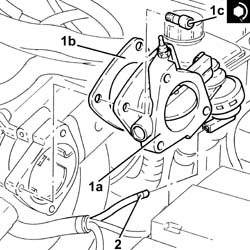
Refitting
1. Replace the pneumatically-controlled throttle body (1a), complete with gasket (1b), back in its housing and secure by tightening bolts (1c) to the recommended torque.
| Fastening | Component | Ø | Value (daNm) | |
|---|---|---|---|---|
| 1c |
2. Connect the vacuum pipe to the pneumatic valve on the throttle body.
1. Replace the connector on the throttle body (1a), complete with gasket (1b), back in its housing and secure by tightening bolts (1c) to the recommended torque.
| Fastening | Component | Ø | Value (daNm) | |
|---|---|---|---|---|
| 1c |
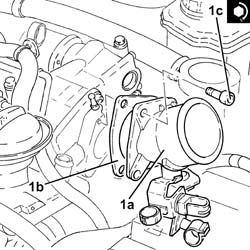
Connect the air inlet hose to the connector on the throttle casing and tighten the band.
Place the engine oil vapour recovery pipe in its seat and secure it using the band.
Connect the engine oil vapour recovery pipe to the engine oil filler and tighten the band.
Proceed with refitting - 1016A10 sound-proofing cover - r + r.
Proceed with refitting - 7025A14 Bonnet LID - R.R..
Proceed with refitting - 7025A12 Engine front sound insulation COVER - R.R..
Parts & tools for this job For 2000 Alfa Romeo 147
- PARTGlow plugsSearch: Alfa Romeo 147 2000 glow plugs
- TOOLGlow plug socketSearch: glow plug socket
- TOOLDiesel compression testerSearch: diesel compression tester
Links open Amazon search results in a new tab. As an Amazon Associate I earn from qualifying purchases.