
Compressor - ’l’ series
- Make
- Rover
- Model
- 400 Workshop Manual
- Year
- 1995–2000
- Section
- Repairs › Compressor - ’l’ series
Air conditioningCompressor - ’l’ series
Refit
- Clean air conditioning pipe connections.
- Lubricate new ’O’ rings with refrigerant oil and fit to adaptors.
- Remove caps from new evaporator and fit to old evaporator.
- Fit new seal to sides and top of evaporator
- Fit expansion valve to evaporator and tighten screws to 9 Nm.
- Fit adaptor to expansion valve and tighten screw to 9 Nm.
- Locate evaporator in lower casing.
- Insert temperature sensor probe 30mm into vanes at centre of evaporator.
- Fit upper casing and engage flange of of lower casing, secure with screws and clips.
- Insert air intake filter into casing.
- Fit lid to casing.
- Fit seal to expansion valve.
- Insert drain tube grommet into body aperture and lubricate drain tube with rubber lubricant.
- Using assistance, hold pipe flange clear as evaporator is fitted.
- Manoeuvre evaporator into place between heater casings. Push drain tube fully into grommet.
- Fit nut to upper casing and screw to lower casing securing casing to body. Fit remaining screws securing casing to heater, tighten nut and screws to 10 Nm.
- Connect Lucars to evaporator thermistat.
- Fit fascia lower rail, tighten screws to 10 Nm.
- Fit glovebox, tighten screws to 10 Nm.
- Engage pipe flange in evaporator adaptor, tighten bolt to 10 Nm.
- LH drive: Connect pipes to bracket, tighten screws to 10 Nm.
- Replace receiver drier. See this section.
- Recharge air conditioning system. See Adjustments.
COMPRESSOR - ’L’ SERIES
Service repair no - 82.10.20
Remove
- Recover refrigerant from air conditioning system. See Adjustments.
- Raise front of vehicle.
WARNING: Support on safety stands.
- Remove alternator. See ELECTRICAL, Repairs.
- Position container to catch PAS fluid.
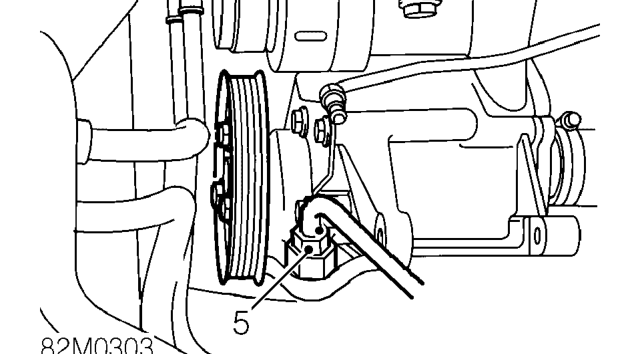
- Disconnect PAS pipe from union on PAS pump.
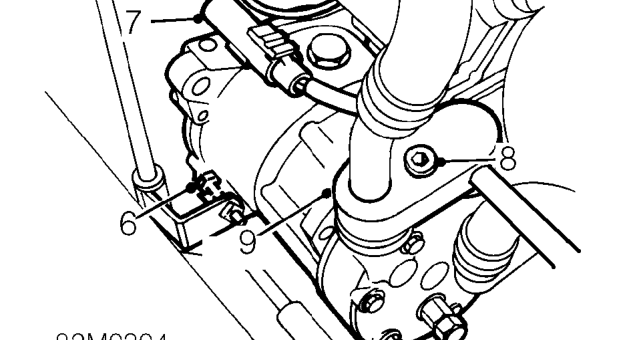
- Remove bolt securing PAS pipe bracket to A/C compressor. Allow pipe to freely hang beneath vehicle.
- Disconnect multiplug from air conditioning compressor.
- Remove bolt securing air conditioning pipe union to compressor.
- Release air conditioning pipe union from compressor.
Parts & tools for this job For 1995 Rover 400
- TOOLA/C manifold gauge setSearch: AC manifold gauge set
- TOOLUV leak detection kitSearch: AC UV leak detection kit
- PARTCabin filterSearch: Rover 400 1995 cabin filter
Links open Amazon search results in a new tab. As an Amazon Associate I earn from qualifying purchases.