
Gearbox - ’t’ series (page 5 of 5)
- Make
- Rover
- Model
- 400 Workshop Manual
- Year
- 1995–2000
- Section
- Repairs
Manual gearbox - PG1Gearbox - ’t’ series · page 5 of 5
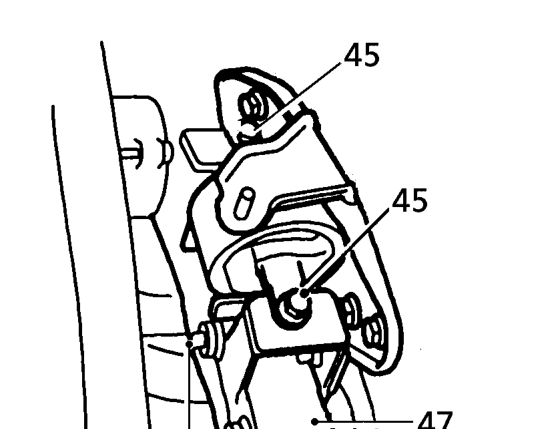
- Remove 2 bolts securing mounting bracket to gearbox.
- Lower engine on jack and remove 2 bolts securing mounting bracket to gearbox.
- Remove mounting bracket from gearbox.
- Attach hook of crane to gearbox lifting eye and support weight of gearbox.
- Remove 3 remaining bolts securing gearbox to adaptor plate.
- Release gearbox from locating dowels.
- Lower crane to release gearbox from engine compartment.
- Release hook of crane from gearbox lifting eye.
- Remove gearbox from beneath vehicle.
- Remove bolt securing lifting eye to gearbox, remove lifting eye and refit bolt.
Refit
- Clean mating faces of gearbox and gearbox adaptor plate; ensure locating dowels are fitted.
- Clean gearbox input shaft and clutch drive plate splines.
- Remove bolt securing gear case to differential housing, position lifting eye, fit and tighten bolt.
- Position gearbox beneath vehicle.
- Attach hook of crane to lifting eye and raise gearbox until aligned with engine.
- Locate gearbox input shaft to clutch and align locating dowels to adaptor plate.
- Fit uppermost bolt securing gearbox to engine and tighten to 83 Nm.
- Fit bolt securing gearbox to adaptor plate located alongside upper coil mounting bracket bolt and tighten to 45 Nm .
- Fit rear lower gearbox to adaptor plate bolt and tighten to 83 Nm.
- Detach crane hook from lifting eye and remove crane.
- Fit mounting bracket to gearbox, fit bolts and tighten to 60 Nm.
- Raise engine on jack and align engine LH mounting.
- Fit bolts securing engine LH mounting and tighten to 45 Nm.
- Remove bolt securing gear case to differential housing, position suitable lifting eye, refit bolt and tighten to 24 Nm.
- Fit clutch slave cylinder mounting bracket to gearbox, fit bolts and tighten nuts to 70 Nm.
- Remove jack from beneath engine.
- Clean LH drive shaft end and differential oil seal.
CAUTION: If a gearbox with modified type differential oil seals is to be fitted to a vehicle that has early type drive shafts, the differetial oil seals MUST be replaced with early type oil seals.
- Fit NEW circlip to groove in drive shaft and lubricate oil seal running surfaces.
- Ensuring drive shaft is kept horizontal, insert drive shaft through the seal protector until the drive shaft begins to engage the differential splines.
- Remove seal protector by pulling carefully on the seal protector tail.
- Push drive shaft fully home until circlip locks in differential groove. Pull on inner housing to ensure circlip is fully engaged.
- Clean ball joint and engage ball joint to lower arm, tighten nut to 50 Nm and fit NEW split pin.
NOTE: If necessary, tighten nut only to align next split pin hole.
- Fit damper fork over lower arm then align to damper.
- Fit clamp bolt and tighten to 43 Nm.
- Fit bolt and nut securing fork to lower arm but DO NOT tighten.
NOTE: Bolt to be tightened with vehicle weight on damper.
- Repeat above operations 17 to 25 and fit RH drive shaft.
- Fit flat washer to steady bar fixture.
- Position steady bar and selector rod, align holes.
- Fit selector rod roll pin and fit retaining clip.
- Fit steady bar dished washer, fit bolt and tighten to 10 Nm.
Parts & tools for this job For 1995 Rover 400
- PARTClutch kitSearch: Rover 400 1995 clutch kit
- TOOLClutch alignment toolSearch: clutch alignment tool
- FLUIDGear oilSearch: Rover 400 manual gearbox oil
Links open Amazon search results in a new tab. As an Amazon Associate I earn from qualifying purchases.