
Selector shaft oil seal - ’t’ series
- Make
- Rover
- Model
- 400 Workshop Manual
- Year
- 1995–2000
- Section
- Repairs › Selector shaft oil seal - ’t’ series
Manual gearbox - PG1Selector shaft oil seal - ’t’ series
- Fit anti-beaming bracket, fit bolts and tighten to; Gearbox bolts = 60 Nm Engine bolt = 45 Nm.
- Align coolant rail support bracket to exhaust manifold, fit bolt and tighten to 45 Nm.
- Align coolant rail to cylinder head, fit bolt and tighten to 25 Nm.
- Connect multiplug to speed sensor.
- Secure coolant hose to engine LH mounting bracket.
- Position earth leads to bolt and tighten bolt to gearbox.
- Connect reverse lamp switch leads.
- Clean clutch release lever and clutch slave cylinder.
- Fit clutch slave cylinder to clutch release lever.
- Locate clutch slave cylinder on gearbox mounting bracket and secure with locking collar.
- Secure clutch hydraulic pipe to clip on harness.
- Secure clutch hydraulic pipe to slave cylinder mounting bracket clip.
- Position battery tray mounting bracket and connect vacuum hose to cruise control vacuum control unit.
- Connect multiplugs to dim dip resistor and cruise control vacuum control unit.
- Position battery tray mounting bracket to fixings, do not tighten at this stage.
- Position air intake hose to battery tray mounting bracket and secure with bolt.
- Position battery tray to mounting bracket.
- Fit bolts and nut securing battery tray to mounting bracket and engine LH mounting.
- Tighten 2 bolts securing battery tray mounting bracket to body 9 Nm.
- Fit starter motor. See ELECTRICAL, Repairs.
- Fit exhaust front pipe. See MANIFOLD & EXHAUST SYSTEMS, Repairs.
- Fit underbelly panel. See BODY, Exterior fittings.
- Fit road wheel(s) and tighten nuts to correct torque. See INFORMATION, Torque wrench settings.
- Remove stand(s) and lower vehicle.
- Tighten bolt and nut securing fork to lower arm to 64 Nm.
- Refill gearbox oil. See Adjustments.
SELECTOR SHAFT OIL SEAL - ’T’ SERIES
Service repair no - 37.23.10
Remove
- Raise front of vehicle.
WARNING: Support on safety stands.
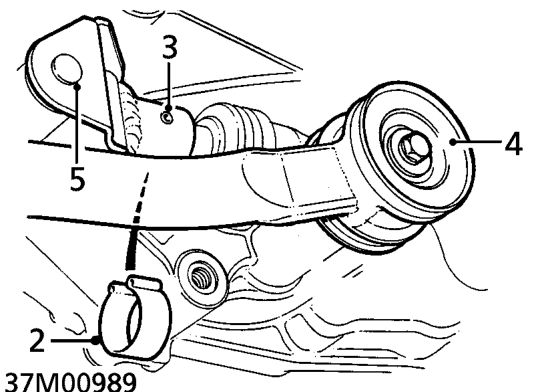
- Remove clip retaining selector rod roll pin.
- Using a suitable punch, drive out selector rod roll pin.
- Remove bolt and disconnect gear change steady bar and collect 2 washers.
- Release selector rod from selector shaft.
Parts & tools for this job For 1995 Rover 400
- PARTOil filterSearch: Rover 400 1995 oil filter
- TOOLOil filter wrenchSearch: oil filter wrench
- FLUIDEngine oilSearch: Rover 400 engine oil
Links open Amazon search results in a new tab. As an Amazon Associate I earn from qualifying purchases.