
Refit
- Make
- Rover
- Model
- Coupé, Cabriolet & Tourer 200/400 Coupé, Cabriolet & Tourer Workshop Manual
- Section
- Repairs › Refit
Engine 1.6Refit
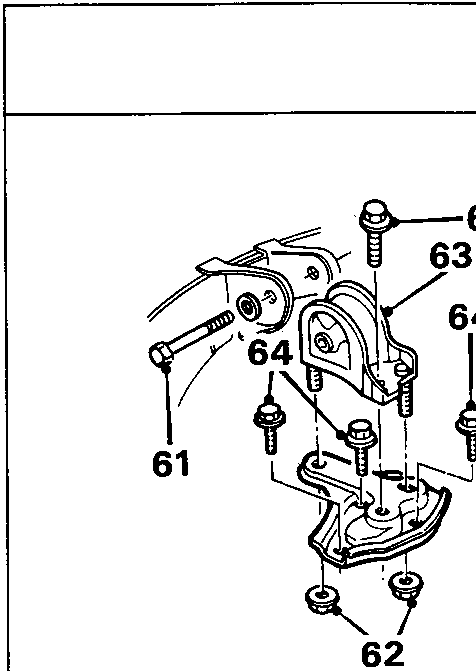
- Remove through bolt, R.H. mounting to body.
- Remove 1 bolt and 2 nuts, R.H. mounting to mounting plate.
- Remove R.H. mounting.
- Remove 3 bolts mounting plate to gearbox and remove mounting plate.
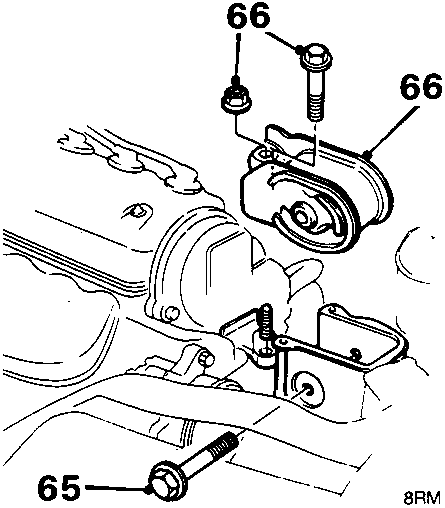
- Remove through bolt, L.H. engine mounting to body.
- Remove 1 bolt and 1 nut, L.H. mounting bracket to cylinder block and remove mounting.
- Raise engine and gearbox 100 mm, check that all components are disconnected and lift clear of engine compartment.
CAUTION: Ensure lifting chains do not contact camshaft cover.
Refit
- Attach lifting chains to engine and gearbox brackets, lower engine and gearbox into position ensuring that front mounting bracket is aligned to gearbox.
CAUTION: Ensure lifting chains do not contact camshaft cover.
- Fit L.H. mounting tighten bolts to 39 Nm. Fit through bolt and washer, do not tighten.
- Align front mounting bracket to gearbox; tighten bolts to 55 Nm. Fit NEW through bolt and washer, do not tighten.
- Fit R.H. mounting plate, tighten bolts 55 Nm. Fit through bolt and washer, do not tighten.
- Align rear mounting bracket to gearbox; tighten bolts to 55 Nm. Fit NEW through bolt, do not tighten.
- Finally tighten mounting through bolts in sequence as follows:
Rear mounting through bolt 60 Nm.
Front mounting through bolt 60 Nm.
R.H. mounting through bolt 60 Nm.
L.H. mounting through bolt 55 Nm. - Disconnect lifting chains from brackets.
- Remove engine lifting bracket and spacer.
- Connect R.H. drive shaft to differential, see MANUAL GEARBOX. – 1.6 – Differential oil seal – R.H.
- Connect L.H. drive shaft to intermediate shaft, see MANUAL GEARBOX. – 1.6 – Differential oil seal – L.H.
- Fit starter motor, see ELECTRICAL – Repairs.
- Connect L.H. engine harness at multiplugs.
- Secure engine harness multiplugs to brackets.
- Connect vacuum pipes to inlet manifold.
- Connect brake servo vacuum hose to pipe.
- Air conditioning: Secure pipe to clip.
- Connect gear change steady bar and selector rod; tighten bolt to 35 Nm.
- Align pin holes and fit roll pin to retain selector rod.
- Secure roll pin with spring clip and fit gaiter.
- Fit front exhaust pipe, see MANIFOLD & EXHAUST – Repairs.
- Connect clutch cable to release lever, see CLUTCH – Clutch Cable – 1.6.
- Connect reverse lamp leads at snap connectors.
- Connect speedometer cable to gearbox, secure retaining clip by rotating gaiter.
- Connect heater hoses to engine, tighten clips.
- Connect coolant hoses to engine, tighten clips.
Air conditioning
- Locate compressor and fit securing bolts, tighten to 25 Nm.
- Fit and tension compressor drive belt, see MAINTENANCE.
Power steering
- Locate power steering pump and fit securing bolts, tighten to 35 Nm.
- Locate power steering hose in clip.
- Position power steering pipe clamp: tighten bolt to 15 Nm.
Parts & tools for this job For Rover Coupé, Cabriolet & Tourer
- PARTEngine gasket setSearch: Rover Coupé, Cabriolet & Tourer engine gasket set
- TOOLTorque wrenchSearch: 3/8 inch torque wrench
- TOOLFeeler gauge setSearch: feeler gauge set
Links open Amazon search results in a new tab. As an Amazon Associate I earn from qualifying purchases.