
Power steering rack - ’k’ series
- Make
- Rover
- Model
- 200 Workshop Manual
- Year
- 1995–1999
- Section
- Repairs › Power steering rack - ’k’ series
SteeringPower steering rack - ’k’ series · page 1 of 3
Refit
- Ensure body aperture seal is seated correctly in rear beam.
- Feed rack into passenger side first, then manoeuvre pinion end into position.
CAUTION: Ensure slot in aperture seal is located to tab on pinion housing.
- Raise rack and locate pinion through body aperture.
CAUTION: Take care not to dislodge aperture seal.
- Align rack and loosely fit flange bolts securing rack to rear beam. DO NOT tighten.
- Fit steering rack clamp and rubber, fit bolts and tighten to 38 Nm.
- Tighten flange bolts securing steering rack to rear beam to 58 Nm.
- Position engine steady bar mounting bracket to rear beam and tighten bolts to 60 Nm.
- Fit engine steady bar. See ENGINE - ’K8’, Repairs.
- Clean gear selector linkage and gear selector linkage ball joints.
- Using tool 18G 1594 connect gear selector linkage ball joint to gear selector lever.
- Using tool 18G 1594 connect gear change linkage ball joint to gear change lever.
- Position each locknut on track rods with same amount of thread exposed as noted during removal.
- Centralise steering rack and screw both track rod ends up to locknuts, with ball pins facing upwards.
- Connect track rod ends and tighten NEW nuts to 45 Nm.
- Fit road wheel(s) and tighten nuts to correct torque. See INFORMATION, Torque wrench settings.
- Remove stand(s) and lower vehicle.
- Connect column universal joint ensuring bolts are located in grooves. Tighten bolts to 28 Nm.
- Fit universal joint cover and secure with studs and clips.
- Reposition drivers footwell carpet.
- Check and adjust front wheel alignment. See Adjustments.
POWER STEERING RACK - ’K’ SERIES
Service repair no - 57.10.01
Remove
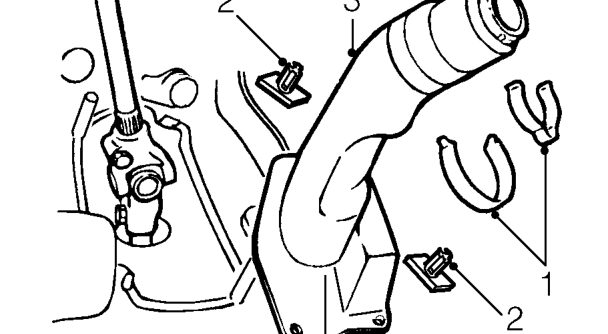
- Remove 2 clips securing column universal joint cover.
- Pull back drivers footwell carpet and remove 2 studs securing cover to floor.
- Remove cover.
- Align road wheels to straight ahead position and remove starter key from steering lock.
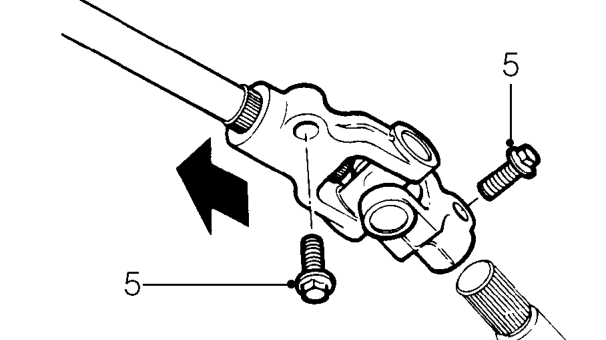
- Remove 2 bolts securing column universal joint. Slide joint up column and disconnect from steering rack pinion shaft.
- Raise front of vehicle.
WARNING: Support on safety stands.
- Remove road wheel(s).
Parts & tools for this job For 1995 Rover 200
- TOOLTie rod end toolSearch: tie rod end puller
- TOOLBall joint separatorSearch: ball joint separator
- FLUIDPower steering fluidSearch: Rover power steering fluid
Links open Amazon search results in a new tab. As an Amazon Associate I earn from qualifying purchases.