
Fluid cooler - ’l’ series
- Make
- Rover
- Model
- 400 Workshop Manual
- Year
- 1995–2000
- Section
- Repairs › Fluid cooler - ’l’ series
SteeringFluid cooler - ’l’ series · page 1 of 2
Refit
- Wipe pulley and mounting bracket clean.
- Remove plugs from new pump and fit to old. Hold pump in vice with soft jaws.
CAUTION: Take care not to damage pump housing.
- Fit pulley to pump and use extension bar to hold pulley against rotation, tighten LH THREAD nut to 64 Nm.
- Remove pump from vice.
- Position pump to mounting bracket, fit bolts but DO NOT TIGHTEN.
- Fit adjusting bolt, engage pump.
- Fit NEW ’O’ ring to feed pipe adaptor and lubricate with steering fluid.
- Connect feed pipe adaptor to pump, tighten bolts to 11 Nm.
- Connect return suction hose to pump and fit clip.
- Fill power steering reservoir to ’MAX’ mark. See INFORMATION, Capacities, fluids and lubricants.
- Remove drain tray.
- Fit power steering pump drive belt. See this section.
- Adjust drive belt tension. See Adjustments.
CAUTION: Ensure steering reservoir fluid level is kept above ’MIN’ mark.
- Bleed power steering system. See Adjustments.
FLUID COOLER - ’L’ SERIES
Service repair no - 57.15.11
Remove
- Remove underbelly panel. See BODY, Exterior fittings.
- Remove front bumper. See BODY, Exterior fittings.
- Position drain tray below fluid cooler.
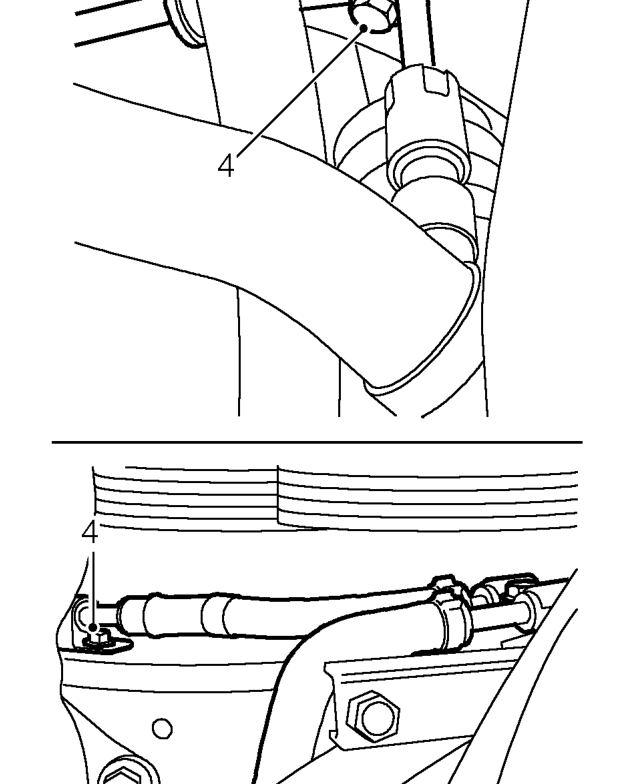
- Remove 2 bolts securing fluid cooler pipe clips to valance.
Parts & tools for this job For 1995 Rover 400
- TOOLTie rod end toolSearch: tie rod end puller
- TOOLBall joint separatorSearch: ball joint separator
- FLUIDPower steering fluidSearch: Rover power steering fluid
Links open Amazon search results in a new tab. As an Amazon Associate I earn from qualifying purchases.