
Fuel tank - r + r and decant fuel
- Make
- Fiat
- Model
- 500 Factory Service Manual
- Year
- 2007–2024
- Section
- Fuel tank and pipes › Fuel tank - r + r and decant fuel
FUEL TANK - R + R AND DECANT FUEL
Removing
- Position the vehicle on a lift.
- Disconnect the negative battery terminal.
| Description | Connector | |
|---|---|---|
| Battery | See A001 BATTERY |
Op. 7050A20 ONE-PIECE REAR SEAT CUSHION - R.R.
Op. 4450B08 RIGHT REAR WHEEL - R.R
Op. 7055B48 REAR WHEEL ARCH LINER (ONE), LEFT OR RIGHT - R.R.
Op. 1076B20 REAR EXHAUST SILENCER - R + R
Op. 1076B40 CENTRE EXHAUST PIPE - R.R.
Op. 1040E22 FUEL PIPE PROTECTION - R.R
Op. 1040E20 FUEL FILLER PIPE PROTECTION - ARRANGE
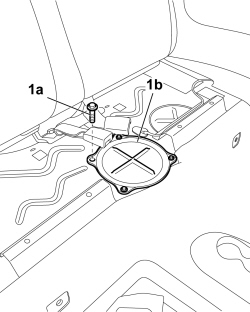
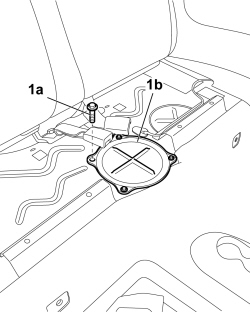
1. Undo the fixing bolts (1a) and remove the fuel pump cover (1b).
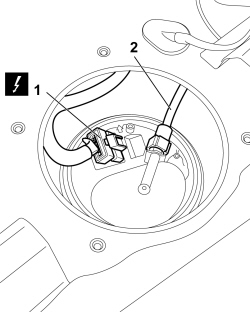
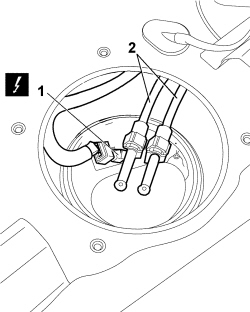
1. Disconnect the electrical connection for the fuel pump.
| Description | Connector | |
|---|---|---|
| 1 | Fuel pump and level gauge | See N040 FUEL PUMP AND LEVEL GAUGE |
2. Disconnect the fuel delivery pipe.
Seal the pipe to prevent fuel leaks.
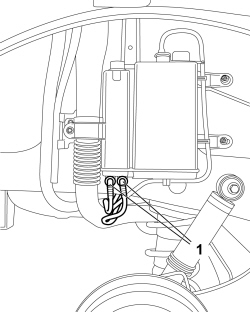
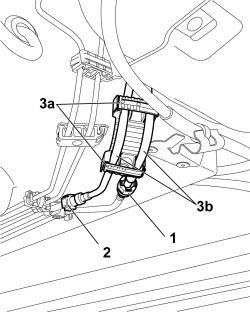
1. Adjust the rapid connectors and disconnect the evaporation control system pipes, active charcoal filter side.
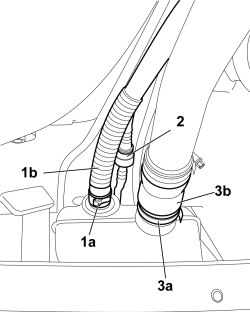
1. Open the retaining band (1a) and disconnect the reflux pipe (1b), fuel tank side.
2. Adjust the rapid connector and disconnect the intermediate pipe for the evaporation control system for the section from the active charcoal filter to the fuel vapour flow enablement solenoid valve.
3. Open the retaining band (3a) and disconnect the hose (3b) between the fuel filler and the tank, tank side.
1. Adjust the rapid connector and disconnect the intermediate pipe for the evaporation control system for the section from the active charcoal filter to the fuel vapour flow enablement solenoid valve.
2. Adjust the rapid connector and disconnect the fuel supply pipe.
3. Open the retaining bands (3a) and release the wiring (3b).
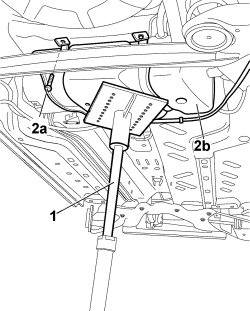
1. Position a hydraulic lift fitted with a support suitable for supporting the fuel tank.
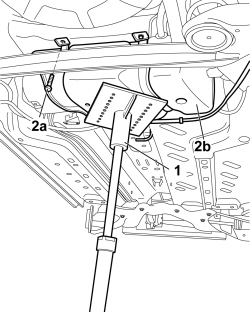
2. Undo the fixing bolts (2a) and remove the fuel tank (2b) from the housing.
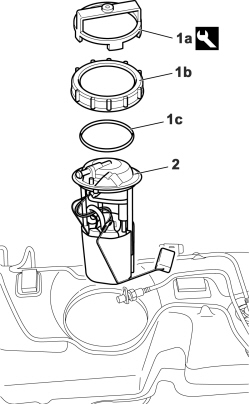
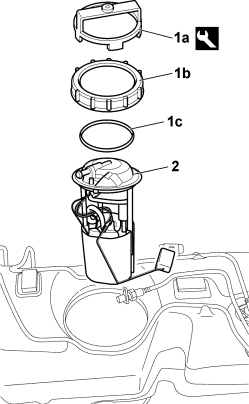
1. At the bench, undo the ring nut (1b) using the tool and keep the seal (1c).
| Tool | Description | Function | Validity |
|---|---|---|---|
| 1.870.736.000 | Spanner | Removing-refitting submerged pump | all versions |
2. Remove the fuel pump from its seat.
Position a suitable container for collecting the fuel contained in the submerged pump assembly.
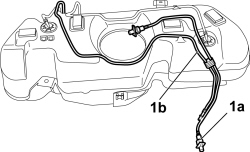
1. Release the fuel supply pipe (1a) and the intermediate section (1b) of the evaporation control system pipe from the retaining bands.
- Proceed with transferring the fuel using suitable equipment.
Refitting
- Check that the fuel supply pipes and the evaporation control system are not damaged. If they are, replace them.
- Secure the fuel supply pipe and the intermediate section of the evaporation control system pipe to the retaining bands.
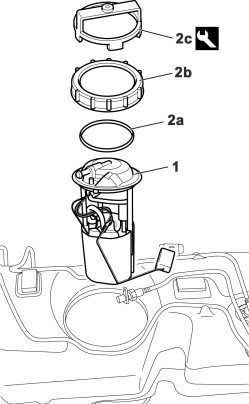
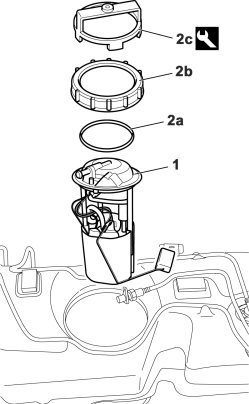
1. Place the fuel pump in position.
2. Fit a new seal (2a) and tightenn the ring nut (2b) using the tool (2c).
| Tool | Description | Function | Validity |
|---|---|---|---|
| 1.870.736.000 | Spanner | Removing-refitting submerged pump | all versions |
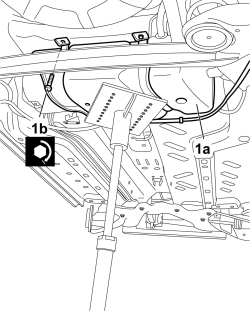
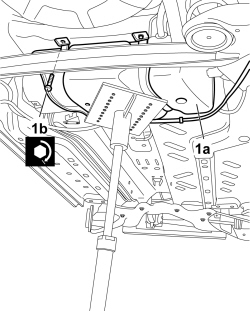
1. Fit the fuel tank (1a) in place and tighten the fixing bolts (1b) to the recommended torque.
| Component | Fastening | dia | Value (daNm) | Validity |
|---|---|---|---|---|
| Fuel tank (on body) | Bolt | M8 | 3.5 | all versions |
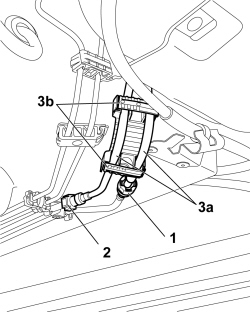
1. Adjust the rapid connector and connect the intermediate pipe for the evaporation control system for the section from the active charcoal filter to the fuel vapour flow enablement solenoid valve.
2. Adjust the rapid connector and connect the fuel supply pipe.
3. Secure the pipes (3a) to the retaining bands (3b).
- Connect the reflux pipe, fuel tank side and fasten it using the retaining bands.
- Connect the intermediate pipe for the evaporation control system for the section from the active charcoal filter to the fuel vapour flow enablement solenoid valve, tank side.
- Connect the hose between the fuel filler pipe and the tank, tank side and secure it using the retaining band.
- Connect the evaporation control system pipes, active charcoal filter side.
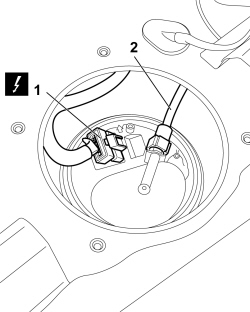
1. Connect the electrical connection for the fuel pump.
| Description | Connector | |
|---|---|---|
| 1 | Fuel pump and level gauge | See N040 FUEL PUMP AND LEVEL GAUGE |
2. Connect the fuel delivery pipe.
- Position the fuel pump cover and tighten the fixing bolts.
Op. 1040E20 FUEL FILLER PIPE PROTECTION - ARRANGE
Op. 1040E22 FUEL PIPE PROTECTION - R.R
Op. 1076B40 CENTRE EXHAUST PIPE - R.R.
Op. 1076B20 REAR EXHAUST SILENCER - R + R
Op. 7055B48
Op. 4450B08 RIGHT REAR WHEEL - R.R
Op. 7050A20 ONE-PIECE REAR SEAT CUSHION - R.R.
- Connect the negative battery terminal.
| Description | Connector | |
|---|---|---|
| Battery | See A001 BATTERY |
- Remove the vehicle from the lift.
Removing
- Position the vehicle on a lift.
- Disconnect the negative battery terminal.
| Description | Connector | |
|---|---|---|
| Battery | See A001 BATTERY |
Op. 7050A20 ONE-PIECE REAR SEAT CUSHION - R.R.
Op. 4450B08 RIGHT REAR WHEEL - R.R
Op. 7055B48
Op. 1076B20 REAR EXHAUST SILENCER - R + R
Op. 1076B40 CENTRE EXHAUST PIPE - R.R.
Op. 1040E22 FUEL PIPE PROTECTION - R.R
1. Undo the fixing bolts (1a) and remove the fuel pump cover (1b).
1. Disconnect the electrical connection for the fuel pump.
| Description | Connector | |
|---|---|---|
| 1 | Fuel pump and level gauge | See N040 FUEL PUMP AND LEVEL GAUGE |
2. Disconnect the fuel delivery pipe.
Seal the pipe to prevent fuel leaks.
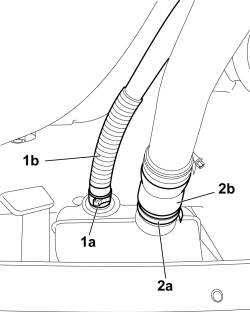
1. Open the retaining band (1a) and disconnect the reflux pipe (1b), fuel tank side.
2. Open the retaining band (2a) and disconnect the hose (2b) between the fuel filler pipe and tank, tank side.
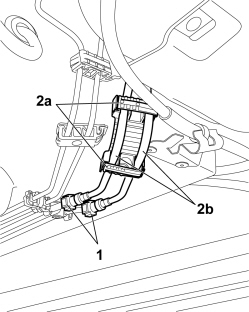
1. Undo the rapid connectors and disconnect the fuel supply and return pipes.
2. Open the retaining bands (2a) and release the pipes (2b).
1. Position a suitable lift with a support for supporting the fuel tank.
2. Undo the fixing bolts (2a) and remove the fuel tank (2b) from the housing.
1. At the bench, using the tool (1a), undo the ring nut (1b) and keep the seal (1c).
| Tool | Description | Function | Validity |
|---|---|---|---|
| 1.870.736.000 | Spanner | Removing-refitting submerged pump | all versions |
2. Remove the fuel pump from its housing.
Position a suitable container for collecting the fuel contained in the submerged pump assembly.
- Remove the fuel supply and return pipes, releasing them from the retaining clips.
- Proceed with transferring the fuel using suitable equipment.
Refitting
- Check that the fuel supply and return pipes are not damaged. If it they are, replace them.
- Secure the fuel supply and return pipes to the retaining bands.
1. Place the fuel pump in position.
2. Fit a new seal (2a) and tighten the ring nut (2b) using the tool (2c).
| Tool | Description | Function | Validity |
|---|---|---|---|
| 1.870.736.000 | Spanner | Removing-refitting submerged pump | all versions |
1. Fit the fuel tank (1a) in place and tighten the fixing bolts (1b) to torque.
| Component | Fastening | dia | Value (daNm) | Validity |
|---|---|---|---|---|
| Fuel tank (on body) | Bolt | M8 | 3.5 | all versions |
- Undo the rapid connectors and disconnect the fuel supply and return pipes.
- Connect the reflux pipe, fuel tank side and secure it using the retaining band.
- Connect the hose between the fuel filler pipe and the tank, tank side and secure it using the retaining band.
1. Connect the electrical connection for the fuel pump.
| Description | Connector | |
|---|---|---|
| 1 | Fuel pump and level gauge | See N040 FUEL PUMP AND LEVEL GAUGE |
2. Connect the fuel delivery pipe.
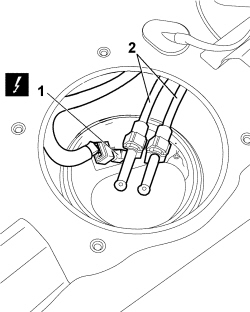
- Fit the fuel pump cover and tighten the fixing bolts.
Op. 1040E22 FUEL PIPE PROTECTION - R.R
Op. 1076B40 CENTRE EXHAUST PIPE - R.R.
Op. 1076B20 REAR EXHAUST SILENCER - R + R
Op. 7055B48
Op. 4450B08 RIGHT REAR WHEEL - R.R
Op. 7050A20 ONE-PIECE REAR SEAT CUSHION - R.R.
- Connect the negative battery terminal.
| Description | Connector | |
|---|---|---|
| Battery | See A001 BATTERY |
- Remove the vehicle from the lift.
Parts & tools for this job For 2007 Fiat 500
- PARTEngine gasket setSearch: Fiat 500 2007 engine gasket set
- TOOLTorque wrenchSearch: 3/8 inch torque wrench
- TOOLFeeler gauge setSearch: feeler gauge set
Links open Amazon search results in a new tab. As an Amazon Associate I earn from qualifying purchases.