
Workshop Manuals Factory service & repair Fiat
01 00 Introduction and technical data02 10 Engine03 18 Clutch04 21 Gearbox and differential05 33 Braking system06 41 Steering07 44 Suspension and wheels08 50 Auxiliary units09 55 Electrical system10 70 Bodywork
Fiat Bravo/Brava (182) Factory Service Manual (1995-2001)02 · 10 Engine
02 · Engine

Checking the resistance

Make
Fiat
Model
Bravo /Brava (182) Factory Service Manual
Year
1995–2001
Section
Fuel system (98 range, 1581 16v) › Checking the resistance
10 EngineChecking the resistance
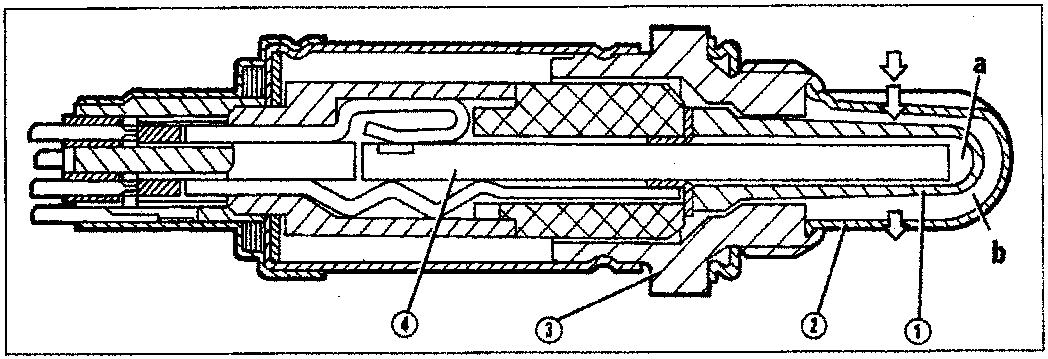
Cross-section diagram of a Lambda probe showing internal components labeled a, b, 1, 2, 3, and 4.
a. Electrode (+) in contact with the external air b. Electrode (-) in contact with the exhaust gases 1. Ceramic casing 2. Protective pipe 3. Metal casing 4. Heating element When the probe provides a low voltage level (below 200 mV), the control unit recognizes that the mixture strength is weak (lambda » 1) and increases the quantity of fuel injected. When the probe provides a high voltage level (over 800 mV), the control unit recognizes that the mixture strength is rich (lambda « 1) and reduces the quantity of fuel injected. The Lambda probe thus varies the injection times so that the engine operates with a Lambda coefficient constantly fluctuating between about 0.980 and 1.020. For temperatures below 300°C the ceramic material is not active, so the probe does not send usable signals and a particular circuit present in the control unit blocks the closed loop adjustment of the mixture strength during the warming up of the probe. To ensure that operating temperature is quickly reached, the probe has a heating element (4) supplied by the battery.

The probe can be quickly put out of service by even small quantities of lead in the fuel.
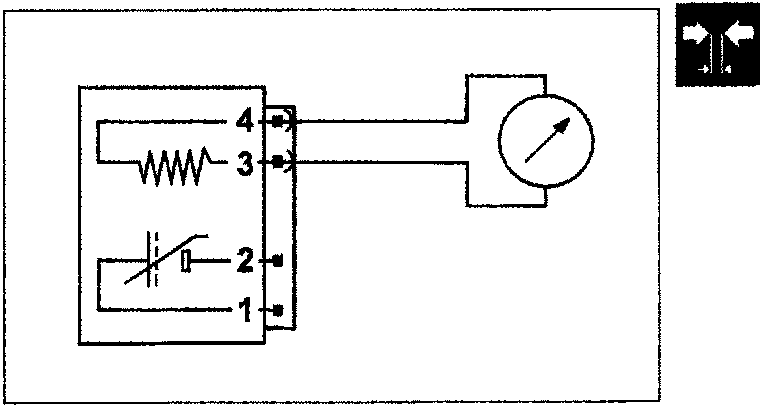
Schematic wiring diagram showing an ohmmeter connected to pins 3 and 4 of the Lambda probe connector.

Checking the resistance

The resistance of the heater and probe can be measured by disconnecting the connector and connecting an ohmmeter as shown in the figure. Heater resistance = 4.3 - 4.7 ohm
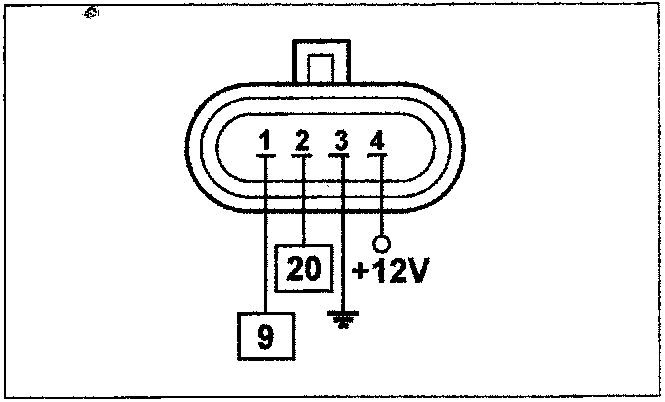
Diagram of the wiring connector showing pin numbers 1, 2, 3, 4 and their corresponding control unit pins 20, +12V, and 9.

Recovery

The Lambda data are ignored (open loop).

Wiring connector

The numbers in boxes indicate the corresponding control unit pins.

Parts & tools for this job For 1995 Fiat Bravo

Links open Amazon search results in a new tab. As an Amazon Associate I earn from qualifying purchases.