
Switch - inertia - fuel cut-off (page 2 of 2)
- Make
- Land Rover
- Model
- Discovery II (UK)
- Section
- Repairs
Fuel delivery system - V8Switch - inertia - fuel cut-off · page 2 of 2
- Remove 2 trim clips securing RH side trim casing to body.
- Remove rear lamp access panel from RH side trim casing.
- Remove trim clip securing RH side trim casing to lower 'E' post.
- Models with third row seats: Remove bolt securing lower mounting of third row seat belt to body.
- Remove RH side trim casing.
- Pull back loadspace carpet from fuel pump access panel.
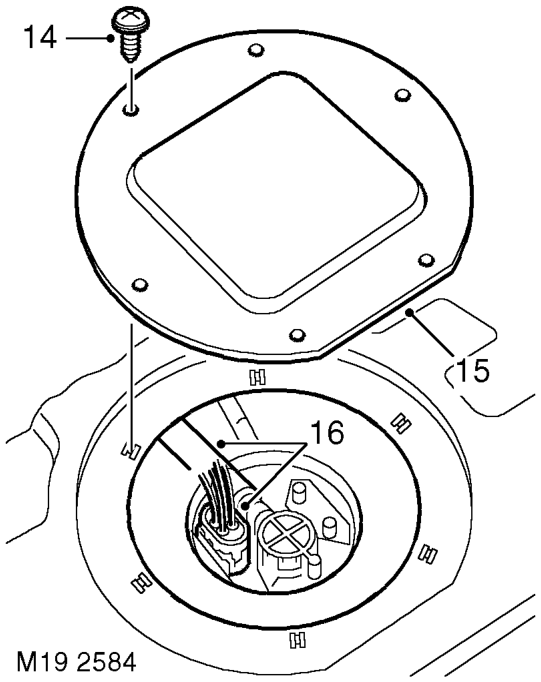
- Use
- Remove fuel pump housing.
- Remove and discard sealing ring from fuel
Refit
- Remove 6 screws securing access panel.
- Remove access panel.
- Fit trim clip securing RH side trim casing to
- Disconnect multiplug and fuel hose from fuel pump housing.
- Fit rear lamp access panel to RH side trim
CAUTION: Always fit plugs to open connections to prevent contamination.
- Fit trim clips securing RH side trim casing to
- NAS models: Disconnect pressure sensor
- Fit tail door aperture seal.
pipe from fuel pump housing.
- Models with rear ICE controls:
CAUTION: Always fit plugs to open connections to prevent contamination. 15. Models with rear ICE controls:
- Fit trim clips securing lower edge of RH 'D' post
- Models with third row seats:
- Connect battery earth lead.
- Fit battery cover and secure with fixings.
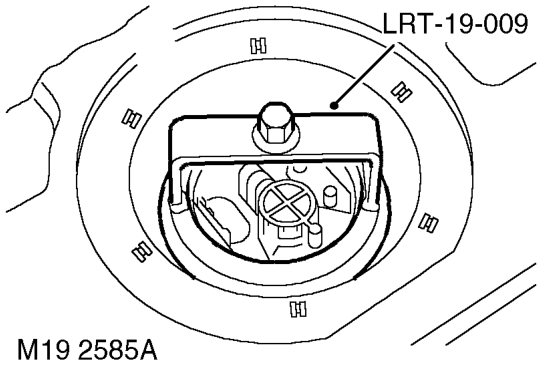
LRT-19-009 to remove locking ring from fuel pump housing.
pump housing.
- Clean fuel pump housing and mating face on fuel tank.
- Fit new seal to mating face on fuel tank.
- Fit fuel pump housing to fuel tank and use LRT- 19-009 to fit locking ring.
- Connect multiplug and fuel hose to fuel pump housing.
- NAS models: Connect pressure sensor pipe to fuel pump housing.
- Fit access panel and secure with screws.
- Reposition loadspace carpet.
- Fit RH side trim casing.
- Models with third row seats: Fit bolt securing lower mounting of third row seat belt to body and tighten to 50 Nm (37 lbf.ft).
lower 'E' post.
casing.
body.
Connect multiplug to remote ICE controls. Fit ICE controls to RH side trim casing and secure with screw.
trim casing to body. Fit RH third row seat. SEATS, REPAIRS, Seat - third row.
Parts & tools for this job For Land Rover Discovery
- TOOLOBD2 scannerSearch: OBD2 scanner
- TOOLDigital multimeterSearch: automotive digital multimeter
- TOOLBack-probe test leadsSearch: back probe test leads
Links open Amazon search results in a new tab. As an Amazon Associate I earn from qualifying purchases.