
Camshaft timing belt - models with air conditioning (page 2 of 2)
- Make
- Rover
- Model
- 400 Workshop Manual
- Year
- 1995–2000
- Section
- Repairs
- Remove timing belt.
CAUTION: Ease timing belt off gears using fingers only. Metal levers may damage the belt and gears. Do not rotate crankshaft with timing belt removed and cylinder head fitted. Timing belts must be stored and handled with care. Always store a timing belt on its edge with a bend radius greater than 50 mm. Do not use a timing belt which has been twisted or bent double as this can fracture reinforcing fibres. Do not use an oil contaminated timing belt. Although the belt has a service life of 96 000 miles, 160 000 km, an existing belt should only be refitted if it has completed less than 48 000 miles, 80 000 km.
Refit
- Clean timing belt gears and pulleys.
- Clean crankshaft pulley.
CAUTION: If original belt is to be refitted, ensure direction of rotation mark is facing correct way.
- Using fingers only, fit timing belt to gears, starting at the crankshaft gear and working in an anti-clockwise direction around the remaining gears and pulleys.
CAUTION: Ensure the belt run between the crankshaft and exhaust camshaft gear is kept taut during the fitting procedure.
- Fit timing belt lower cover, fit bolts and tighten to 5 Nm.
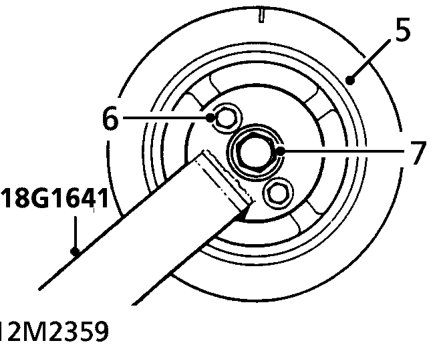
- Position crankshaft pulley to crankshaft timing gear.
- Position tool 18G 1641 to crankshaft pulley, align bolt holes in pulley and timing gear, fit and tighten 2 bolts to retain tool.
- Fit crankshaft pulley centre bolt, and using tool 18G 1641 to restrain pulley, tighten bolt to 85 Nm.
- Remove bolts securing tool 18G 1641 , remove tool.
- Fit bolts securing crankshaft pulley to timing gear, tighten bolts to 10 Nm.
- Loosen nut securing tool 18G 1524 , remove tool.
- Loosen timing belt tensioner pulley bolt sufficiently to allow tensioner pulley backplate to rotate without tipping the pulley.
- Remove timing pin tool 18G 1523 from flywheel.
- Rotate crankshaft 2 complete revolutions and align camshaft gear timing marks.
- Tighten tensioner pulley bolt to 25 Nm.
- Fit camshaft timing belt centre cover. See this section.
- Fit alternator. See ELECTRICAL, Repairs.
Parts & tools for this job For 1995 Rover 400
- PARTTiming belt kitSearch: Rover 400 1995 timing belt kit
- TOOLEngine timing tool setSearch: Rover engine timing tool set
- TOOLTorque wrenchSearch: 3/8 inch torque wrench
Links open Amazon search results in a new tab. As an Amazon Associate I earn from qualifying purchases.