
Refit (page 2 of 2)
- Make
- Rover
- Model
- Coupé, Cabriolet & Tourer 200/400 Coupé, Cabriolet & Tourer Workshop Manual
- Section
- Screens
BodyRefit · page 2 of 2
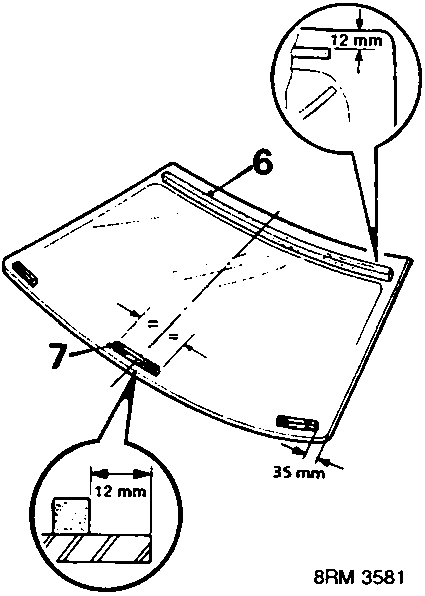
- Fit upper dam to top edge of glass as shown.
- Fit 3 lower dams to bottom edge of glass as shown.
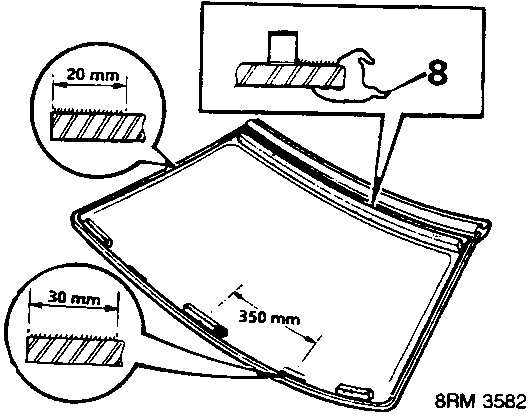
- Fit new upper moulding to glass.
- Shake primer tins for 30 seconds. Apply Glass Primer around glass, at mounting bracket positions apply 30 mm wide strip for 100 mm as shown.
Use clean gauze to wipe off primed surfaces when dry.
- Apply Body Primer to body flange as shown.
CAUTION: Use a new sponge for each primer.
- Fit pre - cut nozzle to sealer cartridge, remove lid and shake out crystals and install in applicator gun.
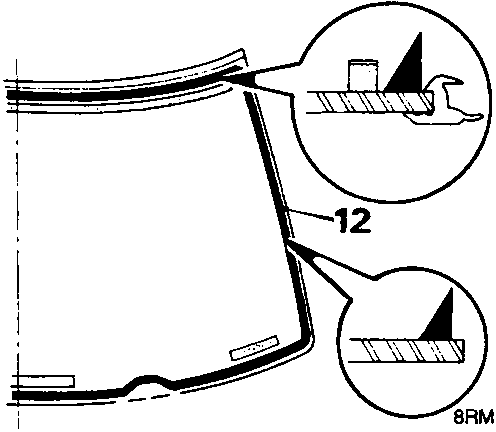
- Apply a continuous bead of sealer around edge of glass as shown. Make bead slightly thicker at each corner and increase distance from edge at mounting bracket points.
- Open a front door window.
- With assistant: Lift glass and locate on brackets, carefully align to tapes and lower onto flange. Lightly press glass to fully seat sealer.
- Remove protective coverings and tapes.
- Remove excess sealer with a knife and wipe from glass with solvent.
- Test sealer for leaks, apply additional sealer as necessary. If water is used, allow sealer to dry. Spray water around glass and check for leaks. Mark any area that leaks. Dry glass and sealer then apply additional sealer.
- Set clips at right – angles to moulding and fit side mouldings, press firmly to engage clips.
- Fit seal and plenum air intake and press in clips. Secure top of intake with screws and fit caps.
- Fit wiper arms, see WIPERS & WASHERS – Repairs.
- Fit interior mirror.
CAUTION: A curing time of 6 hours is desirable, during this time leave a window open and do not slam the doors. If the car must be used, drive slowly.
Parts & tools for this job For Rover Coupé, Cabriolet & Tourer
- TOOLTrim removal tool kitSearch: trim removal tool kit
- PARTTouch-up paintSearch: Rover touch up paint
- PARTPanel clip assortmentSearch: Rover panel clips assortment
Links open Amazon search results in a new tab. As an Amazon Associate I earn from qualifying purchases.