
Introduction - diesel injection pressure pump electronic control
- Make
- Fiat
- Model
- Bravo Factory Service Manual
- Year
- 2007–2014
- Section
- Diesel injection system › Introduction - diesel injection pressure pump electronic control
INTRODUCTION - DIESEL INJECTION PRESSURE PUMP ELECTRONIC CONTROL
DESCRIPTION OF COMPONENTS
Injection control unit
This is fitted in the engine compartment on the battery drip-cradle.
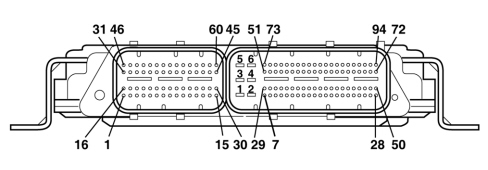
Pin out for versions with: EURO 4, LAMBDA SENSOR
Connector A (vehicle wiring)
01 - Battery positive
02 - Battery negative
03 - N.C.
04 - Battery negative
05 - Battery positive
06 - Battery negative
07 - N.C.
08 - Accelerator pedal 2 position sensor earth
09 - Accelerator pedal 1 position sensor signal
10 - Fuel temperature sensor earth
11 - Fuel temperature sensor signal
12 - Air conditioning compressor pressure sensor earth
13 - Air conditioning compressor pressure sensor signal
14 - N.C.
15 - N.C.
16 - N.C.
17 - Brake pedal main switch signal
18 - N.C.
19 - N.C.
20 - Low pressure pump control relay
21 - N.C.
22 - Air conditioning compressor pressure sensor power supply
23 - N.C.
24 - N.C.
25 - K line
26 - N.C.
27 - Fuel consumption signal
28 - Key signal
29 - Air conditioning compressor control relay
30 - Accelerator pedal 1 position sensor earth
31 - Accelerator pedal 2 position sensor signal
32 - N.C.
33 - N.C.
34 - N.C.
35 - N.C.
36 - N.C.
37 - N.C.
38 - Cruise "Resume"
39 - N.C.
40 - N.C.
41 - N.C.
42 - N.C.
43 - N.C.
44 - N.C.
45 - Accelerator pedal 1 position sensor power supply
46 - Accelerator pedal 2 position sensor power supply
47 - Immobiliser interface
48 - N.C.
49 - N.C.
50 - N.C.
51 - Lambda sensor heater control
52 - Preheating control unit fault diagnosis signal
53 - N.C.
54 - Air conditioning request switch
55 - N.C.
56 - Cruise "Set/Increase"
57 - N.C.
58 - N.C.
59 - N.C.
60 - N.C.
61 - N.C.
62 - N.C.
63 - N.C.
64 - Lambda sensor signal
65 - Lambda sensor signal
66 - N.C.
67 - N.C.
68 - N.C.
69 - Fan 2 control relay
70 - N.C.
71 - Diagnostic warning light control
72 - Main control relay
73 - N.C.
74 - Water in fuel signal
75 - N.C.
76 - N.C.
77 - Cruise "Off"
78 - Cruise "Set/Decrease"
79 - Clutch pedal switch signal
80 - Brake pedal secondary switch signal
81 - N.C.
82 - N.C.
83 - CAN (low channel)
84 - CAN (high channel)
85 - N.C.
86 - Lambda sensor earth
87 - Lambda sensor signal
88 - N.C.
89 - N.C.
90 - Fan 1 control relay
91 - N.C.
92 - N.C.
93 - Preheating control unit control relay
94 - N.C.
Connector B (engine wiring)
01 - Bank 2 injector Cylinder 3 "High" control
02 - Bank 2 injector Cylinder 2 "High" control
03 - N.C.
04 - N.C.
05 - N.C.
06 - N.C.
07 - Engine rpm sensor screening
08 - Rail pressure sensor earth
09 - N.C.
10 - N.C.
11 - Timing sensor power supply
12 - Engine rpm sensor negative (-) signal
13 - Turbo pressure sensor power supply
14 - N.C.
15 - Turbo pressure actuator
16 - Bank 1 injector Cylinder 1 "High" control
17 - Bank 1 injector Cylinder 4 "High" control
18 - N.C.
19 - High pressure pump flow regulator power supply (BAT+)
20 - Timing sensor earth
21 - N.C.
22 - N.C.
23 - Turbo pressure sensor earth
24 - N.C.
25 - N.C.
26 - N.C.
27 - Engine rpm sensor positive (+) signal
28 - Rail pressure sensor power supply
29 - N.C.
30 - N.C.
31 - Bank 2 injector Cylinder 2 "Low" control
32 - N.C.
33 - Bank 1 injector Cylinder 4 "Low" control
34 - N.C.
35 - N.C.
36 - N.C.
37 - Intake duct air temperature sensor signal
38 - N.C.
39 - N.C.
40 - Turbo pressure sensor signal
41 - Water temperature sensor earth
42 - Air flow sensor signal
43 - Rail pressure sensor signal
44 - Air temperature/flow rate sensor earth
45 - N.C.
46 - Bank 2 injector Cylinder 3 "Low" control
47 - Bank 1 injector Cylinder 1 "Low" control
48 - N.C.
49 - High pressure pump flow regulator control
50 - Timing sensor signal
51 - N.C.
52 - N.C.
53 - Turbo air temperature sensor signal
54 - N.C.
55 - N.C.
56 - Oil pressure signal
57 - N.C.
58 - Water temperature sensor signal
59 - Throttle valve actuator
60 - EGR actuator
Pin out for versions with: EURO 4, DPF
Connector A (vehicle wiring)
01 - Battery positive
02 - Battery negative
03 - N.C.
04 - Battery negative
05 - Battery positive
06 - Battery negative
07 - N.C.
08 - Accelerator pedal 2 position sensor earth
09 - Accelerator pedal 1 position sensor signal
10 - Fuel temperature sensor earth
11 - Fuel temperature sensor signal
12 - Air conditioning compressor pressure sensor earth
13 - Air conditioning compressor pressure sensor signal
14 - N.C.
15 - N.C.
16 - N.C.
17 - Brake pedal main switch signal
18 - N.C.
19 - N.C.
20 - Low pressure pump control relay
21 - N.C.
22 - Air conditioning compressor pressure sensor power supply
23 - N.C.
24 - N.C.
25 - K line
26 - N.C.
27 - Fuel consumption signal
28 - Key signal
29 - Air conditioning compressor control relay
30 - Accelerator pedal 1 position sensor earth
31 - Accelerator pedal 2 position sensor signal
32 - Exhaust gas 2 temperature sensor signal
33 - Exhaust gas 2 temperature sensor earth
34 - Exhaust gas 1 temperature sensor signal
35 - Exhaust gas 1 temperature sensor earth
36 - Differential pressure sensor signal DPF
37 - Differential pressure sensor earth DPF
38 - Cruise "Resume"
39 - N.C.
40 - N.C.
41 - N.C.
42 - N.C.
43 - N.C.
44 - Differential pressure sensor power supply DPF
45 - Accelerator pedal 1 position sensor power supply
46 - Accelerator pedal 2 position sensor power supply
47 - Immobiliser interface
48 - N.C.
49 - N.C.
50 - N.C.
51 - N.C.
52 - Preheating control unit diagnosis signal
53 - N.C.
54 - Air conditioning request switch
55 - N.C.
56 - Cruise "Set/Increase"
57 - N.C.
58 - N.C.
59 - N.C.
60 - N.C.
61 - N.C.
62 - N.C.
63 - N.C.
64 - N.C.
65 - N.C.
66 - N.C.
67 - N.C.
68 - N.C.
69 - Fan 2 control relay
70 - N.C.
71 - Diagnostic warning light control
72 - Main control relay
73 - N.C.
74 - Water in fuel signal
75 - N.C.
76 - N.C.
77 - Cruise "Off"
78 - Cruise "Set/Decrease"
79 - Clutch pedal switch signal
80 - Brake pedal secondary switch signal
81 - N.C.
82 - N.C.
83 - CAN (low channel)
84 - CAN (high channel)
85 - N.C.
86 - N.C.
87 - N.C.
88 - N.C.
89 - N.C.
90 - Fan 1 control relay
91 - N.C.
92 - N.C.
93 - Preheating control unit control relay
94 - N.C.
Connector B (engine wiring)
01 - Bank 2 injector Cylinder 3 "High" control
02 - Bank 2 injector Cylinder 2 "High" control
03 - N.C.
04 - N.C.
05 - N.C.
06 - N.C.
07 - Engine rpm sensor screening
08 - Rail pressure sensor earth
09 - N.C.
10 - N.C.
11 - Timing sensor power supply
12 - Engine rpm sensor negative (-) signal
13 - Turbo pressure sensor power supply
14 - N.C.
15 - Turbo pressure actuator
16 - Bank 1 injector Cylinder 1 "High" control
17 - Bank 1 injector Cylinder 4 "High" control
18 - N.C.
19 - High pressure pump flow regulator power supply (BAT+)
20 - Timing sensor earth
21 - N.C.
22 - N.C.
23 - Turbo pressure sensor earth
24 - N.C.
25 - N.C.
26 - N.C.
27 - Engine rpm sensor positive (+) signal
28 - Rail pressure sensor power supply
29 - N.C.
30 - N.C.
31 - Bank 2 injector Cylinder 2 "Low" control
32 - N.C.
33 - Bank 1 injector Cylinder 4 "Low" control
34 - N.C.
35 - N.C.
36 - N.C.
37 - Intake duct air temperature sensor signal
38 - N.C.
39 - Throttle valve diagnostic earth
40 - Turbo pressure sensor signal
41 - Water temperature sensor earth
42 - Air flow sensor signal
43 - Rail pressure sensor signal
44 - Air flow rate sensor earth
45 - N.C.
46 - Bank 2 injector Cylinder 3 "Low" control
47 - Bank 1 injector Cylinder 1 "Low" control
48 - N.C.
49 - High pressure pump flow regulator control
50 - Timing sensor signal
51 - N.C.
52 - Throttle valve diagnostic signal
53 - Turbo air temperature sensor signal
54 - N.C.
55 - Intake duct air temperature sensor earth
56 - Oil pressure signal
57 - N.C.
58 - Water temperature sensor signal
59 - Throttle valve actuator
60 - EGR actuator
RPM SENSOR
Specifications
It is fitted on the cylinder block, facing the phonic wheel on the crankshaft.
It is inductive, i.e. operated by magnetic field changes generated by the teeth passing in front of a phonic wheel (60-2 teeth).
The injection control unit uses the rpm sensor signal to:
- determine the rotation speed;
- determine the crankshaft angular position.

Operation
The changeover from full to empty determined by the presence or absence of a gap brings about a magnetic flux change sufficient to generate an induced alternating voltage proportional to the number of teeth on the ring (or phonic wheel).
The frequency and amplitude of the voltage sent to the electronic control unit provides it with details of crankshaft angular speed.
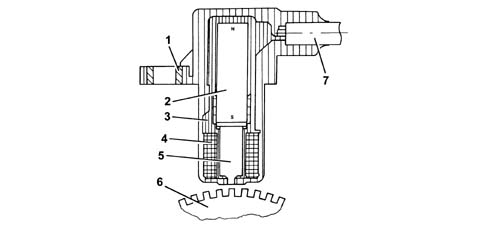
1 - Brass bush
2 - Permanent magnet
3 - Plastic sensor casing
4 - Coil winding
5 - Core
6 - Toothed ring gear or phonic wheel
7 - Coaxial paired cable or electrical connection
The recommended distance (gap) between the end of the sensor and the phonic wheel in order to obtain correct signals should be 0.8 - 1.5 mm.
This distance is not adjustable. Therefore, if the gap is found to be outside the tolerance limits, check the condition of the sensor and phonic wheel.
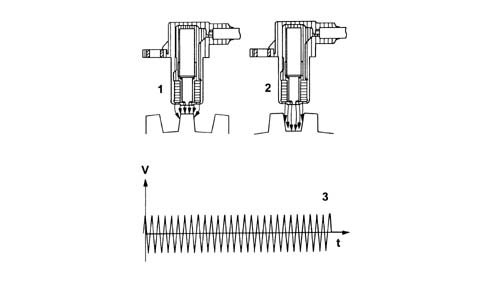
1 - Maximum magnetic flux
2 - Minimum magnetic flux
3 - Induced alternating voltage trend
CAM ANGLE SENSOR
Specifications
This Hall effect sensor is fitted on the cylinder head, facing the camshaft drive pulley.
A slot on the pulley allows the timing sensor to indicate the engine timing position.
The injection control unit uses the timing sensor signal to identify T.D.C. at the end of compression.
Operation
A current-carrying semiconductor layer submerged in a normal magnetic field (with force lines at right angles to the direction of the current) generates a potential difference known as a Hall voltage at the terminals of the semiconductor.
If the intensity of the current remains constant, the generated voltage depends on magnetic field intensity alone. Periodic changes in magnetic field intensity are sufficient to generate a modulated electrical signal whose frequency is proportional to the speed at which the magnetic field changes. This change is achieved by making a magnetic ring with an opening (the internal part of the pulley), pass the sensor.
As it moves, the metal part of the ring covers the sensor to block the magnetic field and thus generate a high (1) output signal. Conversely, the sensor generates a low (0) signal when the opening is over the sensor and a magnetic field is present.
Together with the rpm and TDC signal, this signal allows the control unit to identify the cylinders and determine the injection point.
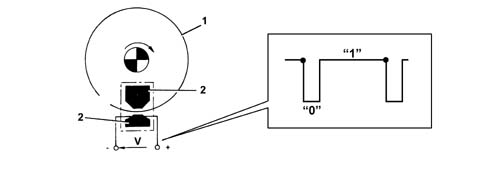
1 - Pulley ring
2 - Magnetic material
INTAKE AIR TEMPERATURE AND EXCESS PRESSURE SENSOR
Specifications
The excess pressure and intake air temperature sensor is an integral component which is designed to measure the pressure and the temperature of the air inside the intake manifold.
It is fitted on the air intake manifold and the signal sent to the engine management control unit makes it possible to:
modulate the turbocharger pressure
protect the engine from overheating
diagnose the operation of the air flow meter

- 1 Earth
- 2 Air temperature signal
- 3 5 Volt (from ECU)
- 4 Turbocharging pressure output signal
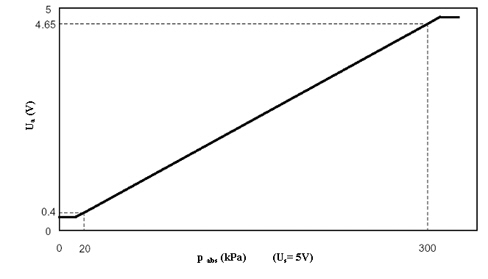
Pressure sensor transfer function
The voltage of the output signal from the sensor varies according to the absolute pressure in accordance with this rule:
Ua=(c1*pabs+c0)*Us
where:
Ua = voltage of output signal in V
Us = supply voltage in V
pabs = absolute pressure in kPa
c0 = 5.4/280
c1 = 0.85/280 kPa-1
The trend is illustrated in the graph below.
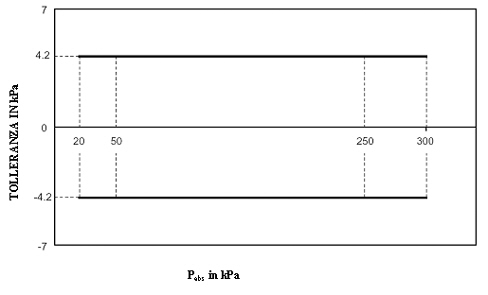
Tolerance of output signal (pressure)
The graph below illustrates the progress of the tolerance of the output signal depending on the pressure.
ENGINE COOLANT TEMPERATURE SENSOR
Specifications
This is fitted on the thermostat and detects coolant temperature by means of a dual NTC thermistor with negative resistance coefficient.
One NTC thermistor sends a signal to the injection control unit whilst the other sends a signal to the temperature gauge and the warning light in the instrument panel.
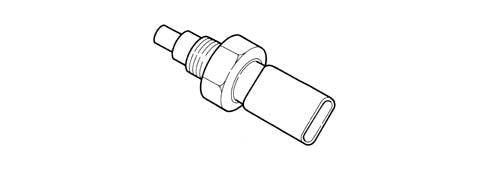
The sensor is designed using semiconductor technology. In other words, the resistance level drops if sensor temperature rises with increasing coolant temperature.
Because the resistance does not change in linear fashion as the temperature increases, it is relatively higher at low temperatures than at high temperatures.
AIR FLOW METER WITH BUILT-IN AIR TEMPERATURE SENSOR
Specifications
The air flow meter is located on the air intake sleeve and is a hot film meter.
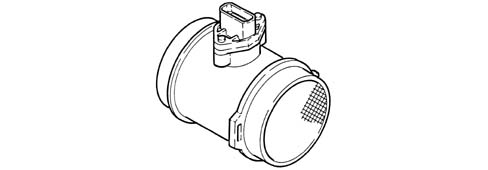
The intake air temperature sensor is built into the airflow meter.
THE AIR FLOW METER CANNOT BE DISMANTLED OR SEPARATED FROM THE CYLINDRICAL CASING BY REMOVING THE RETAINING BOLTS.
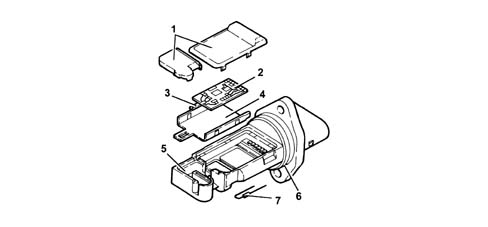
1 - Covers
2 - Electronic card
3 - Sensor
4 - Mounting plate
5 - Mount
6 - O - Ring seal
7 - Temperature sensor
Operation
This component works on the basis of a heated membrane positioned within a measurement channel that carries intake air into the engine.
The hot film membrane is maintained at a constant temperature (about 120°C higher than the incoming air temperature) by the heating coil.
The air mass that flows through the measurement channel tends to remove heat from the membrane. A certain amount of current must therefore flow through the heater coil to maintain the membrane at a constant temperature.
This current is measured by a special Wheatstone bridge.
The current is therefore proportional to the flowing air mass.
The air flow meter measures the air mass (not the volume) directly to eliminate problems of temperature, altitude, pressure etc.
FUEL PRESSURE SENSOR
Specifications
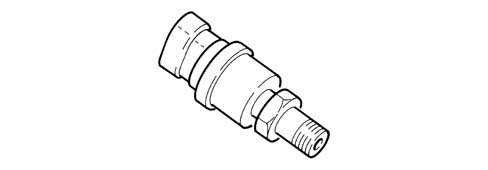
It is fitted at the left-hand end of the common rail and its function is to provide the injection control unit with a feedback signal to enable it to:
- modulate injection pressure;
- regulate fuel injection duration.
ACCELERATOR PEDAL POTENTIOMETER
Construction specifications
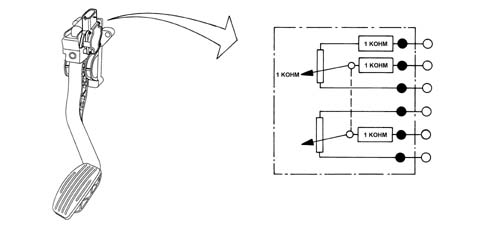
The sensor consists of a case secured to the accelerator pedal; the case contains an axially-located shaft connected to two potentiometers: a main one and a safety one.
A coil spring on the shaft ensures the correct amount of resistance to pressure while a second spring ensures return following release.
Operation
The accelerator pedal position is converted into an electrical voltage signal and sent to the injection control unit by the potentiometer connected to the pedal.
The accelerator pedal position signal is processed together with the information relating to the engine rpm in order to obtain the injection times and the pressure.
MOTORISED THROTTLE BODY (only for EURO 4 versions with DPF)
The electrical throttle unit is a system that includes both the control logics and the activation logics of the electric motor for moving the throttle valve.
The system is operated by means of a PWM-type signal, which is processed by the electronics of the actual component. The position of the throttle valve is controlled as a result.
The motorised throttle casing carries out the following two functions:
management of shut-off stage
control of the exhaust gas temperature by reducing the intake duct cross-section.
Operating specifications:
temperature interval: between -40°C and +140°C
input signal: PWM
input signal frequency: 263.2 Hz +/-3%
signal for diagnosis: PWM
frequency of signal for diagnosis: between 20 and 90 Hz +/-5%
supply voltage: 14V.
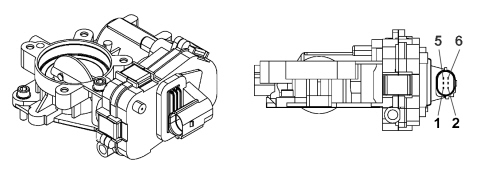
The connector pin out is illustrated below
1 earth
2 power supply
3 N.C.
4 diagnostic signal
5 N.C.
6 PWM control (Pulse Width Modulate)
DESCRIPTION OF COMPONENTS
Injection control unit (EDC 16C39 common rail)
This is fitted in the engine compartment on the right side. It is a flash EPROM type control unit, i.e. it can be externally reprogrammed without adjusting the hardware.
The injection control unit incorporates the absolute pressure sensor.
PIN OUT
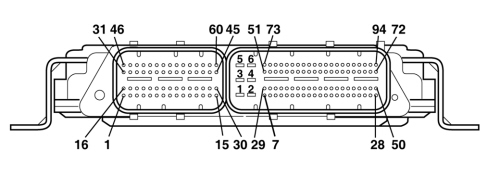
Connector A (vehicle wiring)
1 - Battery positive
2 - Battery negative
3 - N.C.
4 - Battery negative
5 - Battery positive
6 - Battery negative
7 - N.C.
8 - Potentiometer 2 on accelerator pedal (-)
9 - Potentiometer 1 on accelerator pedal signal
10 - Diesel temperature sensor (-)
11 - Diesel temperature sensor signal
12 - Air conditioning linear pressure sensor (-)
13 - Air conditioning linear pressure sensor signal
14 - N.C.
15 - N.C.
16 - N.C.
17 - Signal + contact on brake pedal (NO)
18 - N.C.
19 - N.C.
20 - Low pressure pump control relay
21 - N.C.
22 - Air conditioning linear pressure sensor (+)
23 - N.C.
24 - N.C.
25 - K line
26 - N.C.
27 - Fuel consumption signal
28 - Key signal
29 - Compressor engagement control relay negative signal
30 - Potentiometer 1 on accelerator pedal (-)
31 - Potentiometer 2 on accelerator pedal signal
32 - Exhaust gas temperature sensor signal 2 (only for versions with DPF)
33 - Exhaust gas temperature sensor earth 2 (only for versions with DPF)
34 - Exhaust gas temperature sensor signal 1 (only for versions with DPF)
35 - Exhaust gas temperature sensor earth 1 (only for versions with DPF)
36 - DPF differential pressure sensor signal (only for versions with DPF)
37 - DPF differential pressure sensor earth (only for versions with DPF)
38 - Resume Cruise Control
39 - N.C.
40 - N.C.
41 - N.C.
42 - N.C.
43 - N.C.
44 - Differential pressure sensor (DPF) (+) (only for versions with DPF)
45 - Potentiometer 1 on accelerator pedal (+)
46 - Potentiometer 2 on accelerator pedal (+)
47 - Immobiliser interface
48 - N.C.
49 - N.C.
50 - N.C.
51 - Lambda sensor heater control (only for versions with Lambda sensor)
52 - Glowheater plug control unit diagnosis
53 - N.C.
54 - Compressor engagement request
55 - N.C.
56 - SET + Cruise Control
57 - N.C.
58 - N.C.
59 - N.C.
60 - N.C.
61 - N.C.
62 - N.C.
63 - N.C.
64 - Lambda sensor signal (only for versions with Lambda sensor)
65 - Lambda sensor signal (only for versions with Lambda sensor)
66 - N.C.
67 - N.C.
68 - N.C.
69 - Engine cooling fan 2nd level
70 - N.C.
71 - EOBD failure warning light
72 - Main control relay negative signal
73 - N.C.
74 - Water in diesel filter sensor signal
75 - N.C.
76 - N.C.
77 - Cruise "off"
78 - Cruise "Set/Decrease"
79 - Signal - contact on clutch pedal
80 - Brake pedal secondary switch signal
81 - N.C.
82 - N.C.
83 - CAN (low channel)
84 - CAN (high channel)
85 - N.C.
86 - Lambda sensor earth (only for versions with Lambda sensor)
87 - Lambda sensor signal (only for versions with Lambda sensor)
88 - N.C.
89 - N.C.
90 - Engine cooling fan 1st level
91 - N.C.
92 - N.C.
93 - Glowheater plug activation
94 - N.C.
Connector B (engine wiring)
1 - Cylinder no. 3 injector (+)
2 - Cylinder no. 2 injector (+)
3 - N.C.
4 - N.C.
5 - N.C.
6 - Swirl solenoid valve earth
7 - Engine rpm sensor screen
8 - Fuel pressure sensor (-)
9 - N.C.
10 - N.C.
11 - Timing sensor (+)
12 - Engine rpm sensor (-)
13 - Air pressure/temperature sensor (+)
14 - N.C.
15 - Turbo pressure actuator
16 - Cylinder no. 1 injector (+)
17 - Cylinder no. 4 injector (+)
18 - N.C.
19 - Fuel pressure regulator (+)
20 - Timing sensor (-)
21 - N.C.
22 - N.C.
23 - Air pressure/temperature sensor (-)
24 - N.C.
25 - N.C.
26 - N.C.
27 - Engine rpm sensor (+)
28 - Fuel pressure sensor (+)
29 - N.C.
30 - N.C.
31 - Cylinder no. 2 injector (-)
32 - N.C.
33 - Cylinder no. 4 injector (-)
34 - N.C.
35 - Diagnostic feedback (swirl)
36 - N.C.
37 - Air temperature sensor (air flow meter)
38 - N.C.
39 - Throttle valve diagnosis earth (only for versions with DPF)
40 - Pressure signal from air pressure/temperature sensor
41 - Engine coolant temperature sensor (-)
42 - Air flow rate sensor signal
43 - Rail pressure sensor signal
44 - Earth (air flow meter)
45 - Swirl solenoid valve control
46 - Cylinder no. 3 injector (-)
47 - Cylinder no. 1 injector (-)
48 - N.C.
49 - Fuel pressure regulator (-)
50 - Timing sensor signal
51 - N.C.
52 - Throttle valve diagnosis signal (only for versions with DPF)
53 - Temperature signal from air pressure/temperature sensor
54 - N.C.
55 - N.C.
56 - Insufficient engine oil pressure
57 - N.C.
58 - Engine coolant temperature sensor signal
59 - Throttle solenoid control
60 - EGR solenoid
RPM SENSOR
Specifications
It is fitted on the cylinder block, facing the phonic wheel on the crankshaft.
It is inductive, i.e. its operation is determined by magnetic field changes generated by the teeth passing in front of a phonic wheel (60-2 teeth).
The injection control unit uses the rpm sensor signal to:
- determine the engine rotation speed
- determine the crankshaft angular position.
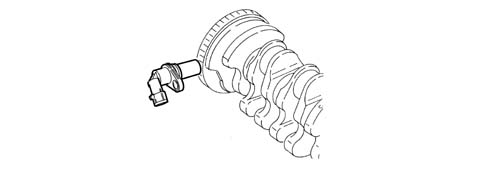
Operation
The changeover from full to empty determined by the presence or absence of a gap brings about a magnetic flux change sufficient to generate an induced alternating voltage proportional to the number of teeth on the ring (or phonic wheel).
The frequency and amplitude of the voltage sent to the electronic control unit provides it with details of crankshaft angular speed.
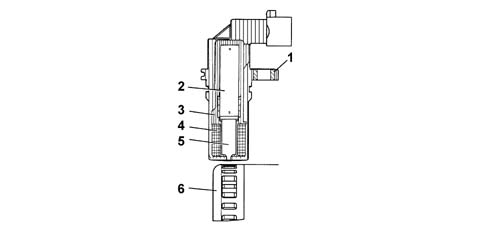
1 - Brass bush
2 - Permanent magnet
3 - Plastic sensor casing
4 - Coil winding
5 - Core
6 - Ring gear or phonic wheel
7 - Coaxial paired cable or electrical connection
The recommended distance (gap) between the end of the sensor and the phonic wheel in order to obtain correct signals should be 0.8 - 1.5 mm.
This distance is not adjustable. Therefore, if the gap is found to be outside the tolerance limits, check the condition of the sensor and phonic wheel.
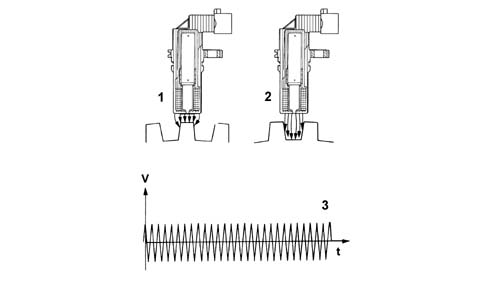
1 - Maximum magnetic flux
2 - Minimum magnetic flux
3 - Induced alternating voltage trend
CAM ANGLE SENSOR
Specifications
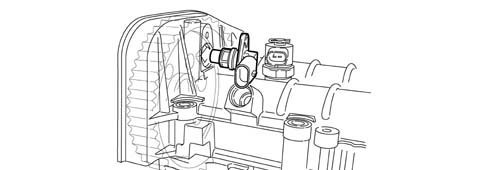
This Hall effect sensor is fitted on the cylinder head, facing the camshaft drive pulley.
A tooth on the pulley allows the timing sensor to indicate the engine timing position.
The injection control unit uses the timing sensor signal to identify T.D.C. at the end of compression.
Operation
A current-carrying semiconductor layer submerged in a normal magnetic field (with force lines at right angles to the direction of the current) generates a potential difference known as a Hall voltage at the terminals of the semiconductor.
If the intensity of the current remains constant, the generated voltage depends on magnetic field intensity alone. Periodic changes in magnetic field intensity are sufficient to generate a modulated electrical signal whose frequency is proportional to the speed at which the magnetic field changes. To produce this change, a tooth on the inner part of the pulley periodically moves close to the sensor.
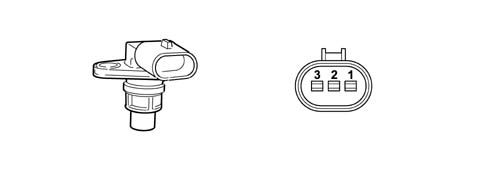
1 - Earth
2 - Signal
3 - Supply
INTAKE AIR TEMPERATURE AND EXCESS PRESSURE SENSOR
Specifications
The excess pressure and intake air temperature sensor is an integral component designed to measure the pressure and the temperature of the air inside the intake manifold.
It is fitted on the intake manifold and has the task of informing the injection control unit to:
- regulate the pressure of the variable geometry turbine in order to ensure optimum engine performance in all operating conditions.
- regulate fuel injection duration.
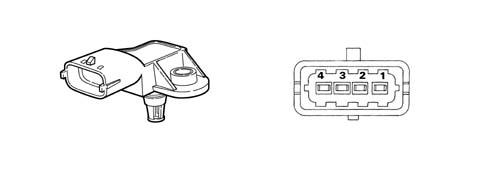
1 - Earth
2 - Air temperature signal
3 - 5 Volt (from ECU)
4 - Turbocharging pressure output signal
ENGINE COOLANT TEMPERATURE SENSOR
Specifications
This is fitted on the thermostat and detects coolant temperature by means of a dual NTC thermistor with negative resistance coefficient.
One NTC thermistor sends a signal to the injection control unit, whilst the other sends a signal to the temperature gauge and the warning light on the instrument panel.
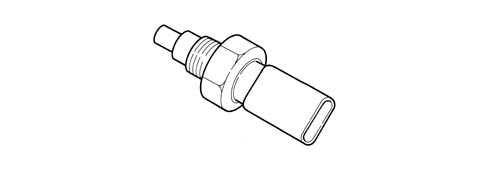
The sensor is designed using semiconductor technology. In other words, the resistance level drops if sensor element temperature increases with increasing coolant temperature.
Because the resistance does not change in linear fashion as the temperature increases, it is relatively higher at low temperatures than at high temperatures.
AIR FLOW METER WITH BUILT-IN AIR TEMPERATURE SENSOR
Specifications
The air flow meter is located on the air intake sleeve and is a hot film type meter.
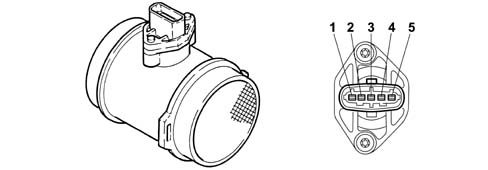
1 - Air temperature sensor output signal
2 - Maintenance current
3 - Negative
4 - 5V power supply
5 - Air flow meter output signal
The intake air temperature sensor is built into the airflow meter.
The air flow meter cannot be disassembled.
Operation
This component works on the basis of a heated membrane positioned within a measurement channel that carries intake air into the engine.
The hot film membrane is maintained at a constant temperature (about 120°C higher than the incoming air temperature) by the heating coil.
The air mass that flows through the measurement channel tends to remove heat from the membrane. A certain amount of current must therefore flow through the heater coil in order to maintain the membrane at a constant temperature.
This current is measured by a special Wheatstone bridge.
The current is therefore proportional to the flowing air mass.
The air flow meter measures the air mass (not the volume) directly to eliminate problems of temperature, altitude, pressure etc.
FUEL PRESSURE SENSOR
Specifications
It is fitted at the end of the common rail and its function is to provide the injection control unit with a feedback signal to enable it to:
- modulate injection pressure;
- regulate fuel injection duration.
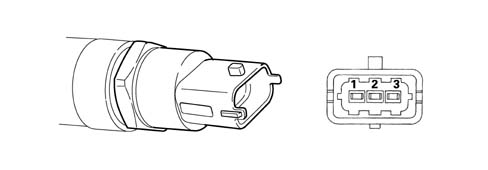
1 - Earth
2 - Output signal
3 - Supply
ACCELERATOR PEDAL POTENTIOMETER
Construction specifications
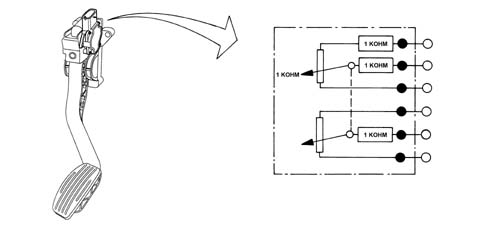
The sensor consists of a case secured to the accelerator pedal; the case contains an axially-located shaft connected to two potentiometers: a main one and a safety one.
A coil spring on the shaft ensures the correct amount of resistance to pressure while a second spring ensures return following release.
Operation
The accelerator pedal position is converted into an electrical voltage signal and sent to the injection control unit by the potentiometer connected to the pedal.
The accelerator pedal position signal is processed together with the information relating to the engine rpm in order to obtain the injection times and the pressure.
MOTORISED THROTTLE BODY (only for versions with DPF)
The electrical throttle body is a system that includes both the control logics and the activation logics of the electric motor for moving the throttle valve.
The system is operated by means of a PWM-type signal, which is processed by the electronics of the actual component. The position of the throttle valve is controlled as a result.
The motorised throttle casing carries out the following two functions:
- management of the shut-off stage
- control the exhaust gas temperature by reducing the intake duct cross-section.
Operating specifications
Temperature interval: between - 40 °C and + 140 °C
Input signal: PWM
Input signal frequency: 262.2 Hz +/- 3%
Signal for diagnosis: PWM
Frequency of signal for diagnosis: between 20 and 90 Hz +/- 5%
Supply voltage: 14 V
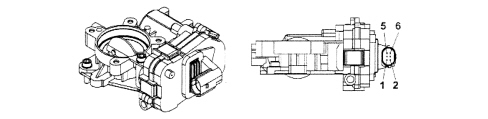
Pin out
1. Earth
2. Fuel system
3. N.C.
4. Diagnosis signal
5. N.C.
6. PWM control (Pulse Width Modulate)
Parts & tools for this job For 2007 Fiat Bravo
- PARTGlow plugsSearch: Fiat Bravo 2007 glow plugs
- TOOLGlow plug socketSearch: glow plug socket
- TOOLDiesel compression testerSearch: diesel compression tester
Links open Amazon search results in a new tab. As an Amazon Associate I earn from qualifying purchases.