
System cable loom - r.r.
- Make
- Fiat
- Model
- Bravo Factory Service Manual
- Year
- 2007–2014
- Section
- Petrol injection system › System cable loom - r.r.
SYSTEM CABLE LOOM - R.R.
Removing
Op. 1048A10 AIR FILTER ASSEMBLY - R.R.
Op. 1048A32 HOSE FROM AIR FILTER TO INTAKE MANIFOLD - R + R
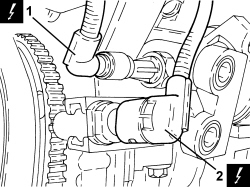
1. Disconnect the electrical connection for the engine oil pressure switch.
| Description | Connector | |
|---|---|---|
| 1 | Insufficient engine oil pressure sensor | See K030 ENGINE OIL PRESSURE SENSOR (SWITCH) |
2. Detach the rpm sensor electrical connection.
| Description | Connector | |
|---|---|---|
| 2 | Rpm sensor | See K046 RPM SENSOR |
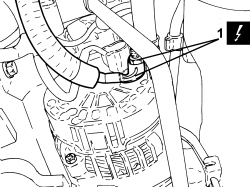
1. Undo the nut and disconnect the alternator earth lead.
| Description | Connector | |
|---|---|---|
| 1 | Alternator | See A010 ALTERNATOR |
1. Undo the bolt and remove the engine block earth lead.
| Description | Connector | |
|---|---|---|
| 1 | Earth on engine | See C040 ENGINE EARTH |
2. Disconnect the electrical connection for the knock sensor.
| Description | Connector | |
|---|---|---|
| 2 | Knock sensor | See K050 DETONATION SENSOR |
3. Open the engine wiring duct retaining clips.
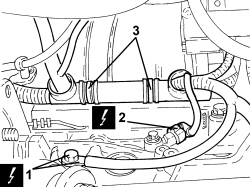
- Undo the bolt securing the timing belt covers and partly release the wiring.
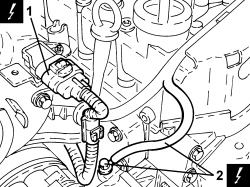
1. Disconnect the electrical connection for the air temperature/pressure sensor.
| Description | Connector | |
|---|---|---|
| 1 | Air pressure - temperature sensor | See K044 AIR TEMPERATURE/PRESSURE SENSOR |
2. Undo the bolt and release the earth lead.
| Description | Connector | |
|---|---|---|
| 2 | Earth on engine | See C040 ENGINE EARTH |
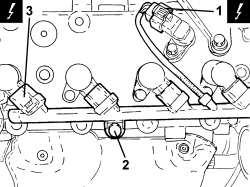
1. Disconnect the electrical connection for the cam angle sensor.
| Description | Connector | |
|---|---|---|
| 1 | Timing sensor | See K047 TIMING SENSOR |
2. Unscrew the bolt securing the wiring loom retaining duct.
3. Disconnect the electrical connections for the ignition coils.
| Description | Connector | |
|---|---|---|
| 3 | Ignition coil | See A030 IGNITION COIL |
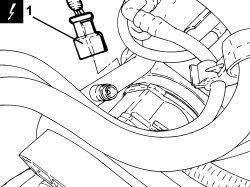
1. Where fitted, disconnect the electrical connection for the air conditioning compressor engagement solenoid.
| Description | Connector | |
|---|---|---|
| 1 | Air conditioning compressor engagement electro-magnet | See L020 AIR CONDITIONING COMPRESSOR ENGAGEMENT ELECTRO-MAGNET |
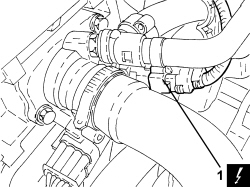
1. Disconnect the electrical connection for the engine coolant temperature sensor.
| Description | Connector | |
|---|---|---|
| 1 | Engine coolant temperature sensor/sender unit | See K036 ENGINE COOLANT TEMPERATURE SENSOR/SENDER UNIT |
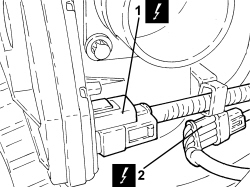
1. Disconnect the electrical connection for the throttle body.
| Description | Connector | |
|---|---|---|
| 1 | Integrated throttle body actuator | See N075 BUILT-IN THROTTLE BODY ACTUATOR |
2. Disconnect the injector wiring coupling.
| Description | Connector | |
|---|---|---|
| 2 | Injector coupling | See D081 INJECTOR JUNCTION |
1. Disconnect the electrical connection for the fuel vapour solenoid.
| Description | Connector | |
|---|---|---|
| 1 | Fuel vapour recovery solenoid | See L010 FUEL VAPOUR RECOVERY SOLENOID VALVE |
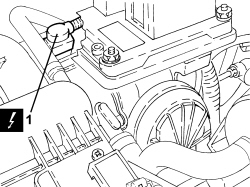
1. Disconnect the electrical connections for the injection-ignition control unit.
| Description | Connector | |
|---|---|---|
| 1 | Engine management control unit | See M010 ENGINE MANAGEMENT ECU |
2. Undo the nut and remove the earth lead for the injection-ignition control unit.
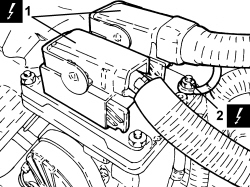
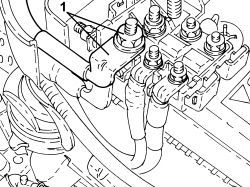
- Remove the protection from the battery positive terminal and the fuse and relay control unit cover.
1. Undo the nut and remove the power supply lead.
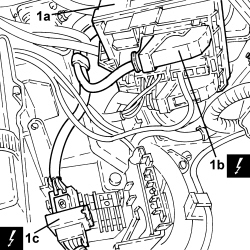
1. Rotate fuse and relay control unit (1a) and disconnect electrical connections (1b) and (1c).
| Description | Connector | |
|---|---|---|
| 1b | Engine compartment junction unit | See B001 JUNCTION UNIT |
| Description | Connector | |
|---|---|---|
| 1c | Front/engine coupling | See D004 FRONT/ENGINE COUPLING |
1. Disconnect the electrical connection for the upper Lambda sensor.
| Description | Connector | |
|---|---|---|
| 1 | Lambda sensor on pre-converter | See K015 LAMBDA SENSOR ON PRE-CATALYZER |
2. Disconnect the electrical connection for the lower Lambda sensor.
| Description | Connector | |
|---|---|---|
| 2 | Lambda sensor on catalytic converter | See K017 LAMBDA SENSOR ON CATALYZER |
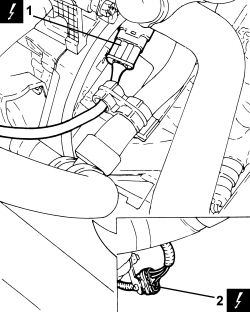
- Release the intermediate fastenings under the intake manifold and remove the wiring loom, working underneath the vehicle.
Refitting
- Refit the wiring loom and connect to the intermediate fastenings.
- Connect the electrical connection for the lower Lambda sensor.
- Connect the electrical connection for the upper Lambda sensor.
- Connect the electrical connections and place the fuse and relay control unit back in position.
- Connect the power supply lead and tighten the nut.
- Place the protection for the battery positive terminal and the fuse and relay control unit cover back in position.
- Place the earth lead for the injection-ignition control unit in position and secure it using the nut.
- Connect the electrical connections for the injection-ignition control unit.
- Connect the electrical connection for the fuel vapour solenoid.
- Connect the injector wiring junction.
- Connect the electrical connection for the throttle body.
- Connect the electrical connection for the engine coolant temperature sensor.
- Connect the electrical connection for the air conditioning compressor engagement solenoid.
- Connect the electrical connections for the ignition coils.
- Tighten the bolt securing the wiring loom retaining duct.
- Connect the electrical connection for the cam angle sensor.
- Place the earth lead in position on the engine and secure it using the bolt.
- Connect the electrical connection for the air pressure/temperature sensor.
- Tighten the timing belt cover retaining bolt.
- Place the earth lead for the starter motor in position and secure it using the nut.
- Close the protective cover for the starter motor electrical connections.
- Connect the electrical connection for the knock sensor.
- Place the engine block earth lead in position and secure it using the bolt.
- Connect the earth lead for the alternator and secure it using the nut.
- Secure the electrical connection for the rpm sensor.
- Connect the electrical connection for the engine oil pressure switch.
Op. 1048A32 HOSE FROM AIR FILTER TO INTAKE MANIFOLD - R + R
Op. 1048A10 AIR FILTER ASSEMBLY - R.R.
Removing
- Position the vehicle on a lift.
Op. 1016A10 SOUND-PROOFING COVER - R.R
Op. 1064A31 HEAT SHIELD FOR TURBOCHARGER - R.R.
1. Undo the bolt and remove the battery earth lead from the upper head.
2. Detach the timing sensor electrical connection.
| Description | Connector | |
|---|---|---|
| 2 | Timing sensor | See K047 TIMING SENSOR |
- Move the ignition coils electrical connections safely clips.
3. Unscrew the nut securing the wiring harness duct.
4. Raise the clip and move the wiring harness duct.
5. Disconnect the electrical connections from the ignition coils, releasing the wiring harness duct from the stud.
| Description | Connector | |
|---|---|---|
| 5 | Ignition coil | See A030 IGNITION COIL |
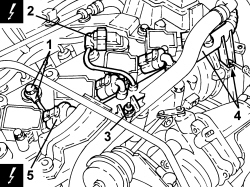
1. Disconnect the electrical connection for the air pressure sensor.
| Description | Connector | |
|---|---|---|
| 1 | Turbocharging sensor | See K082 SUPERCHARGING SENSOR |
2. Disconnect the electrical connection for the front Lambda sensor to the catalytic converter.
| Description | Connector | |
|---|---|---|
| 2 | Lambda sensor on pre-catalyzer | See K015 LAMBDA SENSOR ON PRE-CATALYZER |
3. Disconnect the electrical connection for the rear Lambda sensor to the catalytic converter.
| Description | Connector | |
|---|---|---|
| 3 | Lambda sensor on catalytic converter | See K017 LAMBDA SENSOR ON CATALYZER |
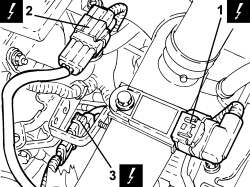
1. Disconnect the electrical connection for the engine coolant temperature sensor.
| Description | Connector | |
|---|---|---|
| 1 | Engine coolant temperature sensor/sender unit | See K036 ENGINE COOLANT TEMPERATURE SENSOR/SENDER UNIT |
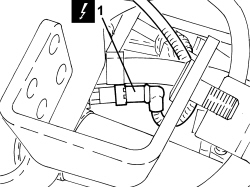
1. Detach the electrical connection for the throttle body.
| Description | Connector | |
|---|---|---|
| 1 | Integrated throttle body actuator | See N075 BUILT-IN THROTTLE BODY ACTUATOR |
2. Disconnect the supercharging air by-pass valve electrical connection.
| Description | Connector | |
|---|---|---|
| 2 | See L102 TURBOCHARGER BY-PASS SOLENOID VALVE |
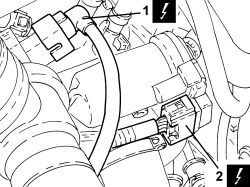
1. Disconnect the electrical connection for the Waste Gate solenoid.
| Description | Connector | |
|---|---|---|
| 1 | Waste gate solenoid | See L037 WASTE GATE SOLENOID VALVE |
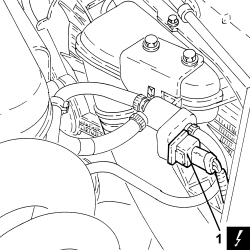
1. Undo the bolt and remove the earth lead from the air conditioner compressor mounting.
2. Disconnect the electrical connection for the air temperature pressure sensor.
| Description | Connector | |
|---|---|---|
| 2 | Air pressure - temperature sensor | See K044 AIR TEMPERATURE/PRESSURE SENSOR |
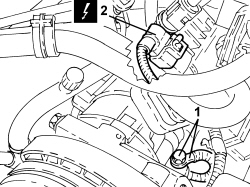
1. Disconnect the injector wiring coupling.
| Description | Connector | |
|---|---|---|
| 1 | Injector coupling | See D081 INJECTOR JUNCTION |
2. Disconnect the electrical connection for the fuel vapour solenoid valve.
| Description | Connector | |
|---|---|---|
| 2 | Fuel vapour recovery solenoid valve | See L010 FUEL VAPOUR RECOVERY SOLENOID VALVE |
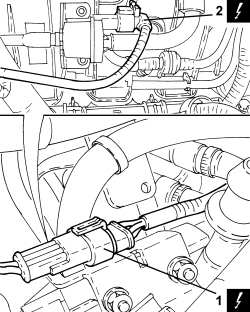
Op. 7055B54 UNDER ENGINE PROTECTION/GUARD - R.R.
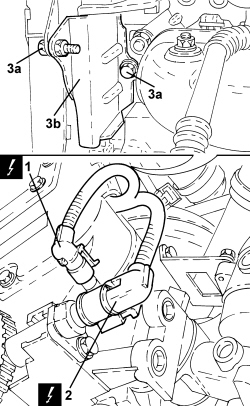
1. Disconnect the electrical connection for the engine oil pressure switch.
| Description | Connector | |
|---|---|---|
| 1 | Engine oil pressure sensor (switch). | See K030 ENGINE OIL PRESSURE SENSOR (SWITCH) |
2. Detach the rpm sensor electrical connection.
| Description | Connector | |
|---|---|---|
| 2 | Rpm sensor | See K046 RPM SENSOR |
3. Undo bolts (3a) and remove timing belt inner guard (3b).
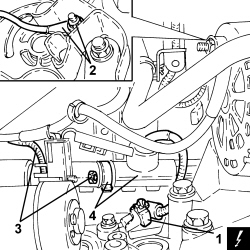
1. Disconnect the electrical connection for the knock sensor.
| Description | Connector | |
|---|---|---|
| 1 | Knock sensor | See K050 DETONATION SENSOR |
2. Undo the nut and disconnect the alternator earth lead.
3. Undo the nut, remove the starter motor power cable and the earth cable.
4. Open the engine wiring duct retaining clips.
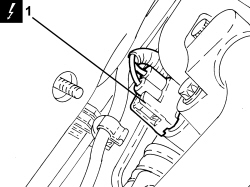
1. Disconnect the electrical connection for the air conditioning compressor engagement solenoid valve.
| Description | Connector | |
|---|---|---|
| 1 | Air conditioning compressor engagement solenoid | See L020 AIR CONDITIONING COMPRESSOR ENGAGEMENT ELECTRO-MAGNET |
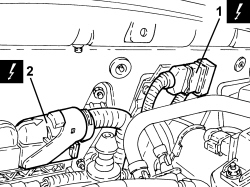
1. Disconnect the engine intermediate coupling.
| Description | Connector | |
|---|---|---|
| 1 | Engine cables/engine services cable coupling | See D004 FRONT/ENGINE COUPLING |
2. Disconnect the electrical connection for the injection/ignition control unit.
| Description | Connector | |
|---|---|---|
| 2 | Engine management control unit | See M010 ENGINE MANAGEMENT ECU |
- Open the retaining clips and remove the engine wiring.
Refitting
- Refit the engine wiring in its housing and close the retaining clips.
- Connect the electrical connection for the injection/ignition control unit.
- Connect the engine intermediate coupling.
- Connect the electrical connection for the air conditioning compressor engagement solenoid valve.
- Close the engine wiring duct retaining clips.
- Connect the starter motor power cable and the earth cable and tighten the nut.
- Connect the alternator earth lead and tighten the nut.
- Connect the electrical connection for the knock sensor.
- Place the timing belt inner guard in its housing and secure it using the bolts.
- Secure the electrical connection for the rpm sensor.
- Connect the electrical connection for the engine oil pressure switch.
Op. 7055B54 UNDER ENGINE PROTECTION/GUARD - R.R.
- Connect the electrical connection for the fuel vapour solenoid valve.
- Connect the injector wiring junction.
- Connect the electrical connection for the air pressure temperature sensor.
- Connect the earth lead from the air conditioner compressor support and tighten the bolt.
- Connect the electrical connection for the Waste Gate solenoid.
- Connect the supercharging air by-pass valve electrical connection.
- Connect the electrical connection for the throttle body.
- Connect the electrical connection for the engine coolant temperature sensor.
- Connect the electrical connection for the rear Lambda sensor to the catalytic converter.
- Connect the electrical connection for the front Lambda sensor to the catalytic converter.
- Secure the electrical connection for the timing sensor.
- Connect the electrical connections for the ignition coils.
- Tighten the the nut securing the wiring harness duct.and fasten the retaining clip.
- Connect the earth lead from the upper head and tighten the bolt.
Op. 1064A31 HEAT SHIELD FOR TURBOCHARGER - R.R.
Op. 1016A10 SOUND-PROOFING COVER - R.R
- Remove the vehicle from the lift.
Parts & tools for this job For 2007 Fiat Bravo
- PARTEngine gasket setSearch: Fiat Bravo 2007 engine gasket set
- TOOLTorque wrenchSearch: 3/8 inch torque wrench
- TOOLFeeler gauge setSearch: feeler gauge set
Links open Amazon search results in a new tab. As an Amazon Associate I earn from qualifying purchases.