
Fuel injectors - r.r.
- Make
- Fiat
- Model
- Croma Factory Service Manual
- Year
- 2005–2010
- Section
- Diesel injection system › Fuel injectors - r.r.
FUEL INJECTORS - R.R.
Removing
Op. 1016A10 SOUND-PROOFING COVER - R.R
Op. 5530B52 BATTERY SUPPORT/DRIP TRAY - R.R
Op. 1048B27 RIGID PIPE FOR AIR INLET TO THROTTLE BODY - R R
Op. 1060G50 THROTTLE BODY - R.R
Op. 1080C24 E.G.R. SYSTEM SOLENOID - R + R
Op. 1060F36 PIPES (ALL) FROM FUEL MANIFOLD TO INJECTOR - R.R.
1. Manually push the clips (1a) and disconnect the pipe from the injectors to the fuel manifold (1b), injector side.
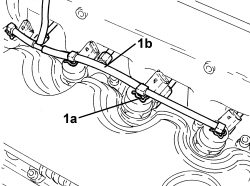
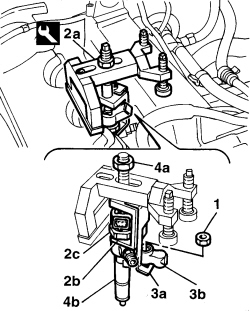
1. Undo the nuts fixing the injector mounting brackets.
2. Position the tool (2a) for extracting the injectors, taking care to position the lifting bracket (2b) under the polygonal area (2c) of the injector.
| Tool | Description | Function | Validity |
|---|---|---|---|
| 1870739000 | Extractor | Removing injectors | 1.9 JTD 8V 1.9 JTD 16V |
3. Position the second tool lifting bracket (3a) under the injector securing bracket (3b).
4. Tighten the tool nut (4a) and remove the injector assembly (4b).
- Repeat the operation for the remaining injectors.
If new injector(s) is (are) being fitted, check that the engine management control unit recognizes the new injector(s) using the Examiner.
Refitting
- Place the injectors (1a) in their seats complete with brackets and fasten them tightening the nuts to the recommended torque.
| Component | Fastening | dia | Value (daNm) | Validity |
|---|---|---|---|---|
| Injector brackets | Nut | M8 | (cylinder head side) 2.7 - 3.3 | 1.9 JTD 8v |
- Connect the pipe from the injectors to the fuel recovery manifold to the injectors and push home until the clips click into place.
Op. 1060F36 PIPES (ALL) FROM FUEL MANIFOLD TO INJECTOR - R.R.
Op. 1080C24 E.G.R. SYSTEM SOLENOID - R + R
Op. 1060G50 THROTTLE BODY - R.R
Op. 1048B27 RIGID PIPE FOR AIR INLET TO THROTTLE BODY - R R
Op. 5530B52 BATTERY SUPPORT/DRIP TRAY - R.R
Op. 1016A10 SOUND-PROOFING COVER - R.R
Removing
- Position the vehicle on a lift.
Op. 1016A10 SOUND-PROOFING COVER - R.R
- Disconnect the electrical connections from the injectors.
| Description | Connector | |
|---|---|---|
| Injector | See N070 INJECTOR |
Op. 1060F36 PIPES (ALL) FROM FUEL MANIFOLD TO INJECTOR - R.R.
1. Undo the injector bracket retaining nuts.
2. Remove the injectors (2a) complete with brackets using the tool (2b).
If a new injector/new inectors are fitted:
- determine the identification code stamped on the top surface;
- check, using an Examiner, the the new injector(s) is (are) recognized by the engine management control unit.
Start the removal beginning with the injector for cylinder no. 1 and continue with the injectors for cylinders 2, 3 and 4.
| Tool | Description | Function | Validity |
|---|---|---|---|
| 1870897300 | Extractor | Removing injectors | 1.9 JTD 8V 1.9 JTD 16V 2.4 JTD 20V |
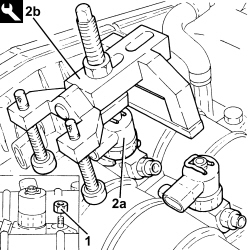
Refitting
- Refit the injectors complete with brackets and tighten nuts to the specified torque.
Start refitting beginning with the injector for cylinder no. 4 and continue with the injectors for cylinders 3, 2 and 1.
| Component | Fastening | dia | Value (daNm) | Validity |
|---|---|---|---|---|
| Injector brackets | Nut | M8 | (cylinder head extension side) 2.3 - 2.8 | 1.9 JTD 16v 2.4 JTD 20v |
Op. 1060F36 PIPES (ALL) FROM FUEL MANIFOLD TO INJECTOR - R.R.
- Connect the electrical connections to the injectors.
Op. 1016A10 SOUND-PROOFING COVER - R.R
- Remove the vehicle from the lift.
Parts & tools for this job For 2005 Fiat Croma
- PARTFuel filterSearch: Fiat Croma 2005 fuel filter
- TOOLFuel pressure test kitSearch: fuel pressure test kit
- TOOLFuel line disconnect toolSearch: fuel line disconnect tool
Links open Amazon search results in a new tab. As an Amazon Associate I earn from qualifying purchases.