
General welding precautions (Panel repairs)
- Make
- Land Rover
- Model
- Discovery II (UK)
- Section
- Procedures › General welding precautions
PROCEDURES
General welding precautions
General
For ease of reference, the diagrams on the following pages show only the type of weld used in repair where it varies from that used in production.
The replacement welds in the welding diagrams are denoted by the following symbols:
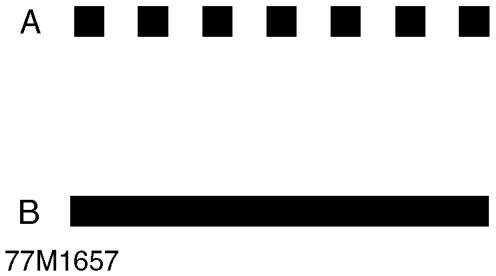
a = Single/Multiple thickness plug welds b = MIG seam weld
When NOT carrying out welding operations the following criteria must be observed: l Where resistance spot welds have been used in production, these must be reproduced with new spot welds in replacement where possible. All such reproduction spot welds must be spaced 30 mm (1.181 in) apart; l When spot welding, it is recommended that test coupons of the same metal gauges and materials are produced to carry out peel tests to ensure that welding equipment being used can produce a satisfactory joint. Plug welds must be used if a satisfactory spot weld cannot be produced; l The electrode arms on hand-held spot welding guns must not exceed 300 mm (11.811 in) in length; l Single-side spot welding is not acceptable; l Brazing and gas welding are not acceptable EXCEPT where they have been specified in production; l Where 3 metal thicknesses or more are to be welded together it is imperative to use MIG plug welds to ensure joint strength; l MIG plug welds must be used in repair joints where there is no access for a resistance spot welder. To replace each production spot weld a hole must be drilled and/or punched, and a MIG plug weld then made in its place. The number of plug welds must match exactly the number of spot welds which have been removed; l Where holes are left in an existing panel after removal of the spot welds, a single MIG plug weld will be made in each hole as appropriate.
Seat belt anchorages
Seat belt anchorages are safety critical. When making repairs in these areas, it is essential to follow design specifications. Note that High Strength Low Alloy (HSLA) steel may be used for seat belt anchorages.
Where possible, the original production assembly should be used, complete with its seat belt anchorages, or the cut line should be so arranged that the original seat belt anchorage is not disturbed.
All welds within 250 mm (9.842 in) of seat belt anchorages must be carefully checked for weld quality, including spacing of spot welds.
Parts & tools for this job For Land Rover Discovery
- TOOLTorque wrenchSearch: 3/8 inch torque wrench
- TOOLSocket setSearch: socket set metric
- BOOKHaynes manualSearch: Haynes manual Land Rover Discovery
Links open Amazon search results in a new tab. As an Amazon Associate I earn from qualifying purchases.