
Engine and gearbox assembly (page 9 of 9)
- Make
- Rover
- Model
- 100 Repair Manual Supplement
- Year
- 1996–1998
- Section
- Repairs
EngineEngine and gearbox assembly · page 9 of 9
Refit
- Lower power unit into vehicle and set horizontal.
- Position LH support member to sub frame, fit bolts and tighten to 45 Nm.
- Align mounting bracket to LH mounting, fit bolts and tighten to 45 Nm.
- Align RH mounting, fit bolt and tighten to 85 Nm.
- Remove adjustable lifting bracket 18G 1598.
- Remove lifting brackets tool 18G 1572 from cylinder head.
- Secure plug leads to clips.
- Fit both drive shaft and hub assemblies. See REPAIR MANUAL - Manual Gearbox - Differential Oil Seal.
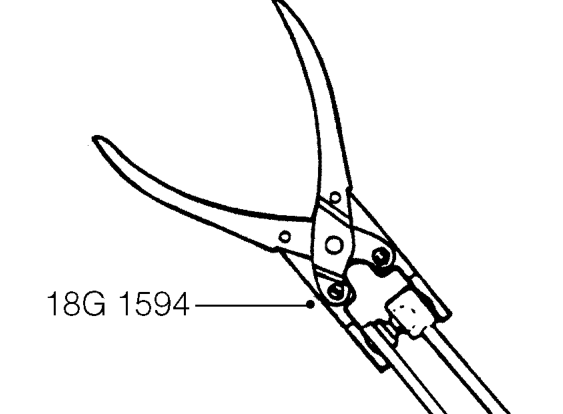
- Clean gearchange linkage ball joint, and using tool 18G 1594 connect ball joint.
- Connect steady bar bracket to gearbox, fit bolts and tighten to 85 Nm.
- Connect oxygen sensor multiplug and secure to bracket.
- Secure oxygen sensor lead to engine harness with clip.
- Connect exhaust front pipe to manifold. See MANIFOLD & EXHAUST SYSTEMS, Repairs.
- Fit starter motor. See REPAIR MANUAL - Electrical.
- Remove stand(s) and lower vehicle.
- Position washer reservoir and tighten screws.
- Connect washer pump multiplugs.
- Connect servo pipe to manifold.
- Connect throttle cable to throttle cam and adjust cable. See ENGINE MANAGEMENT SYSTEM - MEMS, Adjustments.
- Connect fuel return hose and secure clip.
- Connect fuel feed hose union to filter and using backing spanner, tighten union to 28 Nm.
- Connect heater hoses and tighten clips.
- Connect expansion tank hose to inlet manifold and secure clip.
- Connect expansion tank hose and tighten hose clip.
- Connect top hose and tighten clip.
- Clean gearchange upper ball joint, and using tool 18G 1584 connect ball joint.
- Connect speedo cable.
- Connect clutch cable to release lever and secure in clip.
- Fit battery feed cable connector to fuse box and fit 30A fuse and fuse box lid.
- Secure earth leads to body.
- Secure oxygen sensor relay to bracket. connect multiplugs to inertia switch, relay module, ECM and harness.
- Secure harness multiplug to bracket.
- Position air cleaner support bracket and tighten nuts.
- Position battery tray and charcoal canister assembly.
- Position fuse box bracket, fit bolts securing battery tray and tighten to 9 Nm.
- Connect charcoal canister hose and secure with clip.
- Connect ECM vacuum hose to inlet manifold.
- Secure fuse box to bracket.
- Fit air cleaner. See ENGINE MANAGEMENT SYSTEM - MEMS, Repairs.
- Refill gearbox oil. See REPAIR MANUAL - Maintenance.
- Refill engine oil. See REPAIR MANUAL - Maintenance.
- Refill cooling system. See REPAIR MANUAL - Maintenance.
- Fit bonnet. See REPAIR MANUAL - Body.
Parts & tools for this job For 1996 Rover 100
- PARTEngine gasket setSearch: Rover 100 1996 engine gasket set
- TOOLTorque wrenchSearch: 3/8 inch torque wrench
- TOOLFeeler gauge setSearch: feeler gauge set
Links open Amazon search results in a new tab. As an Amazon Associate I earn from qualifying purchases.