
Automatic gearbox & converter - 97.5 my on
- Make
- Rover
- Model
- 400 Workshop Manual
- Year
- 1995–2000
- Section
- Repairs › Automatic gearbox & converter - 97.5 my on
Automatic gearboxAutomatic gearbox & converter - 97.5 my on · page 1 of 7
- Fit anti-beaming bracket and exhaust support bracket. Tighten bolts anti-beaming bracket to engine to 24 Nm and bolt anti-beaming bracket to gearbox to 44 Nm.
- Fit exhaust front pipe. See MANIFOLD & EXHAUST SYSTEMS, Repairs.
- Remove lifting bracket from starter motor top fixing. Fit starter motor bolt and tighten to 45 Nm.
- Clean oil cooler hose connections.
- Connect oil cooler hoses and secure with clips.
- Connect top hose and secure with clip
- Connect down shift inner cable to cam.
- Adjust down shift cable. See Adjustments.
- Align cable bracket to gearbox and cooler pipes. Fit and tighten bolts.
- Fit earth lead to gearbox. Secure with bolt.
- Connect multiplug to speed sensor.
- Connect feed lead to starter solenoid, secure with nut and fit terminal cover.
- Connect lucar to starter solenoid.
- Connect engine harness bracket to bracket on starter motor and tighten bolt.
- Fit distributor. See ENGINE MANAGEMENT SYSTEM - PGMFi, Repairs.
- Position power steering pump, fit securing bolts. Do not tighten bolts.
- Fit and tension power steering pump drive belt. See STEERING, Repairs.
- Refit underbelly panel. See BODY, Exterior fittings.
- Fit road wheel(s) and tighten nuts to correct torque. See INFORMATION, Torque wrench settings.
- Remove stand(s) and lower vehicle.
- Refit air cleaner. See ENGINE MANAGEMENT SYSTEM - PGMFi, Repairs.
- Refill cooling system. See COOLING SYSTEM, Adjustments.
- Fill gearbox with correct quantity and grade of oil. See MAINTENANCEMaintenance.
- Connect both battery leads, negative lead last.
- Check ignition timing. See ENGINE MANAGEMENT SYSTEM - PGMFi, Adjustments.
AUTOMATIC GEARBOX & CONVERTER - 97.5 MY ON
Service repair no - 44.20.02/99
Remove
- Raise front of vehicle.
WARNING: Support on safety stands.
- Remove road wheel(s).
- Remove air cleaner. See ENGINE MANAGEMENT SYSTEM - PGMFi, Repairs.
- Remove underbelly panel. See BODY, Exterior fittings.
- Drain gearbox oil. See MAINTENANCEMaintenance.
- Drain cooling system. See COOLING SYSTEM, Adjustments.
- Disconnect both battery leads, negative first.
- Remove distributor. See ENGINE MANAGEMENT SYSTEM - PGMFi, Repairs.
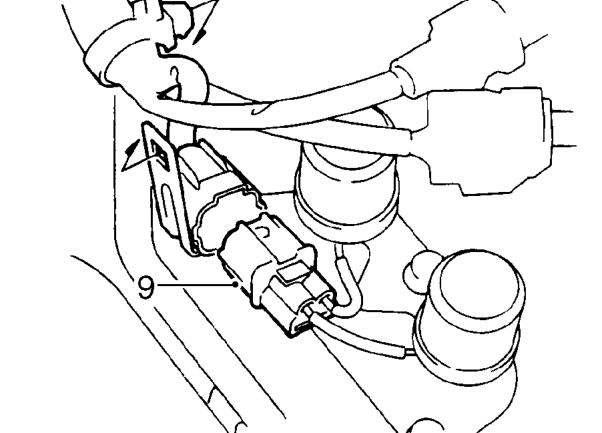
- Disconnect lock-up control solenoid multiplug from engine harness.
Parts & tools for this job For 1995 Rover 400
- PARTTransmission filter kitSearch: Rover 400 1995 transmission filter kit
- FLUIDAutomatic transmission fluidSearch: Rover automatic transmission fluid
- TOOLFluid transfer pumpSearch: fluid transfer pump
Links open Amazon search results in a new tab. As an Amazon Associate I earn from qualifying purchases.