
Harness - engine - diesel (page 3 of 3)
- Make
- Land Rover
- Model
- Discovery II (UK)
- Section
- Repairs
HarnessesHarness - engine - diesel · page 3 of 3
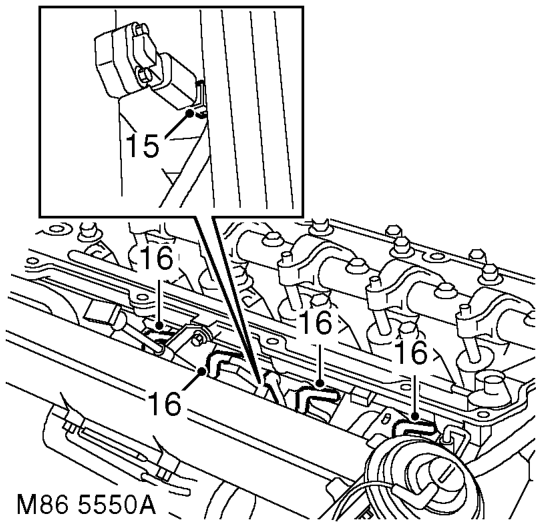
- Disconnect multiplug from MAP sensor.
- Disconnect 4 glow plug connectors.
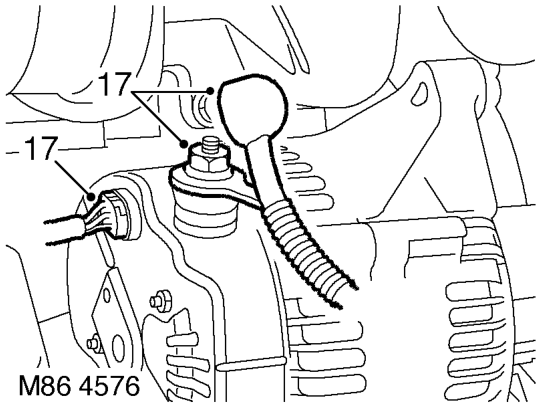
- Release nut securing battery lead to alternator and disconnect multiplug from alternator.
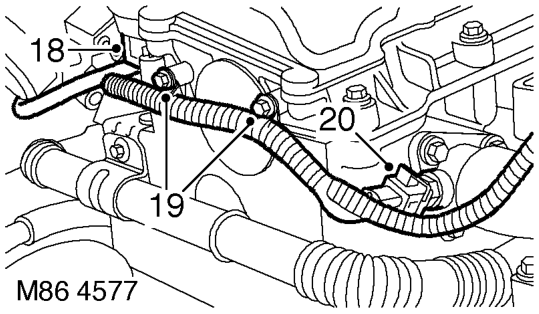
- Disconnect injector multiplug.
- Remove 2 bolts securing harness to front of cylinder head.
- Disconnect multiplug from ECT sensor.
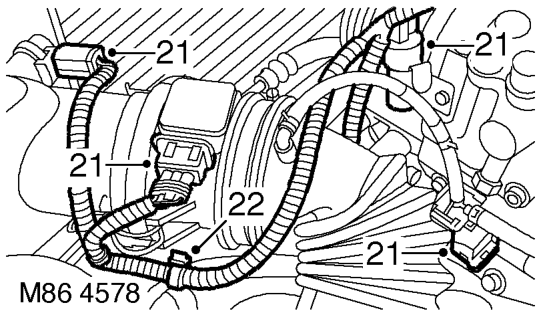
- Disconnect multiplugs from A/C compressor, turbocharger solenoid valve, AAP sensor and MAF sensor.
- Release harness clips from coolant hose and PAS hose.
- Note the route of the engine harness, release from underneath of inlet manifold and remove from engine.
Refit
- Position harness on engine.
- Connect multiplugs to A/C compressor, turbocharger solenoid valve, AAP and MAF sensors.
- Position harness clips to coolant and PAS hoses.
- Connect multiplug to ECT sensor.
- Position harness to front of cylinder head and tighten bolts to 10 Nm (7 lbf.ft).
- Connect injector multiplug.
- Connect multiplug and position battery cable to alternator and tighten nut.
- Connect multiplug to fuel temperature sensor.
- Connect multiplug to MAP sensor.
- Connect glow plugs.
- Connect CKP sensor multiplug.
- Connect Lucar to starter solenoid.
- Connect battery lead to starter solenoid and tighten nut to 10 Nm (7 lbf.ft).
- Position harness clip to coolant pipe.
- Locate harness over bell housing and connect multiplug to oil pressure switch.
- Connect 2 multiplugs to EGR solenoids.
- Connect engine harness multiplug to ECM and main harness.
- Connect engine harness multiplugs to fuse box.
- Position glow plug lead to fuse box and tighten bolt to 3.5 Nm (2.6 lbf.ft).
- Position battery and alternator leads to fuse box and tighten bolts to 6 Nm (4.4 lbf.ft).
- Fit engine compartment fuse box cover.
- Fit battery carrier.
- Fit engine acoustic cover.
Parts & tools for this job For Land Rover Discovery
- PARTGlow plugsSearch: Land Rover Discovery glow plugs
- TOOLGlow plug socketSearch: glow plug socket
- TOOLDiesel compression testerSearch: diesel compression tester
Links open Amazon search results in a new tab. As an Amazon Associate I earn from qualifying purchases.