
Injector needle lift sensor
- Make
- Rover
- Model
- 400 Workshop Manual
- Year
- 1995–2000
- Section
- Repairs › Injector needle lift sensor
Engine management system - EDCInjector needle lift sensor
INJECTOR NEEDLE LIFT SENSOR
Service repair no - 18.30.72
Remove
NOTE: The injector needle lift sensor is an integral part of No. 1 injector and can not be replaced separately.
- Disconnect battery earth lead.
- Remove engine acoustic cover. See BODY, Exterior fittings.
- Remove needle lift sensor multiplug from injector pump mounting bracket.
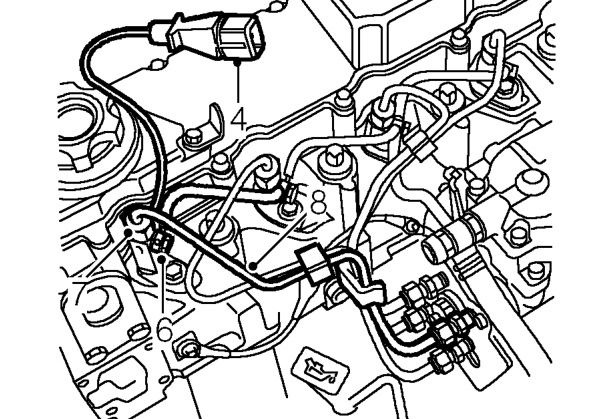
- Disconnect needle lift sensor multiplug.
- Position absorbent cloth around fuel injector to absorb any fuel spillages.
- Remove spill return hose banjo bolt and discard 2 sealing washers.
CAUTION: To prevent damage to fuel system pipes or components use 2 spanners when loosening or tightening unions.
- Slacken injector pipe union at injector. and FIP.
- Disconnect injector pipe from injector and move aside.
CAUTION: Plug the connections to prevent the ingress of dirt.
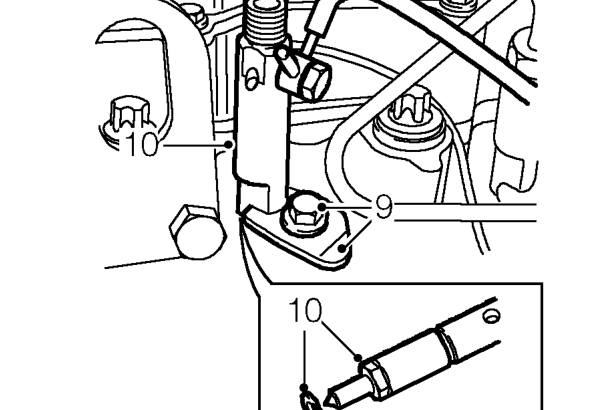
- Remove bolt and collect clamp plate securing injector to cylinder head.
- Remove injector from cylinder head and discard sealing washer.
Refit
- Thoroughly clean injector and injector seat in cylinder head.
- Fit new sealing washer to injector and fit to cylinder head.
CAUTION: Domed surface of sealing washer must face towards injector.
- Fit clamp plate to injector, align injector and clamp plate to bolt hole in cylinder head.
- Fit injector clamp plate bolt and tighten to 25 Nm.
- Remove plugs from injector, and injector pipe.
- Using new sealing washers fit spill return hose banjo bolt to injector and tighten.
- Clean injector pipe/union.
- Position injector pipe to injector and connect union,tighten to 20 Nm.
CAUTION: To prevent damage to fuel system pipes or components, use 2 spanners when loosening and tightening unions.
- Connect needle lift sensor multiplug.
- Fit needle lift sensor multiplug to injector pump mount.
- Fit engine acoustic cover. See BODY, Exterior fittings.
- Connect battery earth lead.
Parts & tools for this job For 1995 Rover 400
- TOOLOBD2 scannerSearch: OBD2 scanner
- TOOLDigital multimeterSearch: automotive digital multimeter
- TOOLBack-probe test leadsSearch: back probe test leads
Links open Amazon search results in a new tab. As an Amazon Associate I earn from qualifying purchases.