
CAUTION: Plug the connections.
- Make
- Rover
- Model
- 600 Repair Manual Supplement
- Year
- 1993–1999
- Section
- Repairs › CAUTION: Plug the connections.
ElectricalCAUTION: Plug the connections.
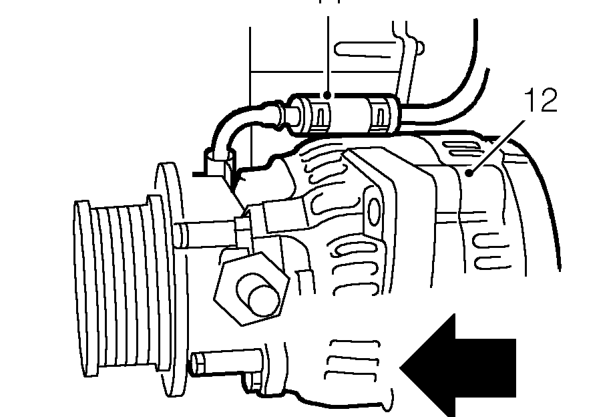
- Release clip and disconnect oil drain hose from alternator.
- Remove alternator from vehicle.
CAUTION: Plug the connections.
Do not carry out further dismantling if component is removed for access only.
- Remove 4 bolts securing vacuum pump to alternator.
- Remove vacuum pump from old alternator and fit to new alternator.
- Fit and tighten bolts securing vacuum pump to alternator.
Refit
- Remove plugs from connections.
- Clean all pipe connections.
- Position alternator to mounting bracket.
- Connect oil return hose and secure with clip.
- Connect oil feed pipe to cylinder block but do not tighten union at this stage.
- Fit bolts securing alternator to mounting bracket. Tighten lower bolt to 45 Nm and upper bolt to 25 Nm.
- Tighten oil feed pipe union at cylinder block.
- Connect vacuum hose to vacuum pump and secure hose with clip.
- Connect battery cable to alternator stud and tighten nut to 4 Nm.Position cover.
- Connect multiplug to alternator.
- Fit auxiliary drive belt. See this section.
- Fit engine acoustic cover. See BODY, Exterior fittings.
- Remove stand(s) and lower vehicle.
- Connect battery earth lead.
Parts & tools for this job For 1993 Rover 600
- TOOLDigital multimeterSearch: automotive digital multimeter
- PARTAssorted fuse kitSearch: car fuse assortment kit
- TOOLWire crimper and connector kitSearch: wire crimper connector kit
Links open Amazon search results in a new tab. As an Amazon Associate I earn from qualifying purchases.