
Original page (page 3 of 7)
- Make
- Rover
- Model
- 600 Rover 600 Repair Manual - Volumes 1 and 2 - 2nd Edition
- Section
- Brakes: repairs
WARNING: Never use an air hose or dry brush to clean brake assemblies. Use a vacuum cleaner, to avoid breathing brake dust.
Contaminated brake discs or pads reduce stopping ability.
When reusing the pads, install them in their original positions to prevent loss of braking efficiency.
CAUTION: Do not allow brake fluid to come into contact with the paintwork as it will cause surface damage. If brake fluid is spilled on the paintwork, wash it off immediately with water.
To prevent spills, cover the hose joints with rags or suitable cloth.
Clean all parts in brake fluid and air dry; blow out all passages with compressed air.
Before reassembling, check that all parts are free of dust and other foreign particles.
Make sure no dirt or other foreign matter is allowed to contaminate the brake fluid.
Do not mix different brands of brake fluid as they may not be compatible.
Do not reuse the drained fluid. Use only clean DOT 4 brake fluid.
Note: Coat piston, piston seal groove, and caliper bore with clean brake fluid.
Replace all rubber parts with new ones whenever disassembled.
Use recommended greases in the caliper seal set.
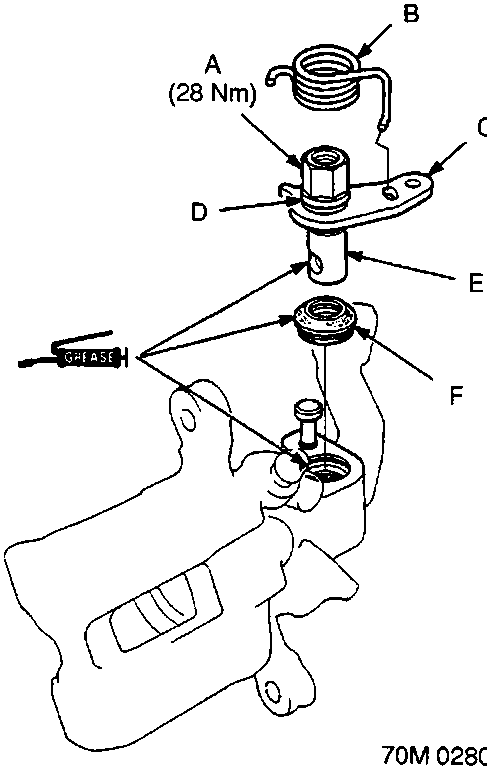
- Parking nut
- Return spring
- Lever
- Spring washer
- Cam
- Cam boot
- Pack all cavities of the needle bearing with recommended grease in the caliper seal set.
- Coat a new cam boot with recommended grease in the caliper seal set and install it in the caliper body.
- Apply recommended grease in the caliper seal set to the pin contacting area of the cam, and install the cam and lever assembly into the caliper body.
- Install the return spring.
CAUTION: When the cam and lever were separated, be sure to assemble them before installing the cam in the caliper body. Install the lever and spring washer, apply thread locking fluid to the threads, and tighten the parking nut while holding the lever with a vice.
Avoid damaging the cam boot since it must be installed before the cam.
When installing the cam, do not allow the cam boot lips to turn outside in.
Parts & tools for this job For Rover 600
- PARTBrake padsSearch: Rover 600 brake pads
- TOOLBrake bleeder kitSearch: one man brake bleeder kit
- FLUIDBrake fluidSearch: brake fluid
Links open Amazon search results in a new tab. As an Amazon Associate I earn from qualifying purchases.