
Inlet manifold - r + r and replace seal
- Make
- Fiat
- Model
- Stilo Factory Service Manual
- Year
- 2001–2007
- Section
- Inlet and exhaust manifolds › Inlet manifold - r + r and replace seal
Inlet manifold - r + r and replace seal
Removing
- 5530B56 BATTERY DRIP TRAY COVER - R.R..
Disconnect the battery negative terminal.
- 1048A10 air cleaner filtering element - replace
- 1056B60 single fuel manifold pipe, with injectors - r + r
- 1048A32 sleeve from air cleaner to intake manifold - r + r
- 1056B82 injection/ignition system e.c.u. (one) - r + r
- 1056B15 throttle body intergral with mds - r r
Fit a suitable container for coolant recovery.
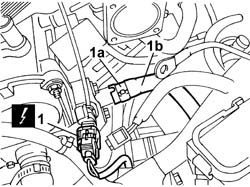
1. Disconnect the electrical connection from the engine coolant temperature sensor.
| Name | Connector | |
|---|---|---|
| 1 | Engine temperature sender unit | K36 |
2. Open the band (1a) and disconnect the engine coolant return pipe from the heater (1b).
Plug the engine coolant return pipe from the heater.
Removing
- 5530B56 BATTERY DRIP TRAY COVER - R.R..
Disconnect the battery negative terminal.
- 1048A10 air cleaner filtering element - replace
- 1056B60 single fuel manifold pipe, with injectors - r + r
- 1048A32 sleeve from air cleaner to intake manifold - r + r
- 1056B82 injection/ignition system e.c.u. (one) - r + r
- 1056B15 throttle body intergral with mds - r r
- 1080E28 enablement solenoid for flow of fuel vapour to inlet - r+r
Position a suitable container to collect the coolant.
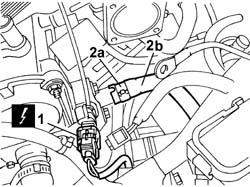
1. Disconnect the electrical connection from the engine coolant temperature sensor.
| Name | Connector | |
|---|---|---|
| 1 | Engine temperature sender unit | K36 |
2. Open the band (2a) and disconnect the engine coolant return pipe from the heater (2b).
Plug the engine coolant return pipe from the heater.
Removing
Place the vehicle on a ramp.
- 1016A10 sound-proofing cover - r + r
- 5530B56 BATTERY DRIP TRAY COVER - R.R.
Disconnect the battery negative terminal.
| Name | Connector | |
|---|---|---|
| Battery | A1 |
- 7055B54 under-engine guard - r r
- 7055B42 Additional FRONT WHEEL ARCH (one), left or right - R.R.
- 1048A32 sleeve from air cleaner to intake manifold - r + r
- 1056B15 throttle body intergral with mds - r r
- 1084A16 oil dip stick pipe - r r
- 1084A22 engine oil filler - r r
- 1072B50 sleeves connecting air capacity box to inlet manifold is - r+r
- 1056B61 single fuel manifold with injectors - r+r with air conveyor/box removed
- 1072B14 inlet manifold - r+r and replace seal with air conveyor/box removed
Removing
Place the car on a lift.
Raise the car on a lift.
- 7055B54 under-engine guard - r r.
Lower the lift.
- 1016A40 ignition coil cover on cylinder head- r+r.
- 5530B56 BATTERY DRIP TRAY COVER - R.R.
Disconnect the battery negative terminal.
- 5530B52 Battery DRIP TRAY/SUPPORT - R.R.
- 1056B82 injection/ignition system e.c.u. (one) - r + r
- 1056B14 throttle case - r + r.
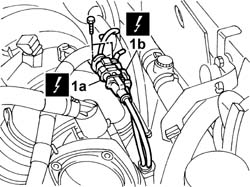
1. On the intake chamber, disconnect the electrical connection (1a) of the left knock sensor and the electrical connection (1b) of the rpm sensor, then undo the bolts securing the connector; release the wiring from the retaining bands.
| Name | Connector | |
|---|---|---|
| 1a | Detonation sensor | K50 |
| Name | Connector | |
|---|---|---|
| 1b | RPM sensor | K46 |
Removing
Place the car on a ramp.
- 5530B56 BATTERY DRIP TRAY COVER - R.R.
Disconnect the battery negative terminal.
- 1016A10 sound-proofing cover - r + r
- 4450B04 right front wheel r r
- 7055B54 under-engine guard - r r
- 7055B42 Additional FRONT WHEEL ARCH (one), left or right - R.R.
- 1092G10 single engine belt r r
- 1092A12 crankshaft pulley - r+r for versions with air conditioner
- 1032D12 timing system protective cover(s) - r + r
- 1060E30 pressure pump pulley - r r
- 1060F50 fuel return manifold - r r
- 1076B50 exhaust pipe attachment to engine - r + r
- 1084A16 oil dip stick pipe - r r
- 5530A14 alternator - r+r for versions with air conditioner
- 2710A35 intermediate drive shaft mount - r r
- 1060E40 supplementary pressure pump - r r
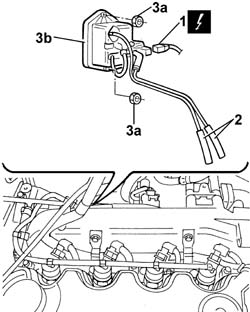
1. Disconnect the electrical connection from the solenoid on the vacuum tank.
| Name | Connector | |
|---|---|---|
| 1 | Butterfly casing solenoid valve | L62 |
2. Disconnect the vacuum pipe from the brake servo vacuum pipe and the pneumatic valve on the throttle body.
3. Undo the nuts (3a) and remove the vacuum reservoir (3b) complete with solenoid valve (3c).
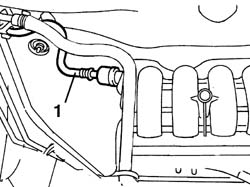
1. Disconnect the anti-evaporation pipe.
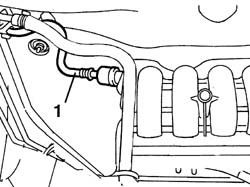
1. Disconnect the anti-evaporation pipe.
Refitting
- 1072B14 inlet manifold - r+r and replace seal with air conveyor/box removed
- 1056B61 single fuel manifold with injectors - r+r with air conveyor/box removed
- 1072B50 sleeves connecting air capacity box to inlet manifold is - r+r
- 1084A22 engine oil filler - r r
- 1084A16 oil dip stick pipe - r r
- 1056B15 throttle body intergral with mds - r r
- 1048A32 sleeve from air cleaner to intake manifold - r + r
- 7055B42 Additional FRONT WHEEL ARCH (one), left or right - R.R.
- 7055B54 under-engine guard - r r
Connect the battery's negative terminal.
| Name | Connector | |
|---|---|---|
| Battery | A1 |
- 5530B56 BATTERY DRIP TRAY COVER - R.R.
- 1016A10 sound-proofing cover - r + r
Remove the car from the ramp.
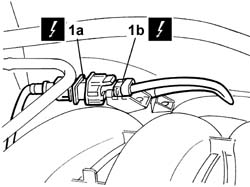
1. On the intake chamber, disconnect the electrical connection (1a) of the timing sensor and the connector (1b) of the right knock sensor, then undo the bolts securing the connectors.
| Name | Connector | |
|---|---|---|
| 1a | Timing sensor | K47 |
| Name | Connector | |
|---|---|---|
| 1b | Knock sensor -2 | K51 |
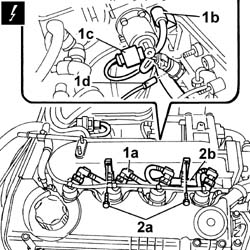
1. Disconnect the electrical connections of injectors (1a), turbo sensor (1b), EGR solenoid (1c) and the electrical connections.
| Name | Connector | |
|---|---|---|
| 1a | Injector | N70 |
| Name | Connector | |
|---|---|---|
| 1b | Turbocharging sensor | K82 |
| Name | Connector | |
|---|---|---|
| 1c | EGR solenoid | L30 |
| Name | Connector | |
|---|---|---|
| 1d | Plug preheating control unit | M15 |
2. Undo the retaining bolt (2a) and move aside the injection wiring mounting (2b).
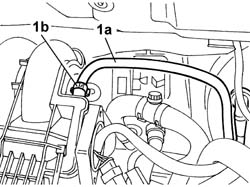
1. Remove the brake servo vacuum pipe to one-way valve (1a) and release it from the retaining band (1b).
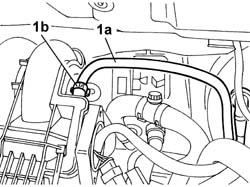
1. Remove the brake servo vacuum pipe to one-way valve (1a) and release it from the retaining band (1b).
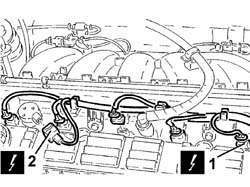
1. Disconnect the electrical connections from the injectors.
| Name | Connector | |
|---|---|---|
| 1 | Injector | N70 |
2. Disconnect the electrical connection from the variable valve timing electro-magnet.
| Name | Connector | |
|---|---|---|
| 2 | Timing variator actuator | N76 |
Release the wiring from the bands located under the modular intake manifold.
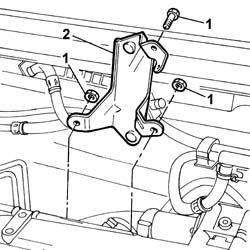
1. Unscrew the retaining bolt and nuts.
2. Remove the vacuum tank mounting bracket.
Release the electrical wiring from the retaining clip housed behind the inlet manifold.
1. Disconnect the electric connection from the third cylinder fuel injector.
| Name | Connector | |
|---|---|---|
| 1 | Injector | N70 |
2. Undo the fixing bolt (2a) and the nuts (2b) and remove the inlet manifold (1c).
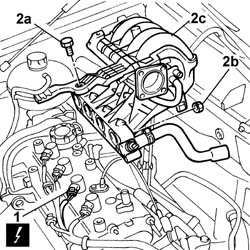
Release the electrical wiring from the retaining clip housed behind the inlet manifold.
1. Disconnect the electric connection from the third cylinder fuel injector.
| Name | Connector | |
|---|---|---|
| 1 | Injector | N70 |
2. Undo the fixing bolt (2a) and the nuts (2b) and remove the inlet manifold (2c).
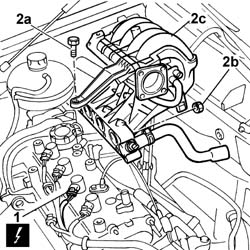
Discharge the fuel pressure using the tool connected to the valve on the fuel manifold pipe.
| Name | Country | |
|---|---|---|
| Rapid connector | 1.870.684.000 |
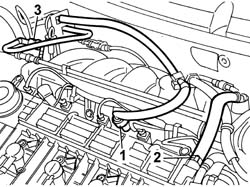
1. Disconnect the fuel supply pipe from the manifold.
2. Disconnect the oil vapour recovery pipe from the cam cover.
3. Disconnect the fuel vapour recovery pipe from the rapid attachment coupling.
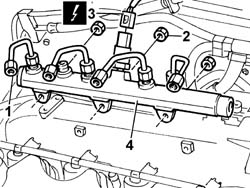
1. Undo the connectors for the fuel pipes from the injectors.
2. Undo the bolts securing the fuel manifold to the intake manifold.
3. Disconnect the electrical connection from the fuel pressure sensor.
| Name | Connector | |
|---|---|---|
| 3 | Fuel pressure sensor | K83 |
4. Remove the single fuel manifold.
Refitting
Position the inlet manifold and tighten the nuts fixing it to the cylinder head.
| Fastening | Component | Ø | Value (daNm) | |
|---|---|---|---|---|
| Nut | INLET MANIFOLD | M7 | 1.5 |
Tighten the fixing bolt on the camshaft housing.
Secure the electrical wiring to the retaining springs housed behind the inlet manifold.
Fit the brake servo vacuum pipe and secure to the retaining clip.
Connect the anti-evaporation pipe.
Connect the coolant supply pipe to the heater and secure it using the retaining band.
Disconnect the electrical connection from the engine coolant temperature sensor.
| Name | Connector | |
|---|---|---|
| Engine temperature sender unit | K36 |
- 1056B15 throttle body intergral with mds - r r
- 1056B82 injection/ignition system e.c.u. (one) - r + r
- 1048A32 sleeve from air cleaner to intake manifold - r + r
- 1056B60 single fuel manifold pipe, with injectors - r + r
- 1048A10 air cleaner filtering element - replace
- 0010T21 coolant check density and top up if necessary
Connect the battery negative terminal.
- 5530B56 BATTERY DRIP TRAY COVER - R.R..
Refitting
Position the inlet manifold and tighten the nuts fixing it to the cylinder head.
| Fastening | Component | Ø | Value (daNm) | |
|---|---|---|---|---|
| Nut | INLET MANIFOLD | M7 | 1.5 |
Tighten the fixing bolt on the camshaft housing.
Secure the electrical wiring to the retaining springs housed behind the inlet manifold.
Fit the brake servo vacuum pipe and secure to the retaining clip.
Connect the anti-evaporation pipe.
Connect the coolant supply pipe to the heater and secure it using the retaining band.
Disconnect the electrical connection from the engine coolant temperature sensor.
| Name | Connector | |
|---|---|---|
| Engine temperature sender unit | K36 |
- 1080E28 enablement solenoid for flow of fuel vapour to inlet - r+r
- 1056B15 throttle body intergral with mds - r r
- 1056B82 injection/ignition system e.c.u. (one) - r + r
- 1048A32 sleeve from air cleaner to intake manifold - r + r
- 1056B60 single fuel manifold pipe, with injectors - r + r
- 1048A10 air cleaner filtering element - replace
- 0010T21 coolant check density and top up if necessary
Connect the battery negative terminal.
- 5530B56 BATTERY DRIP TRAY COVER - R.R..
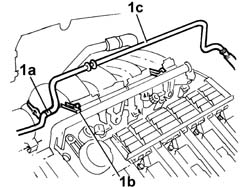
1. Disconnect the rigid pipe from the flexible section (1a), open the retaining brackets (1b) and remove the coolant recovery pipe (1c).
- 5530B52 Battery DRIP TRAY/SUPPORT - R.R.
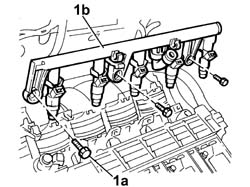
1. Undo the three fixing bolts (1a) and remove the fuel manifold (1b) complete with fuel injectors.
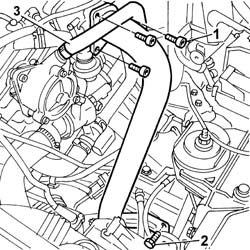
1. Undo the air intake pipe retaining bolts from the intake manifold.
2. Undo the bolts fixing the air intake pipe to the gearbox.
3. Disconnect the engine oil vapour recovery pipe from the cam cover.
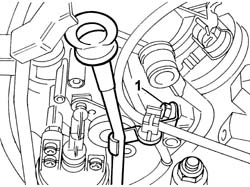
1. Undo the bolt for the engine oil dipstick.
1. Undo the bolts securng the air intake pipe from the intake manifold.
2. Undo the bolt fixing the air intake pipe to the gearbox.
Disconnect the engine oil vapour recovery pipe from the cam cover.
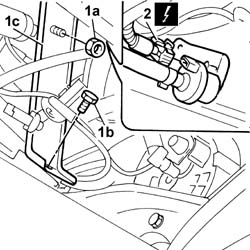
Raise the vehicle.
1. Undo the nut (1a) and bolt (1b), then move the modular inlet manifold mounting bracket (1c).
2. Disconnect the electrical connection from the inlet fuel vapour enabling solenoid valve.
| Name | Connector | |
|---|---|---|
| 2 | Fuel vapour recovery solenoid | L10 |
Release the wiring from the mounting bracket.
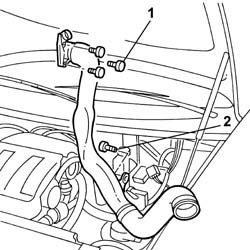
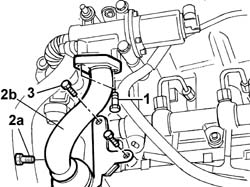
1. Undo the bolt securing the band retaining the exhaust gas supply pipe to the EGR.
2. Unscrew retaining bolts (2a) and remove the front section of the exhaust gas outlet pipe (2b).
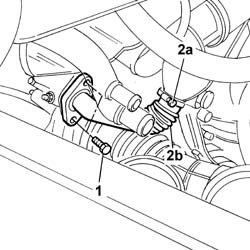
1. Disconnect the bands joining the intake chamber to the connecting hoses to the inlet manifold, then withdraw the chamber from the hoses.
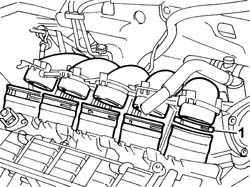
1. Undo the bolts fixing the exhaust gas supply pipe to the EGR solenoid valve.
2. Unscrew band retaining bolts (2a) and remove exhaust gas rear outlet pipe (2b).
3. Undo the bolts fixing the exhaust gas supply pipe mounting bracket to the cylinder head.
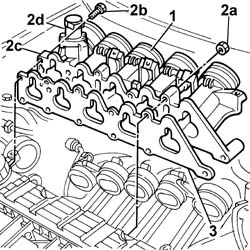
1. Remove the connecting hoses to the inlet manifold.
2. Undo the fixing nuts (2a) and bolt (2b) and remove the inlet manifold (2c) complete with variable valve timing electromagnet (2d)
3. Remove the underlying gasket.
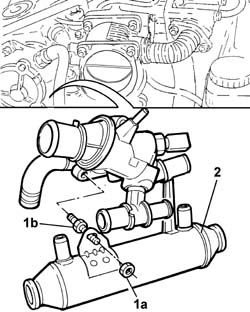
1. Undo nut (1a) securing the exhaust gas delivery pipe to thermostat stud (1b).
2. Move the exhaust gas delivery pipe from its seat so that it can be removed from the intake manifold.
Refitting
Position the inlet manifold complete with new gasket and the hoses connecting to the intake chamber.
Tighten the nuts and bolt securing the inlet manifold to the cylinder head to the specified torque.
| Fastening | Component | Ø | Value (daNm) | |
|---|---|---|---|---|
| Nut | INLET MANIFOLD | M8 | 2.5 |
| Fastening | Component | Ø | Value (daNm) | |
|---|---|---|---|---|
| Nut | INLET MANIFOLD | M8 | 2.5 |
Fit the intake chamber ducts on the hoses connecting to the inlet manifold and secure them with the retaining bands.
Connect the electrical connection to the inlet fuel vapour enabling solenoid valve.
| Name | Connector | |
|---|---|---|
| Fuel vapour recovery solenoid | L10 |
Fit the inlet manifold mounting bracket.
Lower the vehicle.
Tighten the bolt securing the engine oil level dipstick tube to the inlet manifold.
Fit the fuel manifold complete with fuel injectors.
Tighten the retaining bolts.
Fit the coolant recovery pipe and secure it to the plastic bands.
Connect the flexible pipe to the rigid section of the recovery pipe.
Connect the fuel supply pipe to the relevant manifold.
Connect the oil vapour recovery pipe to the cam cover.
Connect the fuel vapour recovery pipe from the rapid attachment coupling.
Connect the electrical connections to the injectors.
| Name | Connector | |
|---|---|---|
| Injector | N70 |
Connect the electrical connection to the variable valve timing electro-magnet.
| Name | Connector | |
|---|---|---|
| Timing variator actuator | N76 |
Secure the wiring to the bands located under the modular inlet manifold.
On the intake chamber, connect the electrical connection of the timing sensor and the right knock sensor connector.
| Name | Connector | |
|---|---|---|
| Timing sensor | K47 |
| Name | Connector | |
|---|---|---|
| Knock sensor -2 | K51 |
On the intake chamber, connect the electrical connection of the left knock sensor and the electrical connection of the rpm sensor, then tighten the bolts securing the connector; release the wiring from the retaining bands.
| Name | Connector | |
|---|---|---|
| Detonation sensor | K50 |
| Name | Connector | |
|---|---|---|
| RPM sensor | K46 |
- 1056B14 throttle case - r + r.
- 1056B82 injection/ignition system e.c.u. (one) - r + r
- 5530B52 Battery DRIP TRAY/SUPPORT - R.R.
Connect the battery negative terminal.
- 5530B56 BATTERY DRIP TRAY COVER - R.R.
- 1016A40 ignition coil cover on cylinder head- r+r.
Raise the lift.
- 7055B54 under-engine guard - r r.
Lower the lift.
Remove the car from the lift.
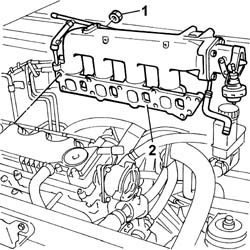
1. Unscrew the nuts securing the intake manifold to the cylinder head.
2. Remove the intake manifold from the cylinder head.
Remove the inlet manifold gasket.
Refitting
Fit the new exhaust manifold gasket to the cylinder head studs.
Fit the intake manifold to its seat on the cylinder head.
Tighten the nuts securing the intake manifold to the cylinder head to the recommended torque.
| Fastening | Component | Ø | Value (daNm) | |
|---|---|---|---|---|
| Nut | INLET MANIFOLD | M8 | 2.5 |
Fit the pipe carrying exhaust gas to the EGR.
Tighten the bolts fixing the front section of the exhaust gas supply pipe to the exhaust manifold.
| Fastening | Component | Ø | Value (daNm) | |
|---|---|---|---|---|
| Bolt | EGR VALVE PIPE | M8 | 2.5 |
Tighten the bolts fixing the rear section of the exhaust gas supply pipe to the EGR valve.
| Fastening | Component | Ø | Value (daNm) | |
|---|---|---|---|---|
| Bolt | EGR VALVE PIPE | M8 | 2.5 |
Tighten the bolts securing the bracket securing the pipe carrying exhaust gas to the cylinder head.
Tighten the bolts securing the rigid section to the throttle body and gearbox.
Connect the engine oil vapour recovery pipe to the cam cover.
Tighten the bolts securing the rigid section to the throttle body and gearbox.
Connect the engine oil vapour recovery pipe to the cam cover.
- 5530B52 Battery DRIP TRAY/SUPPORT - R.R.
Position the single fuel manifold in its seat on the intake manifold.
Whenever you work on the fuel pipe from the fuel manifold to the injectors, always fit a new pipe when reassembling to avoid leakage from the fittings.
Tighten the nuts securing the fuel manifold to torque.
| Fastening | Component | Ø | Value (daNm) | |
|---|---|---|---|---|
| Nut | INJECTOR FUEL MANIFOLD (DIESEL) | M8 | 2.5 |
Connect the electrical connection to the fuel pressure senor.
| Name | Connector | |
|---|---|---|
| Fuel pressure sensor | K83 |
Tighten the connectors on the injectors to torque.
| Fastening | Component | Ø | Value (daNm) | |
|---|---|---|---|---|
| Connector | FUEL MANIFOLD LINE TO INJECTORS | M12 x 1.5 | 2 |
Fit the vacuum tank mount.
Fit the vacuum tank to the mount.
Connect the electrical connections of the injectors, turbo sensor and EGR solenoid and the electrical connections of the spark plugs.
| Name | Connector | |
|---|---|---|
| Injector | N70 |
| Name | Connector | |
|---|---|---|
| Turbocharging sensor | K82 |
| Name | Connector | |
|---|---|---|
| EGR solenoid | L30 |
| Name | Connector | |
|---|---|---|
| Plug preheating control unit | M15 |
Tighten the bolts fixing the injection wiring to the intake manifold.
Fit the vacuum tank in its seat.
Tighten the retaining bolts and connect the solenoid electrical connection.
| Name | Connector | |
|---|---|---|
| Butterfly casing solenoid valve | L62 |
- 1060E40 supplementary pressure pump - r r
- 2710A35 intermediate drive shaft mount - r r
- 5530A14 alternator - r+r for versions with air conditioner
- 1084A16 oil dip stick pipe - r r
- 1076B50 exhaust pipe attachment to engine - r + r
- 1060F50 fuel return manifold - r r
- 1060E30 pressure pump pulley - r r
- 1032D12 timing system protective cover(s) - r + r
- 1092A12 crankshaft pulley - r+r for versions with air conditioner
- 1092G10 single engine belt r r
- 7055B42 Additional FRONT WHEEL ARCH (one), left or right - R.R.
- 7055B54 under-engine guard - r r
- 4450B04 right front wheel r r
- 1016A10 sound-proofing cover - r + r
Connect the battery negative terminal.
- 5530B56 BATTERY DRIP TRAY COVER - R.R.
Remove the vehicle from the ramp.
Parts & tools for this job For 2001 Fiat Stilo
- PARTExhaust gasketSearch: Fiat Stilo 2001 exhaust gasket
- TOOLPenetrating oilSearch: penetrating oil
- TOOLOBD2 scannerSearch: OBD2 scanner
Links open Amazon search results in a new tab. As an Amazon Associate I earn from qualifying purchases.