
Supplementary pressure pump - r r
- Make
- Fiat
- Model
- Stilo Factory Service Manual
- Year
- 2001–2007
- Section
- Diesel fuel injection › Supplementary pressure pump - r r
Supplementary pressure pump - r r
Removing
- 1016A10 sound-proofing cover - r + r
- 4450B04 right front wheel r r
- 7055B54 under-engine guard - r r
- 7055B42 Additional FRONT WHEEL ARCH (one), left or right - R.R.
- 1092G10 single engine belt r r
- 1092A12 crankshaft pulley - r+r for versions with air conditioner
- 1032D12 timing system protective cover(s) - r + r
- 1060E30 pressure pump pulley - r r
- 1060F50 fuel return manifold - r r
- 1076B50 exhaust pipe attachment to engine - r + r
- 1084A16 oil dip stick pipe - r r
- 5530A14 alternator - r+r for versions with air conditioner
- 2710A35 intermediate drive shaft mount - r r
Undo the bolts fixing the electrical wiring mounting bracket.
Disconnect the timing sensor electrical connection.
| Name | Connector | |
|---|---|---|
| Timing sensor | K47 |
1. Unscrew retaining bolt (1a) and position power unit mounting bracket (1b).
2. Position a beam lengthways resting on the suspension domes.
| Name | Country | |
|---|---|---|
| 2 | Crossmember | 1.870.595.000 |
3. Position beam (3a) transversally, rest the front part (3b) on the sacrificial beam and secure the rear part to the beam positioned previously using bolt (3c).
| Name | Country | |
|---|---|---|
| 3a | Crossmember | 1.860.851.000 |
| Name | Country | |
|---|---|---|
| 3b | Vertical support | 1.870.748.000 |
4. Use a chain and hook to secure the beam to the previously installed bracket.
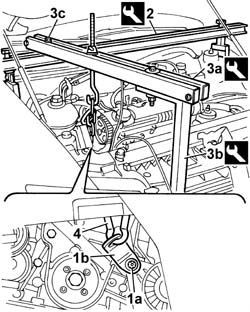
Removing
Place the car on a lift.
- 4450B04 right front wheel r r.
- 1016A10 sound-proofing cover - r + r.
Disconnect the battery negative terminal.
| Name | Connector | |
|---|---|---|
| Battery | A1B |
- 7055B54 under-engine guard - r r.
- 7055B42 Additional FRONT WHEEL ARCH (one), left or right - R.R..
- 1092G10 single engine belt r r.
- 1092G14 engine component single belt mobile tensioner - r + r.
- 1092G21 engine component single belt fixed tensioner - r rwith belt removed
- 1032D12 timing system protective cover(s) - r + r.
- 1032B10 toothed timing belt - r + r for timing adjustment or replacement.
- 1060E30 pressure pump pulley - r r
- 1060E10 pressure pump - r r.
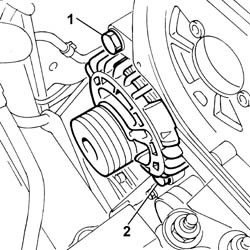
1. Undo the alternator top fixing bolt.
2. Unscrew the lower bolt securing the alternator to the bracket.
3. Move the alternator aside without disconnecting the wiring.
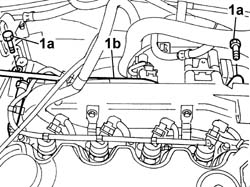
1. Unscrew the retaining bolts (1a) securing rigid fluid recirculation pipe(1b).
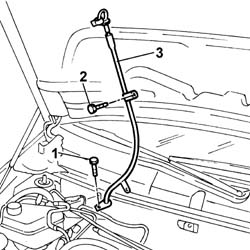
1. Undo the lower bolt fastening the engine oil dipstick pipe to the crankcase sump.
Lower the vehicle.
2. Undo the upper bolt fixing the engine oil dipstick tube to the pressure pump mounting.
3. Remove the tube for the engine oil dipstick releasing it from the fastenings on the electrical wiring.
1. Unscrew the retaining bolts
2. Disconnect the engine coolant pipe from the rigid pipe intake pump.
3. Remove the engine coolant reservoir.
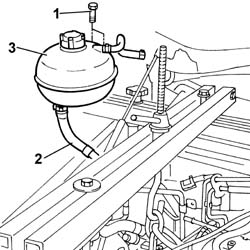
Arrange a hydraulic device beneath the oil sump to secure and support the engine.
1. Unscrew the nuts securing the rigid mount to the pressure pump mount.
2. Unscrew bolts (2) securing the mount to the body and bolt (2b) securing the mount to the fuel filter bracket.
3. Remove the rigid engine support complete with flexible mounting.
The flexible mounting cannot be dismantled from the rigid support.
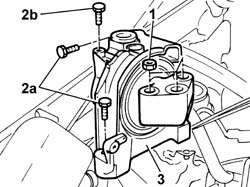
1. Undo the nuts fixing the pressure pump mount support to the rigid timing side mount.
2. Undo the bolts (2a) securing the mount to the body and bolt (2b) securing the engine control unit bracket to the mount.
3. Remove the engine mount, timing side.
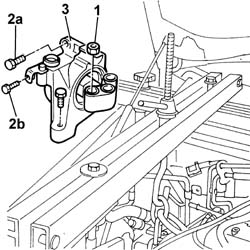
1. Undo the upper bolts securing the vacuum tank bracket and engine oil separator to the cylinder head.
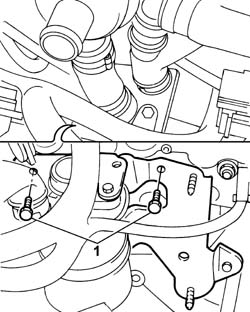
1. Undo the bolts securing the mounting to the crankcase.
2. Undo bolts retaining the mount to the cylinder head.
3. Remove the pressure pump mounting.Undo
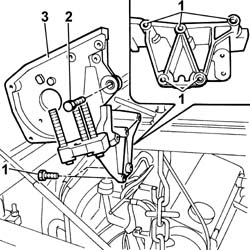
1. Undo the bolts securing the mounting to the crankcase.
2. Undo bolts retaining the mount to the cylinder head.
3. Remove the pressure pump mounting.Undo
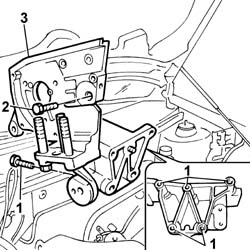
Refitting
Fit the pressure pump mount.
Tighten the bolts retaining the mount to the cylinder head to torque.
| Fastening | Component | Ø | Value (daNm) | |
|---|---|---|---|---|
| Bolt | INJECTION PRESSURE PUMP MOUNT | M8 | (Crankcase) 2.5 |
| Fastening | Component | Ø | Value (daNm) | |
|---|---|---|---|---|
| Bolt | INJECTION PRESSURE PUMP MOUNT | M8 | (Intake manifold) 2.5 |
Fit the rigid engine support complete with flexible mounting.
Tighten the bolts fixing the rigid support to the body to torque.
| Fastening | Component | Ø | Value (daNm) | |
|---|---|---|---|---|
| Bolt | ENGINE MOUNT TIMING SIDE | M10 x 1.25 | (Bodyshell side) 5 |
Tighten the nuts fixing the rigid support to the pressure pump mount to torque.
| Fastening | Component | Ø | Value (daNm) | |
|---|---|---|---|---|
| Nut | ENGINE MOUNT TIMING SIDE | M12 x 1.25 | (Engine side) 7.5 |
Position the coolant reservoir.
Connect engine coolant pipe to the rigid pump inlet to the engine.
Tighten the bolts securing the coolant reservoir.
Secure the rigid recirculation pipe to the engine.
Remove the power unit support tools fitted previously.
| Name | Country | |
|---|---|---|
| Crossmember | 1.870.595.000 |
| Name | Country | |
|---|---|---|
| Crossmember | 1.860.851.000 |
| Name | Country | |
|---|---|---|
| Vertical support | 1.870.748.000 |
Connect the engine timing sensor electrical connection.
| Name | Connector | |
|---|---|---|
| Timing sensor | K47 |
Tighten the engine wiring bracket retaining bolts.
- 2710A35 intermediate drive shaft mount - r r
- 5530A14 alternator - r+r for versions with air conditioner
- 1084A16 oil dip stick pipe - r r
- 1076B50 exhaust pipe attachment to engine - r + r
- 1060F50 fuel return manifold - r r
- 1060E30 pressure pump pulley - r r
- 1032D12 timing system protective cover(s) - r + r
- 1092A12 crankshaft pulley - r+r for versions with air conditioner
- 1092G10 single engine belt r r
- 7055B42 Additional FRONT WHEEL ARCH (one), left or right - R.R.
- 7055B54 under-engine guard - r r
- 4450B04 right front wheel r r
- 1016A10 sound-proofing cover - r + r
Refitting
Fit the pressure pump mount.
Tighten the bolts retaining the mount to the cylinder head to torque.
| Fastening | Component | Ø | Value (daNm) | |
|---|---|---|---|---|
| Bolt | INJECTION PRESSURE PUMP MOUNT | M8 | (Crankcase) 2.5 |
| Fastening | Component | Ø | Value (daNm) | |
|---|---|---|---|---|
| Bolt | INJECTION PRESSURE PUMP MOUNT | M8 | (Intake manifold) 2.5 |
Fit the rigid engine support complete with flexible mounting.
Tighten the bolts fixing the rigid support to the body to torque.
| Fastening | Component | Ø | Value (daNm) | |
|---|---|---|---|---|
| Bolt | ENGINE MOUNT TIMING SIDE | M10 x 1.25 | (Bodyshell side) 5 |
Tighten the nuts fixing the rigid support to the pressure pump mount to torque.
| Fastening | Component | Ø | Value (daNm) | |
|---|---|---|---|---|
| Nut | ENGINE MOUNT TIMING SIDE | M12 x 1.25 | (Engine side) 7.5 |
- 1060E10 pressure pump - r r.
- 1060E30 pressure pump pulley - r r
- 1032D12 timing system protective cover(s) - r + r.
- 1092G21 engine component single belt fixed tensioner - r rwith belt removed
- 1092G14 engine component single belt mobile tensioner - r + r.
- 1092G10 single engine belt r r.
- 7055B42 Additional FRONT WHEEL ARCH (one), left or right - R.R..
- 7055B54 under-engine guard - r r.
Connect the battery negative terminal.
| Name | Connector | |
|---|---|---|
| Battery | A1B |
- 1016A10 sound-proofing cover - r + r.
- 4450B04 right front wheel r r.
Remove the vehicle from the lift.
Parts & tools for this job For 2001 Fiat Stilo
- PARTGlow plugsSearch: Fiat Stilo 2001 glow plugs
- TOOLGlow plug socketSearch: glow plug socket
- TOOLDiesel compression testerSearch: diesel compression tester
Links open Amazon search results in a new tab. As an Amazon Associate I earn from qualifying purchases.