
Single cylinder head extension - change gasket
- Make
- Fiat
- Model
- Stilo Factory Service Manual
- Year
- 2001–2007
- Section
- Cylinder head/s › Single cylinder head extension - change gasket
Single cylinder head extension - change gasket
Removing
Place the car on a ramp.
- 5530B56 BATTERY DRIP TRAY COVER - R.R.
Disconnect the battery negative terminal.
- 1008B10 power unit front mount (timing side) flexible block - replace
- 1008A46 cam shaft left rigid mount - r r
- 1032D12 timing system protective cover(s) - r + r
- 1092B60 alternator drive belt - r + r
- 1092A10 Crankshaft services PULLEY - R.R.
- 1032B10 toothed timing belt - r + r for timing adjustment or replacement
- 1048A10 air cleaner filtering element - replace
- 1056B60 single fuel manifold pipe, with injectors - r + r
- 1048A32 sleeve from air cleaner to intake manifold - r + r
- 1056B82 injection/ignition system e.c.u. (one) - r + r
- 1056B15 throttle body intergral with mds - r r
- 1072B10 inlet manifold - r + r and replace seal
- 1016B12 single cylinder head extension - r r with timing belt removed - replace
Removing
Place the car on a ramp.
- 5530B56 BATTERY DRIP TRAY COVER - R.R.
Disconnect the battery negative terminal.
- 1008B10 power unit front mount (timing side) flexible block - replace
- 1008A46 cam shaft left rigid mount - r r
- 1032D12 timing system protective cover(s) - r + r
- 1092G10 single engine belt r r
- 1092A12 crankshaft pulley - r+r for versions with air conditioner
- 1032B10 toothed timing belt - r + r for timing adjustment or replacement
- 1048A10 air cleaner filtering element - replace
- 1056B60 single fuel manifold pipe, with injectors - r + r
- 1048A32 sleeve from air cleaner to intake manifold - r + r
- 1056B82 injection/ignition system e.c.u. (one) - r + r
- 1056B15 throttle body intergral with mds - r r
- 1072B10 inlet manifold - r + r and replace seal
- 1016B12 single cylinder head extension - r r with timing belt removed - replace
Removing
Place the car on a lift.
- 1008B10 power unit front mount (timing side) flexible block - replace
- 4450B04 right front wheel r r
- 7055B54 under-engine guard - r r
- 1008A46 cam shaft left rigid mount - r r
- 1032D12 timing system protective cover(s) - r + r
- 1092B60 alternator drive belt - r + r
Removing
Place the car on a lift.
- 4450B04 right front wheel r r.
- 1016A10 sound-proofing cover - r + r.
With the ignition in the OFF position, disconnect the negative battery terminal.
| Name | Connector | |
|---|---|---|
| Battery | A1B |
- 7055B54 under-engine guard - r r.
- 7055B42 Additional FRONT WHEEL ARCH (one), left or right - R.R.
- 1092G10 single engine belt r r.
- 1092A10 Crankshaft services PULLEY - R.R..
- 1092G14 engine component single belt mobile tensioner - r + r.
- 1092G21 engine component single belt fixed tensioner - r rwith belt removed
- 1032D12 timing system protective cover(s) - r + r.
- 5530B52 Battery DRIP TRAY/SUPPORT - R.R..
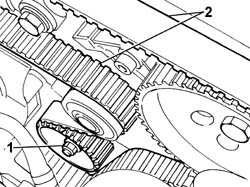
1. Loosen the nut securing the timing belt mobile tensioner
2. Prise off and remove the timing belt.
Refitting
- 1016B12 single cylinder head extension - r r with timing belt removed - replace
- 1072B10 inlet manifold - r + r and replace seal
- 1056B15 throttle body intergral with mds - r r
- 1056B82 injection/ignition system e.c.u. (one) - r + r
- 1048A32 sleeve from air cleaner to intake manifold - r + r
- 1056B60 single fuel manifold pipe, with injectors - r + r
- 1048A10 air cleaner filtering element - replace
- 1032B10 toothed timing belt - r + r for timing adjustment or replacement
- 1092A10 Crankshaft services PULLEY - R.R.
- 1092B60 alternator drive belt - r + r
- 1092B64 alternator drive belt - adjust tension
- 1032D12 timing system protective cover(s) - r + r
- 1008A46 cam shaft left rigid mount - r r
- 1008B10 power unit front mount (timing side) flexible block - replace
Reconnect the negative battery terminal.
- 5530B56 BATTERY DRIP TRAY COVER - R.R.
Remove the vehicle from the ramp.
Refitting
- 1016B12 single cylinder head extension - r r with timing belt removed - replace
- 1072B10 inlet manifold - r + r and replace seal
- 1056B15 throttle body intergral with mds - r r
- 1056B82 injection/ignition system e.c.u. (one) - r + r
- 1048A32 sleeve from air cleaner to intake manifold - r + r
- 1056B60 single fuel manifold pipe, with injectors - r + r
- 1048A10 air cleaner filtering element - replace
- 1032B10 toothed timing belt - r + r for timing adjustment or replacement
- 1092A12 crankshaft pulley - r+r for versions with air conditioner
- 1092G10 single engine belt r r
- 1092B64 alternator drive belt - adjust tension
- 1032D12 timing system protective cover(s) - r + r
- 1008A46 cam shaft left rigid mount - r r
- 1008B10 power unit front mount (timing side) flexible block - replace
Reconnect the negative battery terminal.
- 5530B56 BATTERY DRIP TRAY COVER - R.R.
Remove the vehicle from the ramp.
- 1092G10 single engine belt r r
- 1092A12 crankshaft pulley - r+r for versions with air conditioner
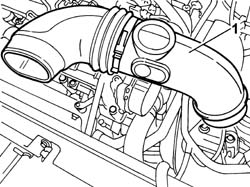
1. Remove the cold air intake pipe.
- 1092A10 Crankshaft services PULLEY - R.R.
- 1048A10 air cleaner filtering element - replace
- 1056B60 single fuel manifold pipe, with injectors - r + r
- 1032B10 toothed timing belt - r + r for timing adjustment or replacement
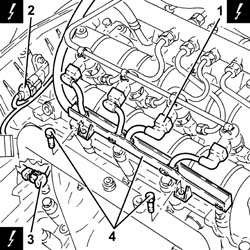
1. Disconnect the electrical connections from the injectors.
| Name | Connector | |
|---|---|---|
| 1 | Injector | N70 |
2. Disconnect the electrical connection from the cam angle sensor.
| Name | Connector | |
|---|---|---|
| 2 | Timing sensor | K47 |
Disconnect the electrical connections for the spark plugs.
3. Disconnect the electrical connection for the air conditioning compressor electromagnet coupling.
| Name | Connector | |
|---|---|---|
| 3 | Air conditioning compressor "on" electromagnet | L20 |
Undo the earth lead on the air conditioning compressor.
Release the electrical wiring from the band on the timing cover.
4. Undo the bolts fastening the cable duct and move the electrical wiring aside.
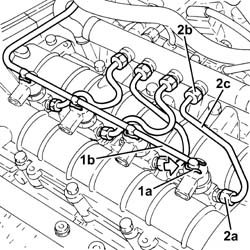
1. Push clips (1a) by hand and disconnect the pipe from the injectors to the fuel recovery manifold (1b), injectors side and move it aside.
2. Undo the connectors (2a), (2b) and remove the pipe from the fuel manifold to the injectors (2c).
Use new pipes from from fuel manifold to injectors upon reassembly.
- 5530B52 Battery DRIP TRAY/SUPPORT - R.R.
- 1016B12 single cylinder head extension - r r with timing belt removed - replace
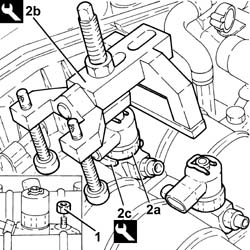
1. Undo the nuts fixing the injector brackets.
2. Remove the injectors (2a) complete with bracket using the tool (2b).
If the same injectors are being reused, mark the cylinder to which they belong so that they can be correctly refitted.
If new fuel injectors are fitted:
determine the identification code stamped on the top;
check that the new injectors(s) is (are) recognized by the engine management control unit using the Examiner.
Start removal beginning with the fuel injector of cylinder no. 1 and continuing with the injectors for cylinders 2, 3, and 4.
| Name | Country | |
|---|---|---|
| 2b | Extractor | 1.870.897.300 |
Refitting
- 1016B12 single cylinder head extension - r r with timing belt removed - replace
- 5530B52 Battery DRIP TRAY/SUPPORT - R.R.
- 1032B10 toothed timing belt - r + r for timing adjustment or replacement
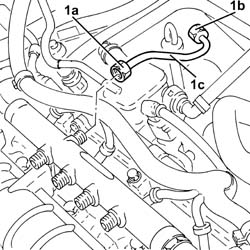
1. Undo the connectors (1a), (1b) and remove the pipe from the pressure pump to the fuel manifold (1c).
When refitting, fit a new pipe from the pressure pump to the fuel manifold.
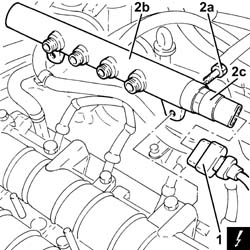
1. Disconnect the electrical connection from the fuel pressure sensor.
| Name | Connector | |
|---|---|---|
| 1 | Fuel pressure sensor | K83 |
2. Undo the bolts (2a) and remove the single fuel manifold pipe (2b) complete with fuel pressure sensor (2c).
- 1056B60 single fuel manifold pipe, with injectors - r + r
- 1048A10 air cleaner filtering element - replace
- 1092A10 Crankshaft services PULLEY - R.R.
- 1092B60 alternator drive belt - r + r
- 1092B64 alternator drive belt - adjust tension
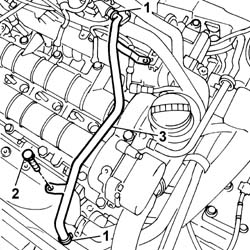
1. Disconnect the bands at the ends.
2. Undo the bolt fixing the engine oil vapour pipe to the water pump filler pipe.
3. Remove the rigid section of the engine oil vapour pipe.
- 1092A12 crankshaft pulley - r+r for versions with air conditioner
- 1092G10 single engine belt r r
1. Loosen the band and disconnect the vacuum pipe from the brake servo.
2. Loosen the band and disconnect the engine oil vapour recovery pipe from the engine oil filler.
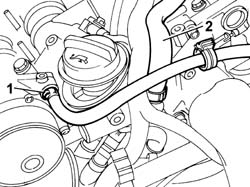
- 1032D12 timing system protective cover(s) - r + r
- 1008A46 cam shaft left rigid mount - r r
- 7055B54 under-engine guard - r r
- 4450B04 right front wheel r r
- 1008B10 power unit front mount (timing side) flexible block - replace
Remove the vehicle from the lift.
1. Disconnect the electrical connection from the engine coolant temperature sensor.
| Name | Connector | |
|---|---|---|
| 1 | Engine temperature sender unit | K36 |
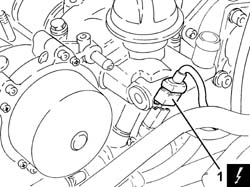
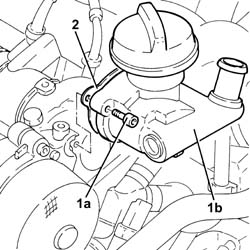
1. Undo the bolts (1a) and remove the engine oil filler (1b).
2. Remove the gasket.
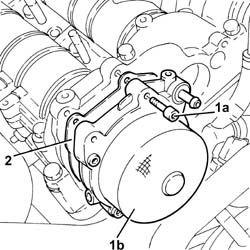
1. Undo bolts (1a) and remove vacuum unit (1b).
2. Remove the gasket.
1. Undo the bolts (1a) and remove the single cylinder head extension (1b) complete with camshafts.
Remove the gasket.
Refitting
Position a new gasket on the surface of the cylinder head.
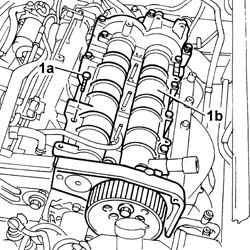
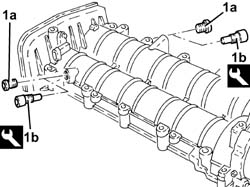
1. Remove the plugs (1a) and fit the camshaft timing tools (1b) in the upper cylinder head.
Check that the tools are correctly inserted in the housings in the camshafts.
| Name | Country | |
|---|---|---|
| 1b | Gauge | 1.870.986.900 |
Remove the inlet side camshaft timing tool and tighten the plug.
1. Place the single camshaft housing assembly (1a) back in its housing and secure it tightening the bolts (1b) to the recommended torque.
| Fastening | Component | Ø | Value (daNm) | |
|---|---|---|---|---|
| 1b | Bolt | CYLINDER HEAD EXTENSION | M8 | (Cylinder head) 2.5 |
2. Loosen the bolt fixing the exhaust side camshaft pulley.
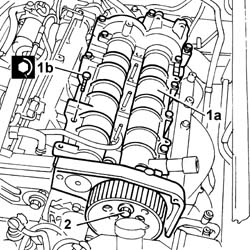
1. Undo the bolt fixing the crankcase front cover shown in the diagram.
Fit the toothed timing belt on the drive gear checking that the belt teeth are correctly engaged in the gear grooves.
2. Fit the tool (2a) and fasten it using the calibrated screw (2b) and lock the nut (2c).
To allow the engagement of the locating dowel on the timing drive pulley, rotate the crankshaft using small movements.
| Name | Country | |
|---|---|---|
| 2a | Template | 1.860.905.000 |
| Name | Country | |
|---|---|---|
| 2b | Calibrated screw | 1.860.905.010 |
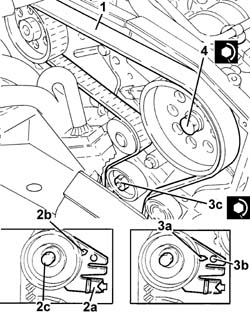
1. Completely fit the timing belt.
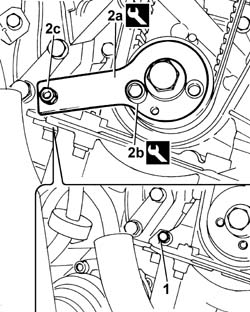
2. Use a screwdriver on the tab (2a) for leverage until the moving reference on the tensioner (2b) is in the maximum tension position, then tighten the tensioner nut (2c).
3. Loosen the tensioner fixing nut and position the tensioner moving reference (3a) in line with the reference opening (3b) and, in this position, tighten the tensioner nut (3c) to the recommended torque.
| Fastening | Component | Ø | Value (daNm) | |
|---|---|---|---|---|
| 3c | Nut | FIXED TENSIONER | M8 | 2..5 |
4. Tighten the exhaust side camshaft toothed drive pulley fixing bolt to the recommended torque.
| Fastening | Component | Ø | Value (daNm) | |
|---|---|---|---|---|
| 3 | Bolt | TIMING GEAR DRIVEN PULLEYS | M12 | 12 |
Remove the timing tools.
| Name | Country | |
|---|---|---|
| Gauge | 1.870.986.900 |
| Name | Country | |
|---|---|---|
| Template | 1.860.905.000 |
| Name | Country | |
|---|---|---|
| Calibrated screw | 1.860.905.010 |
Rotate the crankshaft through two revolutions.
Check once again that the timing is correct by refitting the timing tools.
Only fit the exhaust camshaft side template because the inlet side one is not accessible.
Check the alignment of the tensioning references on the moving timing tensioner.
Tighten the bolt for the crankcase front cover previously removed.
| Fastening | Component | Ø | Value (daNm) | |
|---|---|---|---|---|
| Bolt | CRANKSHAFT FRONT COVER | M6 | 0.9 |
Tighten the plug in the camshaft housing removed to allow the fitting of the exhaust side timing tool.
Connect the electrical connection to the engine coolant temperature sensor.
| Name | Connector | |
|---|---|---|
| Engine temperature sender unit | K36 |
Fit the vacuum unit complete with new gasket in place and tighten the fixing bolts to torque.
| Fastening | Component | Ø | Value (daNm) | |
|---|---|---|---|---|
| Bolt | BRAKE SERVO VACUUM PUMP | M6 | 0.5 + 50° |
Fit the engine oil filler in place complete with a new gasket and tighten the fixing bolts to torque.
Connect the pipe from the engine oil filler to the separator.
Connect the vacuum pipe to the vacuum unit.
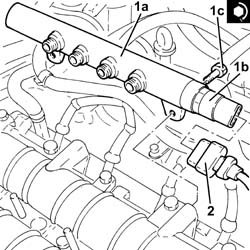
1. Fit the single fuel manifold pipe (1a), complete with fuel pressure sensor (1b), back in its housing and secure it tightening the bolts (1c) to the recommended torque.
| Fastening | Component | Ø | Value (daNm) | |
|---|---|---|---|---|
| 1c | Bolt | INJECTOR FUEL MANIFOLD (DIESEL) | M8 | 2.5 |
2. Connect the electrical connection to the fuel pressure sensor.
| Name | Connector | |
|---|---|---|
| 2 | Fuel pressure sensor | K83 |
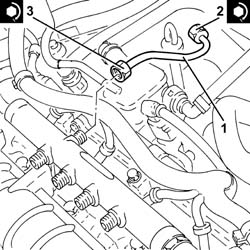
1. Fit a new pipe from the pressure pump to the single fuel manifold and fix it using the connectors without tightening them.
2. Tighten the connector for the pipe from the pressure pump to the single fuel manifold, pump side, to the recommended torque using a suitable spanner.
| Fastening | Component | Ø | Value (daNm) | |
|---|---|---|---|---|
| 2 | Connector | PRESSURE PUMP LINE TO FUEL MANIFOLD | M14 x 1.5 | (Pump side) 2.3 |
3. Tighten the connector for the pipe from the pressure pump to the single fuel manifold, fuel manifold side, to the recommended torque using a suitable spanner.
| Fastening | Component | Ø | Value (daNm) | |
|---|---|---|---|---|
| 3 | Connector | PRESSURE PUMP LINE TO FUEL MANIFOLD | M14 x 1.5 | (Manifold side) 2.3 |
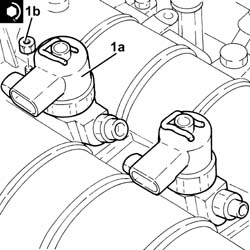
1. Fit the injectors (1a) complete with brackets and secure by tightening the nuts (1b) to the specified torque.
Start the refitting beginning with the injector for cylinder no. 4 and continuing with the injectors for cylinders 3, 2 and 1.
| Fastening | Component | Ø | Value (daNm) | |
|---|---|---|---|---|
| 1b | Nut | INJECTORS(DIESEL) | M8 x 1.25 | 2.5 |
Fit the new pipes from the fuel manifold to the injectors and fix them using the connectors without tightening them.
Tighten the connectors for the pipes from the fuel manifold to the injectors, injector side, to the recommended torque using a suitable spanner.
| Fastening | Component | Ø | Value (daNm) | |
|---|---|---|---|---|
| Connector | FUEL MANIFOLD LINE TO INJECTORS | M12 x 1.5 | (Injector side) 2.3 |
Tighten the connectors for the pipes between the fuel manifold and the injectors, fuel manifold side to the recommended torque using a suitable spanner.
| Fastening | Component | Ø | Value (daNm) | |
|---|---|---|---|---|
| Connector | FUEL MANIFOLD LINE TO INJECTORS | M12 x 1.5 | (Manifold side) 2.3 |
Clean the threaded seats for the above-mentioned pipe on the manifold and the injectors using heptane.
Connect the pipe from the injectors to the fuel recovery manifold to the injectors pushing it until the clips can be heard clicking into place.
Place the electrical wiring back in its housing and tighten the cable duct fixing bolts.
Connect the electrical connections to the injectors.
| Name | Connector | |
|---|---|---|
| Injector | N70 |
Connect the timing sensor electrical connection.
| Name | Connector | |
|---|---|---|
| Timing sensor | K47 |
Connect the electrical wiring for the heater plugs.
| Name | Connector | |
|---|---|---|
| Heater plug | A40 |
Connect the electrical connection to the air conditioning compressor electromagnet coupling.
| Name | Connector | |
|---|---|---|
| Air conditioning compressor "on" electromagnet | L20 |
Tighten the nut for the earth lead on the air conditioning compressor.
Fit the cold air intake pipe in the special housing.
- 5530B52 Battery DRIP TRAY/SUPPORT - R.R..
- 1032D12 timing system protective cover(s) - r + r.
- 1092G21 engine component single belt fixed tensioner - r rwith belt removed
- 1092G14 engine component single belt mobile tensioner - r + r.
- 1092A10 Crankshaft services PULLEY - R.R..
- 1092G10 single engine belt r r.
- 7055B42 Additional FRONT WHEEL ARCH (one), left or right - R.R.
- 7055B54 under-engine guard - r r.
Connect the battery negative terminal.
- 1016A10 sound-proofing cover - r + r.
- 4450B04 right front wheel r r.
Remove the vehicle from the lift.
Parts & tools for this job For 2001 Fiat Stilo
- PARTEngine gasket setSearch: Fiat Stilo 2001 engine gasket set
- TOOLTorque wrenchSearch: 3/8 inch torque wrench
- TOOLFeeler gauge setSearch: feeler gauge set
Links open Amazon search results in a new tab. As an Amazon Associate I earn from qualifying purchases.