
Gasket - inlet manifold
- Make
- Land Rover
- Model
- Discovery II (UK)
- Section
- Overhaul › Gasket - inlet manifold
Engine - Td5Gasket - inlet manifold
OVERHAUL
Gasket - inlet manifold
$% 30.15.08.01
Disassembly
Note: The following procedures cover engines fitted with or without an EGR cooler. The EGR cooler is bolted to the front of the cylinder head.
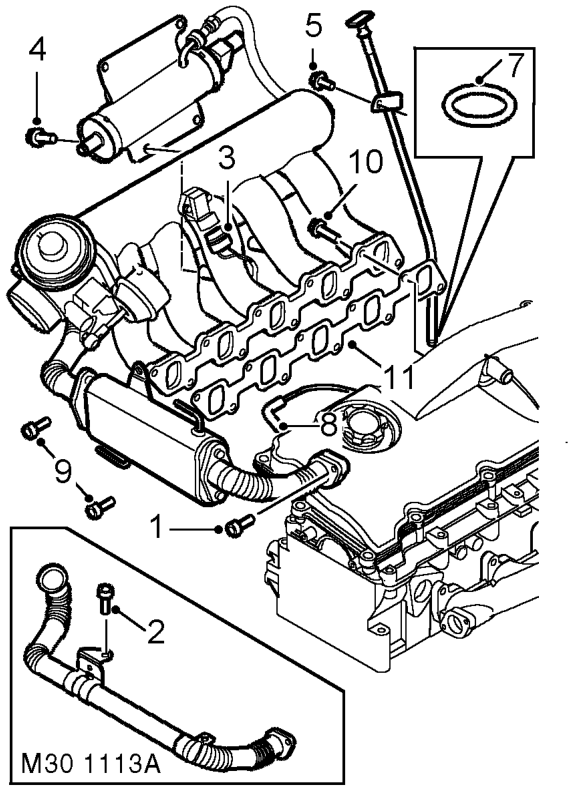
EU3 Engine in main illustration, Pre EU3 condition shown in inset
- Remove and discard 2 Allen screws securing EGR pipe to exhaust manifold or EGR cooler.
- Remove bolt securing EGR pipe to cylinder head, (if fitted)
- Disconnect multiplug from IAT and MAP sensor.
- Remove 4 bolts securing fuel cooler to inlet manifold. and remove cooler.
- Remove bolt securing engine dipstick tube to camshaft carrier.
- Release and remove engine dipstick tube.
- Remove 'O' ring from dip stick tube.
- Disconnect 4 leads from glow plugs.
- Remove 2 bolts securing alternator strap bracket, remove bracket, (if fitted)
- Remove 2 nuts and 8 bolts and remove inlet manifold.
- Remove manifold gasket.
Reassembly
- Clean inlet manifold and mating face, clean mating faces of EGR pipe, exhaust manifold or EGR cooler – if fitted.
- Fit new gasket.
- Position inlet manifold and working from the centre outwards, fit inlet manifold nuts and bolts and tighten to 25 Nm (18 lbf.ft) .
- Fit alternator strap bracket and tighten bolts to 25 Nm (18 lbf.ft), (if fitted)
- Connect glow plug leads.
- Clean engine dipstick tube.
- Fit new 'O' ring to dipstick tube.
- Fit engine dipstick tube to camshaft carrier and tighten bolt to 10 Nm (7 lbf.ft).
- Position fuel cooler and tighten bolts to 25 Nm (18 lbf.ft).
- Connect multiplug to IAT and MAP sensor.
- Position EGR pipe to exhaust manifold or EGR cooler and using new Allen screws tighten to 10 Nm (7 lbf.ft).
- Fit EGR pipe clamp to cylinder head, (if fitted) and tighten bolt to 10 Nm (7 lbf.ft).
Parts & tools for this job For Land Rover Discovery
- PARTEngine gasket setSearch: Land Rover Discovery engine gasket set
- TOOLTorque wrenchSearch: 3/8 inch torque wrench
- TOOLFeeler gauge setSearch: feeler gauge set
Links open Amazon search results in a new tab. As an Amazon Associate I earn from qualifying purchases.