
Engine LH front mounting
- Make
- Rover
- Model
- 400 Workshop Manual
- Year
- 1995–2000
- Section
- Repairs › Engine LH front mounting
Engine - D SeriesEngine LH front mounting
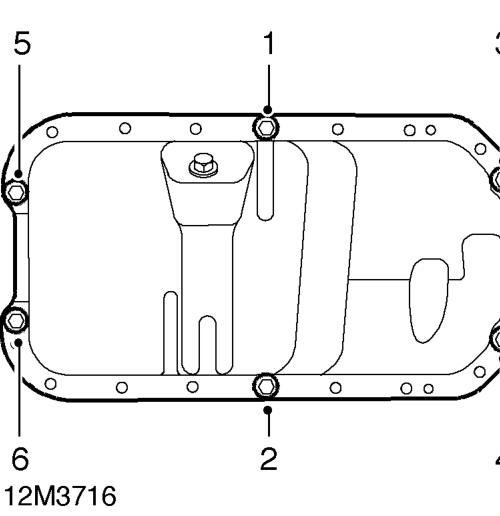
- Fit sump and fit nuts finger tight at 6 positions illustrated.
- Fit remaining bolts and nuts and, working in a clockwise direction from position 1, progressively tighten to 12 Nm.
CAUTION: Excessive tightening can cause distortion of sump gasket and oil leakage.
- Fit converter cover plate and tighten bolts to 12 Nm.
- Fit anti-beaming brackets to gearbox and tighten bolts as follows: Anti-beaming bracket to engine 24 Nm.. Anti-beaming bracket to gearbox 44 Nm.
- Fit exhaust front pipe. See MANIFOLD & EXHAUST SYSTEMS, Repairs.
- Remove stand(s) and lower vehicle.
CAUTION: Wait 20 minutes before filling engine with oil.
- Fill engine with oil. See MAINTENANCEMaintenance.
- Connect battery earth lead.
ENGINE LH FRONT MOUNTING
Service repair no - 12.45.01
Remove
- Remove underbelly panel. See BODY, Exterior fittings.
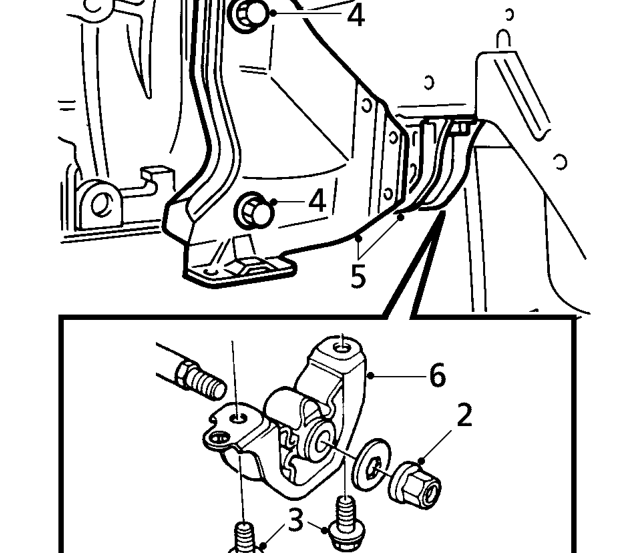
- Remove nut securing engine mounting to bracket.
- Remove 2 bolts securing engine mounting to body.
- Remove 2 bolts securing engine mounting bracket to engine.
- Remove mounting and bracket.
- Remove mounting from bracket.
Refit
- Fit mounting to bracket and fit mounting assembly to vehicle.
- Tighten bolts securing bracket to engine to 55 Nm.
- Align mounting to body and tighten bolts to 45 Nm.
- Fit nut securing mounting to stud and tighten to 60 Nm.
- Fit underbelly panel. See BODY, Exterior fittings.
Parts & tools for this job For 1995 Rover 400
- PARTEngine gasket setSearch: Rover 400 1995 engine gasket set
- TOOLTorque wrenchSearch: 3/8 inch torque wrench
- TOOLFeeler gauge setSearch: feeler gauge set
Links open Amazon search results in a new tab. As an Amazon Associate I earn from qualifying purchases.