
Rear engine mounting
- Make
- Rover
- Model
- 400 Workshop Manual
- Year
- 1995–2000
- Section
- Repairs › Rear engine mounting
Engine - K SeriesRear engine mounting · page 1 of 3
- Fit relay module to mounting bracket.
- Fit 2 bolts securing mounting bracket to body and tighten to 9 Nm.
- Secure engine harness clip to mounting bracket.
- Fit engine control module. See ENGINE MANAGEMENT SYSTEM - MEMS, Repairs.
- Clean 2 ends of clutch hydraulic pipe.
- Connect 2 halves of clutch hydraulic pipe, ensure 2 halves are correctly engaged by trying to pull hydraulic pipes away from connector.
- Secure clutch hydraulic pipe to clip on harness.
- Connect 2 earth leads to starter motor upper bolt.
- Fit upper bolt securing starter motor to engine and tighten to 45 Nm.
- Connect battery cable to starter solenoid and secure with nut.
- Fit plastic cap to nut securing battery cable to starter solenoid.
- Fit radiator top hose to coolant outlet elbow and align orientation marks.
- Tighten clip securing radiator top hose to coolant outlet elbow.
- Connect multiplug to radiator cooling fan.
- Connect top hose to radiator and tighten clip.
- Connect RH drive shaft to gearbox as detailed in RH differential oil seal. See MANUAL GEARBOX, Repairs.
- Connect LH drive shaft to gearbox as detailed in LH differential oil seal. See MANUAL GEARBOX, Repairs.
- If required: Refill engine with oil. See MAINTENANCE.
- Fit vehicle speed sensor. See INSTRUMENTS, Repairs.
- Refill gearbox oil. See MANUAL GEARBOX, Adjustments.
- Lower vehicle.
- Refill cooling system. See COOLING SYSTEM, Adjustments.
- Bleed power steering system. See STEERING, Adjustments.
- Adjust throttle cable. See ENGINE MANAGEMENT SYSTEM - MEMS, Adjustments.
REAR ENGINE MOUNTING
Service repair no - 12.45.08
Remove
- Open bonnet.
- Disconnect battery earth lead.
- Raise front of vehicle.
WARNING: Support on safety stands.
- Remove vehicle speed sensor. See INSTRUMENTS, Repairs.
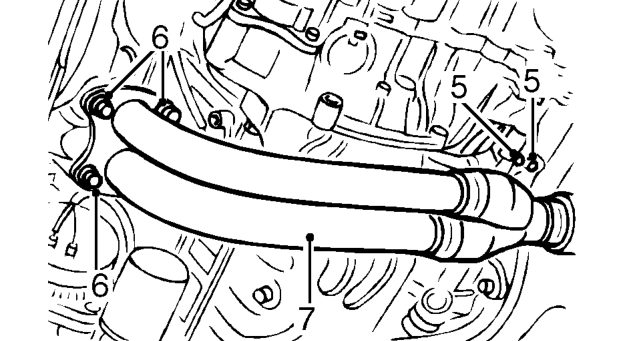
- Remove 2 nuts securing exhaust front pipe to mounting bracket on differential housing.
- Remove 4 nuts securing exhaust front pipe to exhaust manifold.
- Release exhaust front pipe from exhaust manifold.
- Remove and discard exhaust manifold flange gasket.
Parts & tools for this job For 1995 Rover 400
- PARTEngine gasket setSearch: Rover 400 1995 engine gasket set
- TOOLTorque wrenchSearch: 3/8 inch torque wrench
- TOOLFeeler gauge setSearch: feeler gauge set
Links open Amazon search results in a new tab. As an Amazon Associate I earn from qualifying purchases.