
Power steering pump - ’l’ series - models with air conditioning
- Make
- Rover
- Model
- 600 Repair Manual Supplement
- Year
- 1993–1999
- Section
- Repairs › Power steering pump - ’l’ series - models with air conditioning
SteeringPower steering pump - ’l’ series - models with air conditioning · page 1 of 2
Refit
- Fit hose to pump and secure with clip.
- Clean mating face of power steering pump and coolant pump mounting.
- Position power steering pump to coolant pump mounting and align drive lugs with those on the coolant pump.
- Tighten 2 long bolts securing power steering pump to coolant pump mounting until finger tight.
- Fit 3 short bolts securing support bracket to power steering pump and coolant pump mounting.
- Tighten power steering pump to coolant pump mounting bolts to 25 Nm.
- Remove plugs from power steering pump and hoses.
- Use new sealing washers, connect high pressure hose to pump and tighten banjo bolt to 22 Nm.
- Connect power steering pump feed hose to fluid reservoir and tighten clip.
- Fit PAS pump pulley and tighten Torx screws to 9 Nm
- Fit alternator. See ELECTRICAL, Repairs.
- Lower engine mounting onto studs.
- Fit restraint bar and tighten nuts to securing bar and mounting to 45 Nm.
- Tighten nut securing engine bracket to mounting to 105 Nm.
- Remove supporting jack.
- Align engine lower steady bar to sump fit bolt and tighten to 85 Nm.
- Tighten bolt lower steady bar to beam to 80 Nm
- Fit engine upper steady bar. See ENGINE - ’L’ SERIES, Repairs.
- Refill power steering reservoir and bleed system. See Adjustments.
POWER STEERING PUMP - ’L’ SERIES - MODELS WITH AIR CONDITIONING
Service repair no - 57.20.14.20
Remove
- Raise front of vehicle.
WARNING: Support on safety stands.
- Remove auxiliary drive belt. See ELECTRICAL, Repairs.
- Position drain tin to collect any spillage.
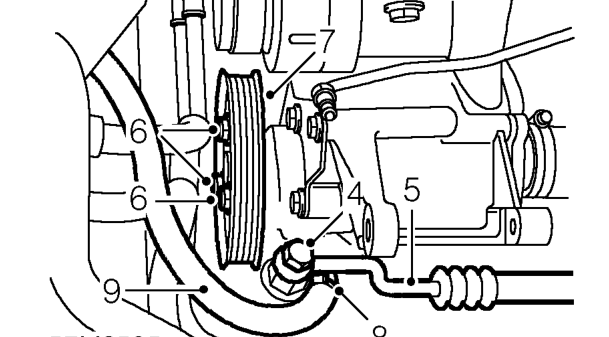
- Remove banjo bolt securing hose to PAS pump.
- Release hose from PAS pump and collect bolt and 2 washers.
CAUTION: Plug the connections.
- Remove 3 Torx screws securing pulley to PAS pump.
- Remove pulley.
- Release clip securing hose to pump.
- Release hose from pump.
Parts & tools for this job For 1993 Rover 600
- TOOLTie rod end toolSearch: tie rod end puller
- TOOLBall joint separatorSearch: ball joint separator
- FLUIDPower steering fluidSearch: Rover power steering fluid
Links open Amazon search results in a new tab. As an Amazon Associate I earn from qualifying purchases.