
Reassembly (page 2 of 2)
- Make
- Land Rover
- Model
- Discovery II (UK)
- Section
- Overhaul
Engine - Td5Reassembly · page 2 of 2
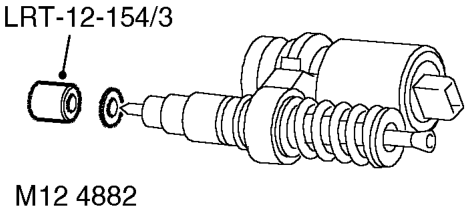
- Using tool LRT-12-154/3, fit new sealing washer to each injector.
- Support each end of cylinder head on blocks of wood ensuring blocks are clear of valves.
- Position reaction posts in their original fitted order.
- Carefully fit EUI's, ensuring they are in their original fitted order and that each retainer is located on its dowel.
CAUTION: If new EUI's are fitted, ensure replacements are correct. Engine Serial No. Prefixes 10P to 14P – Push rod bushes are coloured BLACK or BLUE. Serial No. Prefixes 15P to 19P – Push rod bushes are coloured GREEN.
- Fit new retainer bolts and tighten to 32 Nm (24 lbf.ft).
If new injectors are fitted they must be programmed for use with the ECM using TestBook.
- Lubricate lash adjusters and bores with engine oil.
- Fit lash adjusters ensuring they are in their original fitted order.
- Lubricate finger followers with engine oil.
- Fit finger followers ensuring they are in their original fitted order.
- Lubricate cams and bearing journals on camshaft, cylinder head and camshaft carrier with engine oil.
- Position camshaft in cylinder head with the timing pin hole in the vertical position.
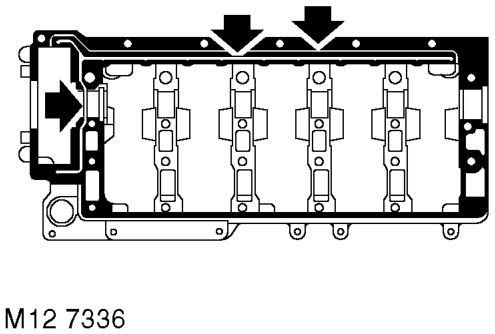
- Apply an even film of sealant, Part No. STC 4600 to camshaft carrier face and spread to an even film using a roller.
CAUTION: Ensure sealant does not block oilways (arrowed) or contaminate camshaft bearings. Assembly and bolt tightening must be completed within 20 minutes of applying sealant.
- Fit camshaft carrier ensuring it is correctly located on dowels.
- Fit and lightly tighten new camshaft carrier bolts.
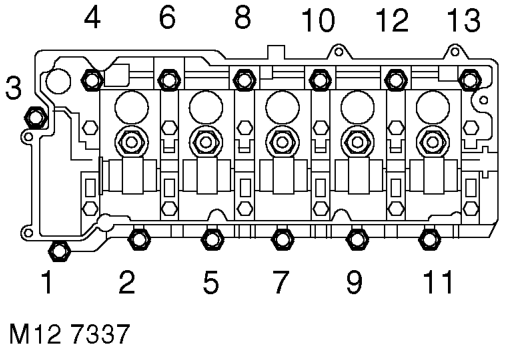
- Using sequence shown, progressively tighten bolts to 25 Nm (18 lbf.ft).
- Lubricate a new camshaft rear oil seal with engine oil, fit seal using a suitable mandrel.
- Position rocker shaft on camshaft carrier ensuring rocker shaft is located on dowel.
- Fit new rocker shaft retaining bolts and working from the centre outwards, tighten rocker shaft bolts to 32 Nm (24 lbf.ft).
- Fit injector harness and connect multiplugs.
- Clean fuel connector block and mating face.
- Lubricate a new fuel filter 'O' ring with engine oil.
Parts & tools for this job For Land Rover Discovery
- PARTEngine gasket setSearch: Land Rover Discovery engine gasket set
- TOOLTorque wrenchSearch: 3/8 inch torque wrench
- TOOLFeeler gauge setSearch: feeler gauge set
Links open Amazon search results in a new tab. As an Amazon Associate I earn from qualifying purchases.